Category Archive Gymnesium

Preparing Your Spa Experience at Home

Preparing Your Spa Experience at Home/Sometimes it feels as though aches and worries have a mind of their own. Especially in the colder, darker months of the year, when depression and anxiety are statistically more likely to flare up, it’s easy to feel exhausted and tense.

In times of added physical, mental, or emotional strain, an overindulgence of self-care may be a good way to begin releasing some of that tension. A home spa experience can enable you to defeat stress with relaxation and meet disconnection with mindfulness. One of your best assets is your home hot tub. It can melt your physical tension directly while also encouraging you to tune into your mental and emotional experiences and needs. The first step toward addressing your self-care needs is identifying what those needs are. The effort you invest in your physical, mental, and emotional wellness now will extend forward into every corner of your life. With that in mind, let’s start planning a simple yet luxurious home spa experience.

Preparing Your Spa Experience at Home

To bring yourself into the mood and the mindset for your DIY spa day, be ready to set aside the usual distractions that help keep you in this cycle of stress and disconnection. Let this day be all about rest and relaxation.

  • Clear your schedule and let this whole day be about your self-care.
  • Put away your phone and other devices, except to use them for music or ambiance.
  • Stay hydrated with herbal teas or water infused with cucumber, lemon, mint, and pineapple for some natural sweetness.
  • Check that your hot tub is ready for your use, once all of your other comforts are in place.
  • Set out some flameless LED candles to help set a mellow mood without having to worry about open flames.
  • Prepare some aromatherapy for its calming and rejuvenating effects. Just remember to never add essential oils to your hot tub water. Use an aromatherapy system specifically designed for use with a hot tub water care system.
  • Choose some relaxing music—perhaps a special spa playlist of instrumentals, or a playlist from Spotify or Pandora, and set it to repeat so you won’t have to bother restarting it when it ends.
  • Pull out a clean robe and slippers to keep you warm and cozy after your home spa experience.
  • Allow time for a deep sleep after your DIY day spa.

You’d be surprised at the importance of the care you put into planning and preparing your dedicated home spa. The attention you put into the planning process will put you into the right soothing mindset to begin healing. You’re ensuring that once you begin to relax in your spa, you won’t have to interrupt your newfound serenity to address something you’ve forgotten.

Home Spa Experience Ideas for Your Body and Mind

Caring for your mind by giving yourself a break from your worries and concerns is just as important as caring for your body. The body and mind influence each other, creating complicated layers of tension in times of physical or mental strain. Conversely, the mind and body can also work together to ease the tension when we’re able to stay centered and in touch with our experience and our needs. Mindfulness is an important tool to help you come into the present moment, listen to what your body is communicating to you, and make a conscious space for your thoughts and feelings to inhabit.

Indulge your body in a complete home spa experience

Home Spa Steps to Soothe the Body

  • Soak in your hot tub, taking full advantage of a complete jet massage.
  • After a few minutes, do some gentle stretches for your joints and your back.
  • Give yourself a gentle face massage as the steam from the hot tub helps to deepen your breath.
  • Lie back and relax in the warmth. Leave the jets on to continue your massage experience, or turn them off to sink into the quiet stillness and space of deep relaxation.

Home Spa Steps to Soothe the Mind

  • As you soak, close your eyes and quietly count to ensure you are inhaling and exhaling at the same rate.
  • While breathing naturally, think about all parts of your body, moving slowly from your toes all the way to the top of your head, and take note of your experiences and sensations along the way: comfort, discomfort, tightness, spaciousness, soreness, or anything else.
  • Take some time to imagine that your mind is like the water in the tub. When the jets are on, your mind is constantly moving, with thoughts passing by and bumping into each other; when you turn the jets off, see if you can let your mind become still and clear like the water.

How Your Home Spa Day Can Enhance the Rest of Your Life

Practice mindfulness in your hot tub for a home spa experience

Yes, your DIY spa is the perfect recipe for relaxation today, but it can also set you up for a healthy body-mind connection and experience in the days to come. Commit to your body’s rest and regeneration and to practicing mindfulness. You’ll discover that you can feel more grounded in your relationships with others and with yourself, in your roles and responsibilities, and in your enjoyment of life. Let this home spa experience become a regular and ongoing commitment. With your hot tub right at home, the preparation is easy, and it will become even easier to settle into your relaxed body and mind with every attempt.

References

Loading

If the article is helpful, please Click to Star Icon and Rate This Post!
[Total: 0 Average: 0]

How a Swim Spa Can Help You Live a Healthier Lifestyle

How a Swim Spa Can Help You Live a Healthier Lifestyle/We all want to enjoy good health, but it can be difficult to make those changes that will take us in the right direction. There are many reasons why.

Gyms can be crowded and noisy. Plus, those machines can be intimidating if you don’t know how to use them. Running seems like a good idea, but it can be hard on the knees for some. Home exercise equipment certainly puts daily workouts within arm’s reach, but they often take up space and more often than not, they end up collecting dust.

That’s why swim spas are such an exciting option. They bring healthier living right to your home in a way that’s easy, convenient, and most important of all, fun.

What is a Swim Spa?

A swim spa is a multifunctional machine that combines the best features of a swimming pool and a hot tub. It also tends to fall somewhere in the middle of these two in terms of size.

One of the most common ways that swim spas are used is for a challenging but impact-free water workout. Swim spas produce a powerful current of water that provides continuous resistance you can swim, run, jog, or walk against without ever “hitting the wall.” You can swim lap after lap, or walk or run for miles, all in the comfort and privacy of your swim spa.

Best of all, once you’ve given your muscles a good workout, you can use the very same swim spa to relax and unwind. Simply settle down in front of the hydrotherapy jets and adjust the settings for an invigorating and therapeutic massage. So, to sum up, a swim spa offers a range of activities geared toward fitness, fun, and relaxation:

  • Swim, run, jog, or walk against a powerful resistance-producing current
  • Splash around with your family and friends
  • Relax into an ergonomic seat surrounded by heated water
  • Soothe sore muscles with massage jets

Healthy Living with a Swim Spa

Many of our clients find that they naturally (and almost effortlessly) live a healthier lifestyle once they add a swim spa to their home.

Keeping up a fitness schedule no longer requires planning, commuting, dressing and undressing in a locker room, and all the other small hassles that working out in a public facility—even a high-end one—requires. Going for a swim or a water run becomes a simple matter of changing into a swimsuit and hitting the water.

Another way that swim spas make adopting a healthier lifestyle a breeze, is the fact that water workouts tend to be really fun and enjoyable. It’s so much easier to stick with an exercise regimen when it’s something you actually look forward to doing. And again, because it’s in the privacy of your home, you can create the ultimate personalized workout environment. Blast your favourite music, set out a stack of fluffy towels to dry off with, and get your favourite smoothie ready to reward yourself with after you step out of the pool.

Finally, swim spas help you live a healthier lifestyle by completely eliminating one huge obstacle that prevents many people from working out consistently: the shyness factor. It can be very intimidating to exercise in front of other people, especially if we’re trying something new. A swim spa offers you complete privacy, and if you don’t already know how to swim or do water aerobics, you can take lessons from a private coach in a comfortable, one-on-one setting in your home.

How a Swim Spa Can Help

Better health and well-being don’t come from a single choice or action—it’s typically the result of our habits. If we want to enjoy the fruits of a strong body and mind, then it’s in our interest to create a lifestyle that supports the development of good habits.

A swim spa is an excellent way to develop a routine. It’s hard to think of a better or more convenient way to get a full-body workout than in the comfort and privacy of your own swim spa. You can use it as often as you like, and in a variety of different ways, to achieve your health and wellness goals.

In terms of physical health, a swim spa offers the following benefits:

  • Eases muscle tension
  • Soothes joint pain
  • Builds a stronger cardiovascular system
  • Promotes weight loss
  • Increases muscle strength
  • Improves circulation

A swim spa is able to produce such a wide range of positive health outcomes because it provides the perfect setting for hydrotherapy.

Hydrotherapy is a water-based therapy that has been used for decades all around the world as a way to heal injuries, improve quality of life, and promote overall well-being. It draws on the healing qualities of water—namely, its temperature and buoyancy—in combination with massage to boost blood circulation and the production of endorphins.

Speaking of endorphins, which are the body’s “feel-good” hormones, the health benefits of a swim spa don’t stop at just the physical level.

A swim spa also offers a range of mental health benefits as well:

  • Improves sleeps patterns
  • Reduce stress and anxiety
  • Promotes relaxation
  • Calms the mind

This is because swim spas are a supremely relaxing environment that promotes mental calmness and clarity. Sinking into the heated waters and letting your stress melt away under the gentle pressure of the massage jets is a deeply healing experience that carries over into the rest of your life. The enhanced sense of well-being that you have after spending time in your swim spa helps you regulate your sleep patterns so you can fall asleep and stay asleep for a good night’s rest, which in turn, leads to an increased ability to handle the stresses of daily life.

Other Benefits of Owning a Swim Spa

Part of health and well-being is feeling good about our choices and enjoying the life we have created for ourselves. On this point, too, swim spas are an excellent way to invest in yourself, your home, and your family.

Enjoy more quality family time

With the fast pace of modern life, It can be difficult to find time to spend together as a family. Having a swim spa right at home provides the perfect gathering place for you and your family members to get together, enjoy each other’s company, and catch up on each other’s lives. Family swim time may just become the highlight of your week.

Upgrade your backyard

There’s no doubt about it—a swim spa is a stunning addition to a backyard and is sure to draw the attention and admiration of your neighbours. You may even inspire some to get their own swim spas!

Increase the value of your home

Like any renovation or extension to your home, a swim spa adds value to your property. It is a unique and attractive feature that will not only make your property stand out if and when it ever goes on the market, but it will also attract higher bids because of it.

Provide an excellent venue for hosting gatherings

Having a strong social network is another important element in living a healthier life. A swim spa gives you a great excuse to get together more often. Throw a mini-pool party for your closest friends, or just have one or two of your favourite people over to unwind with the massage jets and watch the sun go down.

Allow you to spend more time outdoors

Most of us would like to spend more time outdoors, and a backyard swim spa lets you do just that. Because a swim spa uses heated water, it’s a feature you can use 365 days of the year, through every season. Breezy spring days, bright summer afternoons, crisp fall evenings, and calm winter nights are all excellent times to enjoy a soak.

More Ways to Live a Healthier Lifestyle

Once you’ve felt the increased energy, improved mood, and overall boost in well-being that comes from taking good care of yourself, you’ll want to keep it going by making more positive changes in your life. Here are a few ideas to keep you on track for a healthier lifestyle.

Limit your screen time

Spending too much time-consuming media is bad for us. Most of us don’t need statistics to prove it (although there are plenty of those) because we know how we feel after binging on too many TV shows or staying up too late scrolling on our phones. Making a conscious effort to limit your screen time is an effective way to improve your mental health. If you need help doing this, you can adjust your smartphone’s settings to track your screen time and install apps that automatically close down your apps after a certain amount of time.

Try new hobbies

Trying new things is a time-tested way to build your confidence and reignite your zest for life. Let your own personal interests guide you to a new hobby or pastime, whether it’s photography, painting, sewing, or yoga (which you can also do in your swim spa!).

Eat a healthy, well-balanced diet

Along with exercise, the food we eat is one of the biggest determiners of our health and well-being. A well-balanced diet is one that includes a generous amount of fruits, vegetables, grains, and lean proteins, and avoids highly processed foods with high amounts of sugar and fat. Many people find that once they start exercising, they naturally feel motivated to eat well since quality food energizes them and powers their workouts.

Read more books

Reading is an amazing way to broaden your horizons and stimulate your intellect. Whether you prefer fiction, non-fiction, or both, there’s an entire world of knowledge and creativity waiting for you when you pick up a book. Consider joining a book club in order to enjoy another layer of health benefits from connecting with others and expanding your social world.

Grow a garden

Bursting with lush green life, gardens are naturally relaxing environments. Growing a garden in your backyard will not only create a beautiful natural oasis, it also helps support local bug and bird populations (especially if you choose to grow plants that are native to your area). What’s more, a healthy garden improves the air quality of the surrounding area and provides stunning natural scenery to enjoy from the relaxing comfort of your swim spa.

Practice meditation

Meditation is an ancient practice that has exploded in popularity all over the world today, with good reason. The health benefits of meditation are extensive, from improving mental clarity to reducing high blood pressure. One of the best things about meditation is that you can do it pretty much anywhere and anytime. All you have to do is find a quiet space, focus on your breath, and clear your mind.

Loading

If the article is helpful, please Click to Star Icon and Rate This Post!
[Total: 0 Average: 0]

Swimming Spa – All About You Need To Know

Swimming spa is a multifunctional machine that combines the best features of a swimming pool and a hot tub. It also tends to fall somewhere in the middle of these two in terms of size.

One of the most common ways that swim spas are used is for a challenging but impact-free water workout. Swim spas produce a powerful current of water that provides continuous resistance you can swim, run, jog, or walk against without ever “hitting the wall.” You can swim lap after lap, or walk or run for miles, all in the comfort and privacy of your swim spa.

Best of all, once you’ve given your muscles a good workout, you can use the very same swim spa to relax and unwind. Simply settle down in front of the hydrotherapy jets and adjust the settings for an invigorating and therapeutic massage. So, to sum up, a swim spa offers a range of activities geared toward fitness, fun, and relaxation:

  • Swim, run, jog, or walk against a powerful resistance-producing current
  • Splash around with your family and friends
  • Relax into an ergonomic seat surrounded by heated water
  • Soothe sore muscles with massage jets

What is a Swim Spa? The Basics

Swim spas are an alternative to traditional pools and spas. Like hot tubs, swim spas are self-contained, so all the pumps, filters and heating elements are part of the unit — no additional equipment required! However, like swimming pools, swim spas are designed with swimming in mind.

With powerful jets on one side, swim spas produce a swim current, allowing users to swim continuously in one place. When these jets are turned on, it creates an endless pool effect so swimmers can backstroke, butterfly or freestyle as long as they want.

Swim spas are a popular option for people who enjoy pool exercises and swimming workouts. However, most swim spas are split into two sections, with a pool on one side and a hot tub with jets and seating on the other end, so users can get a workout in, and then relax.

Don’t let the word “spa” fool you: the water temperature is adjustable to serve a wide range of uses. Additionally, there are several models and types. You can have an in-ground swim spa or an above-ground swim spa, and you can even choose an indoor or outdoor model.

8 Benefits of Swim Spas

Let’s move on to some of the most significant benefits of swim spas.

1. Less Space:

You don’t need a lot of room to swim laps with swim spas, so they are generally much smaller than traditional swimming pools.

2. Multi-Functional:

Most swim spas provide a space for continuous swimming exercise, hot tub relaxation and entertainment.

3. Year-Round Use:

Because the water is heated, swim spas are meant to be used throughout the entire year. (For this reason, most swim spa owners invest in an automatic pool cover, so they can easily keep their swim spa protected and accessible year-round).

4. Ideal Exercise Environment:

Aquatic exercises are low-impact and great for any fitness level, and swim spas provide space for just that. The buoyancy of water is an excellent choice for people with chronic pain to remain active, improve flexibility, increase balance and enjoy all the other well-known benefits of exercise.

5. Unparalleled Swim Training:

Whether you’re training for a triathlon or competitive swimming, swim training is essential. However, training in public pools, gyms and aquatic centers may not be an option. Swim spas allow swimmers to practice their crawl, backstroke, breaststroke, butterfly and more from the comfort of their backyard — just adjust the water temperature as you like and start swimming.

6. Warm Water & Aquatic Therapy:

You can easily heat up the water temperature of swim spas for therapeutic purposes. Combine this with a water-based aquatic therapy routine, and swim spas can help people struggling with chronic pain.

7. Relaxation:

Don’t forget about the spa part of the swim spa. Most swim spas include massaging jets and other features found in traditional hot tubs, so you can turn up the temperature and use your swim spa to ease tension and relax after a long day (or high-power swimming workout).

8. Entertainment:

Like any pool or spa, a swim spa is a great space to hang out with friends and family. Splash around or relax and catch up. Swim spas offer many of the same benefits of regular pools and spas.

Healthy Living with a Swim Spa

Many of our clients find that they naturally (and almost effortlessly) live a healthier lifestyle once they add a swim spa to their home.

Keeping up a fitness schedule no longer requires planning, commuting, dressing, and undressing in a locker room, and all the other small hassles that working out in a public facility—even a high-end one—requires. Going for a swim or a water run becomes a simple matter of changing into a swimsuit and hitting the water.

Another way that swim spas make adopting a healthier lifestyle a breeze is a fact that water workouts tend to be really fun and enjoyable. It’s so much easier to stick with an exercise regimen when it’s something you actually look forward to doing. And again, because it’s in the privacy of your home, you can create the ultimate personalized workout environment. Blast your favorite music, set out a stack of fluffy towels to dry off with, and get your favorite smoothie ready to reward yourself with after you step out of the pool.

Finally, swim spas help you live a healthier lifestyle by completely eliminating one huge obstacle that prevents many people from working out consistently: the shyness factor. It can be very intimidating to exercise in front of other people, especially if we’re trying something new. A swim spa offers you complete privacy, and if you don’t already know how to swim or do water aerobics, you can take lessons from a private coach in a comfortable, one-on-one setting in your home.

How a Swim Spa Can Help

Better health and well-being don’t come from a single choice or action—it’s typically the result of our habits. If we want to enjoy the fruits of a strong body and mind, then it’s in our interest to create a lifestyle that supports the development of good habits.

A swim spa is an excellent way to develop a routine. It’s hard to think of a better or more convenient way to get a full-body workout than in the comfort and privacy of your own swim spa. You can use it as often as you like, and in a variety of different ways, to achieve your health and wellness goals.

In terms of physical health, a swim spa offers the following benefits:

  • Eases muscle tension
  • Soothes joint pain
  • Builds a stronger cardiovascular system
  • Promotes weight loss
  • Increases muscle strength
  • Improves circulation

A swim spa is able to produce such a wide range of positive health outcomes because it provides the perfect setting for hydrotherapy.

Hydrotherapy is a water-based therapy that has been used for decades all around the world as a way to heal injuries, improve quality of life, and promote overall well-being. It draws on the healing qualities of water—namely, its temperature and buoyancy—in combination with massage to boost blood circulation and the production of endorphins.

Speaking of endorphins, which are the body’s “feel-good” hormones, the health benefits of a swim spa don’t stop at just the physical level.

A swim spa also offers a range of mental health benefits as well:

  • Improves sleeps patterns
  • Reduce stress and anxiety
  • Promotes relaxation
  • Calms the mind

This is because swim spas are a supremely relaxing environment that promotes mental calmness and clarity. Sinking into the heated waters and letting your stress melt away under the gentle pressure of the massage jets is a deeply healing experience that carries over into the rest of your life. The enhanced sense of well-being that you have after spending time in your swim spa helps you regulate your sleep patterns so you can fall asleep and stay asleep for a good night’s rest, which in turn, leads to an increased ability to handle the stresses of daily life.

Other Benefits of Owning a Swim Spa

Part of health and well-being is feeling good about our choices and enjoying the life we have created for ourselves. On this point, too, swim spas are an excellent way to invest in yourself, your home, and your family.

Enjoy more quality family time

With the fast pace of modern life, It can be difficult to find time to spend together as a family. Having a swim spa right at home provides the perfect gathering place for you and your family members to get together, enjoy each other’s company, and catch up on each other’s lives. Family swim time may just become the highlight of your week.

Upgrade your backyard

There’s no doubt about it—a swim spa is a stunning addition to a backyard and is sure to draw the attention and admiration of your neighbors. You may even inspire some to get their own swim spas!

Increase the value of your home

Like any renovation or extension to your home, a swim spa adds value to your property. It is a unique and attractive feature that will not only make your property stand out if and when it ever goes on the market, but it will also attract higher bids because of it.

Provide an excellent venue for hosting gatherings

Having a strong social network is another important element in living a healthier life. A swim spa gives you a great excuse to get together more often. Throw a mini-pool party for your closest friends, or just have one or two of your favourite people over to unwind with the massage jets and watch the sun go down.

Allow you to spend more time outdoors

Most of us would like to spend more time outdoors, and a backyard swim spa lets you do just that. Because a swim spa uses heated water, it’s a feature you can use 365 days of the year, through every season. Breezy spring days, bright summer afternoons, crisp fall evenings, and calm winter nights are all excellent times to enjoy a soak.

More Ways to Live a Healthier Lifestyle

Once you’ve felt the increased energy, improved mood, and overall boost in well-being that comes from taking good care of yourself, you’ll want to keep it going by making more positive changes in your life. Here are a few ideas to keep you on track for a healthier lifestyle.

Limit your screen time

Spending too much time-consuming media is bad for us. Most of us don’t need statistics to prove it (although there are plenty of those) because we know how we feel after binging on too many TV shows or staying up too late scrolling on our phones. Making a conscious effort to limit your screen time is an effective way to improve your mental health. If you need help doing this, you can adjust your smartphone’s settings to track your screen time and install apps that automatically close down your apps after a certain amount of time.

Try new hobbies

Trying new things is a time-tested way to build your confidence and reignite your zest for life. Let your own personal interests guide you to a new hobby or pastime, whether it’s photography, painting, sewing, or yoga (which you can also do in your swim spa!).

Eat a healthy, well-balanced diet

Along with exercise, the food we eat is one of the biggest determiners of our health and well-being. A well-balanced diet is one that includes a generous amount of fruits, vegetables, grains, and lean proteins, and avoids highly processed foods with high amounts of sugar and fat. Many people find that once they start exercising, they naturally feel motivated to eat well, since quality food energizes them and powers their workouts.

Read more books

Reading is an amazing way to broaden your horizons and stimulate your intellect. Whether you prefer fiction, non-fiction, or both, there’s an entire world of knowledge and creativity waiting for you when you pick up a book. Consider joining a book club in order to enjoy another layer of health benefits from connecting with others and expanding your social world.

Grow a garden

Bursting with lush green life, gardens are naturally relaxing environments. Growing a garden in your backyard will not only create a beautiful natural oasis, it also helps support local bug and bird populations (especially if you choose to grow plants that are native to your area). What’s more, a healthy garden improves the air quality of the surrounding area and provides stunning natural scenery to enjoy from the relaxing comfort of your swim spa.

Practice meditation

Meditation is an ancient practice that has exploded in popularity all over the world today, with good reason. The health benefits of meditation are extensive, from improving mental clarity to reducing high blood pressure. One of the best things about meditation is that you can do it pretty much anywhere and anytime. All you have to do is find a quiet space, focus on your breath, and clear your mind.

What’s the Best Swim Spa for Me?

Ultimately, the best swim spa for you comes down to personal preference. You can have one custom-built or order a prefabricated swim spa. There are so many options that it’s best to look around a bit to see which features you want and need most.

Once you decide on a model, be sure to add an automatic pool cover for your swim spa to keep it protected throughout the year. Plus, an auto pool cover can help you control operational costs by trapping heat.


Loading

If the article is helpful, please Click to Star Icon and Rate This Post!
[Total: 0 Average: 0]

What movement does the pectoralis major perform?

What movement does the pectoralis major perform?/Pectoralis major is the superior most and largest muscle of the anterior chest wall. It is a thick, fan-shaped muscle that lies underneath the breast tissue and forms the anterior wall of the axilla. Its origin lies anterior surface of the medial half of the clavicle, the anterior surface of the sternum, the first 7 costal cartilages, the sternal end of the sixth rib, and the aponeurosis of the external oblique of the anterior abdominal wall. The insertion of the pectoralis major is at the lateral lip of the intertubercular sulcus of the humerus. There are 2 heads of the pectoralis major, the clavicular and the sternocostal, which reference their area of origin. The sternocostal head is described as having between 2 to 7 distinct segments.

What movement does the pectoralis major perform?

Your chest muscles are responsible for four different movement patterns of the shoulder joint: flexion (side-arming a baseball), adduction (flapping your arms), internal rotation of the arm (think arm wrestling) and of course, keeping your arms attached to the trunk of your body. For men, a muscular chest is a badge of pride. However, women can also benefit from strengthening and training the muscles of their chests. Both men and women can use the following exercises to build a stronger, more defined upper body.

Anatomy of the Pectoralis Major

  • Origin – Clavicular head, anterior sternum, costal cartilages 1 to 7, the sternal end rib 6, aponeurosis of the external oblique
  • Insertion – Lateral lip intertubercular sulcus of the humerus
  • Nervous innervation – Medial and lateral pectoral nerves (clavicular head C5, sternocostal head C6/7/8, T1)
  • Function – Flexion, adduction, and medial rotation of the arm at the glenohumeral joint; clavicular head causes flexion of the extended arm; sternoclavicular head causes extension of the flexed arm
  • Arterial supply – Pectoral artery (thoracoacromial trunk, the second branch of the axillary artery)
  • Venous drainage – Pectoral vein (drains into the subclavian vein)

Strengthening Exercise For Pectoralis Major

180-Degree Twisting Dumbbell Bench Press

  • If you’re like me and have suffered a torn pec while benching, you’ll agree that the barbell bench press is not ideal for everyone. I also find that my shoulders take over when I’m doing the flat and incline bench, so I prefer to use the dumbbell chest press instead.
  • But I don’t just do any chest press. I add a twist literally in order to utilize the benefits of a supine or reverse grip. A study performed in my home town of Toronto determined that when subjects used a supinated grip during an isometric hold of the flat bench press, it resulted in increased activity for the upper portion of the pectoralis major as compared to a regular pronated grip.

Execution

180-Degree Twisting Dumbbell Bench Press

  • Lie back on a bench holding two dumbbells with a standard grip (palms forward) and arms extended over your chest.
  • Slowly lower the dumbbells to your outer chest, then press and rotate 180 degrees as you push back up to starting position. You should have a supine grip with your pinkies inward and palms facing your face at the top of the movement. Hold this peak contraction for 2 seconds before lowering it into the next rep.
  • Keep your shoulders back and down during the press to maximize pec involvement and minimize delt takeover.

Close-Grip Weighted Push-Up

  • The push-up is a great exercise, but you have to do it a certain way in order to maximize chest activity. Try using the close-grip weighted push-up as a finishing move after you’re done trashing your chest with the weights. The narrow hand position brings out the inner pecs and the added weight across the back elevates this from an everyday move to a pec destroyer.

Push-Ups

  • Before the invention of barbells or dumbbells, push-ups were the best way to build a bigger chest. They also go a long way in building stronger shoulders and arms. To activate more of your pectoral muscles, change the position of your hands. The wider you place your hands, the more your pecs are activated. If you narrow your hands you’ll use more of your triceps.
  • Begin with hands directly under your shoulders with your legs straight behind you. Then slowly slide your hands out 2 to 3 inches further than shoulder width. Keep your back straight and slowly lower your chest to the ground. As you descend toward the ground, keep your arms at a 90-degree angle. Once your chest touches to ground or is slightly hovering above it, push your body back up. Perform three sets of eight to 12 repetitions.
  • You can also add weight to push-ups by having a gym partner or friend place a moderate weight plate on your back before you start your set.

Dumbbell Flyes

  • This exercise works the upper portion of your chest. You’ll need two dumbbells for this exercise. Lie down on a bench with your feet flat on the floor.
  • Begin by placing a dumbbell in each hand and holding it above your shoulders. Keeping a slight bend in your arms, slowly lower the dumbbells down towards your side your arms should come to shoulder level or slightly below.
  • Raise your arms back to the starting position with your pinkies pointed toward each other — and squeeze your chest together at the top. Perform three sets of eight to 12 repetitions.

Bench Press

  • Compared to the flat bench press, the incline bench press is the best exercise for building three-dimensional chess. Like the incline dumbbell fly above, the incline bench press works the upper pectoral muscles near your collarbone.
  • Begin by lying on an incline bench set at 30 to 45 degrees — the higher the incline the more involved your shoulder muscles become. Grab the barbell with your hands, maintaining a shoulder-width distance.
  • Lower the bar until it touches your chest, inhaling as you lower it. Pause for a brief second and then press the weight off your chest, exhale as you press. Pause at the top for a moment, take a deep breath, and repeat the exercise. Perform three sets of eight to 12 repetitions.

Dips

  • Dips have become one of the lost treasures of building a stronger and more defined chest. Unlike grabbing a pair of dumbbells for bench presses, it’s not an easy exercise. And thanks to this, many people skip over dips, but they’re also missing out on one of the best ways to increase strength and size in their upper bodies.
  • Using either a dip station or two straight parallel bars, start by placing each hand on the bars. With your feet dangling below you and your arms fully extended a directly underneath your shoulders, begin the movement by bracing your core.
  • From this position, bend your elbow and slowly lower yourself until your chest dips below the plane of the handles you’re holding. You’ll feel a huge stretch in your chest. Once you feel that stretch, push through your wrists, triceps, and chest until you come back to the fully extended starting position.
  • Perform three to four sets of eight to 10 reps. Dips should always be the first exercise in your training block for the day. This will keep your chest muscles at their freshest and prevent you from using too much of your shoulder to get your body back up.

Dumbbell Pull-Over

  • The dumbbell pullover was one of Arnold Schwarzenegger’s favorite chest building exercises. It targets the sternal portion of your chest and even requires a little work from your latissimus dorsi in your back.
  • Place a dumbbell on a flat bench, then sit down in front of a bench. Place your upper back on the bench, keeping your hips slightly flexed. With the dumbbell on the bench, beside your head, grab the dumbbell with both hands by placing them under the plate of the dumbbell.
  • Move the dumbbell over your chest and keep a slight bend in your elbows. This is your starting position. Keep your elbows slightly bent throughout, and lower the dumbbell behind your head, until upper arms are in-line with your torso. Then pull the dumbbell up and over your chest, back to the starting position. Perform three sets of 10 to 12 reps.

Cable Crossover 21s

Cable work is a great addition to free weights.

  • It provides constant tension throughout the range of motion. But can it match the same level of muscle activation? Perhaps so, according to a recent study sponsored by the American Council on Exercise that investigated the EMG activity of nine common chest exercises. A team of researchers from the University of Wisconsin found that the bent-forward cable crossover produced nearly the same pectoralis major stimulation as the barbell bench press, which was rated the highest.
  • The beauty of the cable crossover is that you can adjust the pulleys to any height you want, which is why I recommend cable crossover 21s. You get the benefit of high, mid-level, and low crossovers in one triset, attacking your chest from all angles. Remember to keep the arms and body stationary so that you perform the exercise from the shoulders. This will help maximize the stretch and contraction of the chest during each rep.

Mid Cable Crossover

Second 7 reps (middle position)

  • Move the cables to chest height, grab the handles, and get into the base position.
  • Push the handles out and in front of your chest with the palms facing each other.
  • Resist the weight as you open up in a wide arc. Pause when you feel a slight stretch in your chest, then squeeze back to the center with the elbows slightly bent and locked in place. Perform 7 reps in this position.

High Cable Crossover

Final 7 reps (high position)

  • Move the cables just above your head, grab the handles, and move back into the base position.
  • Press the handles down and in front of your upper abdominals with palms facing inward.
  • Open your arms back and up until you feel a good stretch across the pecs, pause, and then squeeze back in and under your chest. Perform your last 7 reps in this position.

Kettlebell Fly

  • Kettlebells are harder to grip than dumbbells, which makes you work harder for each rep. Using kettlebells for chest flyes will cause your pecs to recruit more muscle fibers to fight the weight hanging below your palms. Start with kettlebells that are 10 pounds lighter than what you would use on a standard dumbbell fly.
  • If you find yourself bending your elbows during the lowering phase, choose a lighter weight to ensure proper form. You want this to be a full-range fly, not a half-fly, half-press.

Execution

Kettlebell Fly

  • Hold the kettlebells over your chest as you did in the press, but turn your palms to face each other.
  • Using a wide arc from the shoulders, lower your arms with elbows slightly bent until you feel a good stretch across the chest. Pause and contract the pecs against the extra resistance that the kettlebells provide at the bottom range.
  • Squeeze your pecs as you bring your arms back up in a wide hugging motion. Keep your shoulders back and squeeze your pecs together at the top of the motion.

Forward-Leaning Dip

  • The dip is no joke. It’s a tough compound exercise that makes great use of your bodyweight. However, dips are usually performed in an upright position to target the triceps. By simply adding a forward lean to this already-effective exercise, you’ll stimulate more chest activity.
  • You can attempt to do this on your own, but if you really want to get the proper angle you’ll need a training partner to help you get into the right position. You can easily make it more challenging by adding weight via chains or a belt.
  • A word of caution for people with any shoulder issues Start with a small range of motion and listen to your body to determine how deep you can go. I always advise getting a full range of motion, but not at the risk of injury.

Execution

Low Cable Crossover, First 7 reps (low position)

  • Starting with the cables in the lowest position, grab the handles and move into a staggered stance with one foot forward and one foot back. Lean forward slightly from the hip. This is your base position for all three movements.
  • With the handles out at your sides and an underhand grip, squeeze the cables up and in to eye level using a scooping motion. Perform 7 reps in this position.

Foward-Leaning Dip

  • Place your hands on the bars and push yourself up until your elbows are locked. Cross your legs back with your knees bent, core tight, and hamstrings and glutes braced.
  • Have your training partner hold and pull your legs back until you’re in a forward-leaning position, using just enough assistance to get you into the right angle. Your body should be at approximately a 30-degree angle to the ground.
  • Lower yourself until your shoulders are lower than your elbows, or you feel a good stretch across the chest. Listen to your body and don’t push through shoulder pain.
  • Push yourself up by extending your elbows to 180 degrees for a full range of motion. Visualize the pec squeeze as you drive up.


References

What movement does the pectoralis major perform?


Loading

If the article is helpful, please Click to Star Icon and Rate This Post!
[Total: 0 Average: 0]

How To Strength of The Pectoralis Muscle?

How To Strength of The Pectoralis Muscle?/Pectoralis major is the superior most and largest muscle of the anterior chest wall. It is a thick, fan-shaped muscle that lies underneath the breast tissue and forms the anterior wall of the axilla. Its origin lies anterior surface of the medial half of the clavicle, the anterior surface of the sternum, the first 7 costal cartilages, the sternal end of the sixth rib, and the aponeurosis of the external oblique of the anterior abdominal wall. The insertion of the pectoralis major is at the lateral lip of the intertubercular sulcus of the humerus. There are 2 heads of the pectoralis major, the clavicular and the sternocostal, which reference their area of origin. The sternocostal head is described as having between 2 to 7 distinct segments.

How To Strength of The Pectoralis Muscle?

Your chest muscles are responsible for four different movement patterns of the shoulder joint: flexion (side-arming a baseball), adduction (flapping your arms), internal rotation of the arm (think arm wrestling) and of course, keeping your arms attached to the trunk of your body. For men, a muscular chest is a badge of pride. However, women can also benefit from strengthening and training the muscles of their chests. Both men and women can use the following exercises to build a stronger, more defined upper body.

Anatomy of the Pectoralis Major

  • Origin – Clavicular head, anterior sternum, costal cartilages 1 to 7, the sternal end rib 6, aponeurosis of the external oblique
  • Insertion – Lateral lip intertubercular sulcus of the humerus
  • Nervous innervation – Medial and lateral pectoral nerves (clavicular head C5, sternocostal head C6/7/8, T1)
  • Function – Flexion, adduction, and medial rotation of the arm at the glenohumeral joint; clavicular head causes flexion of the extended arm; sternoclavicular head causes extension of the flexed arm
  • Arterial supply – Pectoral artery (thoracoacromial trunk, the second branch of the axillary artery)
  • Venous drainage – Pectoral vein (drains into the subclavian vein)

Strengthening Exercise For Pectoralis Major

180-Degree Twisting Dumbbell Bench Press

  • If you’re like me and have suffered a torn pec while benching, you’ll agree that the barbell bench press is not ideal for everyone. I also find that my shoulders take over when I’m doing the flat and incline bench, so I prefer to use the dumbbell chest press instead.
  • But I don’t just do any chest press. I add a twist literally in order to utilize the benefits of a supine or reverse grip. A study performed in my home town of Toronto determined that when subjects used a supinated grip during an isometric hold of the flat bench press, it resulted in increased activity for the upper portion of the pectoralis major as compared to a regular pronated grip.

Execution

180-Degree Twisting Dumbbell Bench Press

  • Lie back on a bench holding two dumbbells with a standard grip (palms forward) and arms extended over your chest.
  • Slowly lower the dumbbells to your outer chest, then press and rotate 180 degrees as you push back up to starting position. You should have a supine grip with your pinkies inward and palms facing your face at the top of the movement. Hold this peak contraction for 2 seconds before lowering it into the next rep.
  • Keep your shoulders back and down during the press to maximize pec involvement and minimize delt takeover.

Close-Grip Weighted Push-Up

  • The push-up is a great exercise, but you have to do it a certain way in order to maximize chest activity. Try using the close-grip weighted push-up as a finishing move after you’re done trashing your chest with the weights. The narrow hand position brings out the inner pecs and the added weight across the back elevates this from an everyday move to a pec destroyer.

Push-Ups

  • Before the invention of barbells or dumbbells, push-ups were the best way to build a bigger chest. They also go a long way in building stronger shoulders and arms. To activate more of your pectoral muscles, change the position of your hands. The wider you place your hands, the more your pecs are activated. If you narrow your hands you’ll use more of your triceps.
  • Begin with hands directly under your shoulders with your legs straight behind you. Then slowly slide your hands out 2 to 3 inches further than shoulder width. Keep your back straight and slowly lower your chest to the ground. As you descend toward the ground, keep your arms at a 90-degree angle. Once your chest touches to ground or is slightly hovering above it, push your body back up. Perform three sets of eight to 12 repetitions.
  • You can also add weight to push-ups by having a gym partner or friend place a moderate weight plate on your back before you start your set.

Dumbbell Flyes

  • This exercise works the upper portion of your chest. You’ll need two dumbbells for this exercise. Lie down on a bench with your feet flat on the floor.
  • Begin by placing a dumbbell in each hand and holding it above your shoulders. Keeping a slight bend in your arms, slowly lower the dumbbells down towards your side your arms should come to shoulder level or slightly below.
  • Raise your arms back to the starting position with your pinkies pointed toward each other — and squeeze your chest together at the top. Perform three sets of eight to 12 repetitions.

Bench Press

  • Compared to the flat bench press, the incline bench press is the best exercise for building three-dimensional chess. Like the incline dumbbell fly above, the incline bench press works the upper pectoral muscles near your collarbone.
  • Begin by lying on an incline bench set at 30 to 45 degrees — the higher the incline the more involved your shoulder muscles become. Grab the barbell with your hands, maintaining a shoulder-width distance.
  • Lower the bar until it touches your chest, inhaling as you lower it. Pause for a brief second and then press the weight off your chest, exhale as you press. Pause at the top for a moment, take a deep breath, and repeat the exercise. Perform three sets of eight to 12 repetitions.

Dips

  • Dips have become one of the lost treasures of building a stronger and more defined chest. Unlike grabbing a pair of dumbbells for bench presses, it’s not an easy exercise. And thanks to this, many people skip over dips, but they’re also missing out on one of the best ways to increase strength and size in their upper bodies.
  • Using either a dip station or two straight parallel bars, start by placing each hand on the bars. With your feet dangling below you and your arms fully extended a directly underneath your shoulders, begin the movement by bracing your core.
  • From this position, bend your elbow and slowly lower yourself until your chest dips below the plane of the handles you’re holding. You’ll feel a huge stretch in your chest. Once you feel that stretch, push through your wrists, triceps, and chest until you come back to the fully extended starting position.
  • Perform three to four sets of eight to 10 reps. Dips should always be the first exercise in your training block for the day. This will keep your chest muscles at their freshest and prevent you from using too much of your shoulder to get your body back up.

Dumbbell Pull-Over

  • The dumbbell pullover was one of Arnold Schwarzenegger’s favorite chest building exercises. It targets the sternal portion of your chest and even requires a little work from your latissimus dorsi in your back.
  • Place a dumbbell on a flat bench, then sit down in front of a bench. Place your upper back on the bench, keeping your hips slightly flexed. With the dumbbell on the bench, beside your head, grab the dumbbell with both hands by placing them under the plate of the dumbbell.
  • Move the dumbbell over your chest and keep a slight bend in your elbows. This is your starting position. Keep your elbows slightly bent throughout, and lower the dumbbell behind your head, until upper arms are in-line with your torso. Then pull the dumbbell up and over your chest, back to the starting position. Perform three sets of 10 to 12 reps.

Cable Crossover 21s

Cable work is a great addition to free weights.

  • It provides constant tension throughout the range of motion. But can it match the same level of muscle activation? Perhaps so, according to a recent study sponsored by the American Council on Exercise that investigated the EMG activity of nine common chest exercises. A team of researchers from the University of Wisconsin found that the bent-forward cable crossover produced nearly the same pectoralis major stimulation as the barbell bench press, which was rated the highest.
  • The beauty of the cable crossover is that you can adjust the pulleys to any height you want, which is why I recommend cable crossover 21s. You get the benefit of high, mid-level, and low crossovers in one triset, attacking your chest from all angles. Remember to keep the arms and body stationary so that you perform the exercise from the shoulders. This will help maximize the stretch and contraction of the chest during each rep.

Mid Cable Crossover

Second 7 reps (middle position)

  • Move the cables to chest height, grab the handles, and get into the base position.
  • Push the handles out and in front of your chest with the palms facing each other.
  • Resist the weight as you open up in a wide arc. Pause when you feel a slight stretch in your chest, then squeeze back to the center with the elbows slightly bent and locked in place. Perform 7 reps in this position.

High Cable Crossover

Final 7 reps (high position)

  • Move the cables just above your head, grab the handles, and move back into the base position.
  • Press the handles down and in front of your upper abdominals with palms facing inward.
  • Open your arms back and up until you feel a good stretch across the pecs, pause, and then squeeze back in and under your chest. Perform your last 7 reps in this position.

Kettlebell Fly

  • Kettlebells are harder to grip than dumbbells, which makes you work harder for each rep. Using kettlebells for chest flyes will cause your pecs to recruit more muscle fibers to fight the weight hanging below your palms. Start with kettlebells that are 10 pounds lighter than what you would use on a standard dumbbell fly.
  • If you find yourself bending your elbows during the lowering phase, choose a lighter weight to ensure proper form. You want this to be a full-range fly, not a half-fly, half-press.

Execution

Kettlebell Fly

  • Hold the kettlebells over your chest as you did in the press, but turn your palms to face each other.
  • Using a wide arc from the shoulders, lower your arms with elbows slightly bent until you feel a good stretch across the chest. Pause and contract the pecs against the extra resistance that the kettlebells provide at the bottom range.
  • Squeeze your pecs as you bring your arms back up in a wide hugging motion. Keep your shoulders back and squeeze your pecs together at the top of the motion.

Forward-Leaning Dip

  • The dip is no joke. It’s a tough compound exercise that makes great use of your bodyweight. However, dips are usually performed in an upright position to target the triceps. By simply adding a forward lean to this already-effective exercise, you’ll stimulate more chest activity.
  • You can attempt to do this on your own, but if you really want to get the proper angle you’ll need a training partner to help you get into the right position. You can easily make it more challenging by adding weight via chains or a belt.
  • A word of caution for people with any shoulder issues Start with a small range of motion and listen to your body to determine how deep you can go. I always advise getting a full range of motion, but not at the risk of injury.

Execution

Low Cable Crossover, First 7 reps (low position)

  • Starting with the cables in the lowest position, grab the handles and move into a staggered stance with one foot forward and one foot back. Lean forward slightly from the hip. This is your base position for all three movements.
  • With the handles out at your sides and an underhand grip, squeeze the cables up and in to eye level using a scooping motion. Perform 7 reps in this position.

Foward-Leaning Dip

  • Place your hands on the bars and push yourself up until your elbows are locked. Cross your legs back with your knees bent, core tight, and hamstrings and glutes braced.
  • Have your training partner hold and pull your legs back until you’re in a forward-leaning position, using just enough assistance to get you into the right angle. Your body should be at approximately a 30-degree angle to the ground.
  • Lower yourself until your shoulders are lower than your elbows, or you feel a good stretch across the chest. Listen to your body and don’t push through shoulder pain.
  • Push yourself up by extending your elbows to 180 degrees for a full range of motion. Visualize the pec squeeze as you drive up.


References

How To Strength of The Pectoralis Muscle?


Loading

If the article is helpful, please Click to Star Icon and Rate This Post!
[Total: 0 Average: 0]

How can I strengthen my breast muscles/ Pectoralis Major?

How can I strengthen my breast muscles/ Pectoralis Major/Pectoralis major is the superior most and largest muscle of the anterior chest wall. It is a thick, fan-shaped muscle that lies underneath the breast tissue and forms the anterior wall of the axilla. Its origin lies anterior surface of the medial half of the clavicle, the anterior surface of the sternum, the first 7 costal cartilages, the sternal end of the sixth rib, and the aponeurosis of the external oblique of the anterior abdominal wall. The insertion of the pectoralis major is at the lateral lip of the intertubercular sulcus of the humerus. There are 2 heads of the pectoralis major, the clavicular and the sternocostal, which reference their area of origin. The sternocostal head is described as having between 2 to 7 distinct segments.

How can I strengthen my breast muscles/ Pectoralis Major

Your chest muscles are responsible for four different movement patterns of the shoulder joint: flexion (side-arming a baseball), adduction (flapping your arms), internal rotation of the arm (think arm wrestling) and of course, keeping your arms attached to the trunk of your body. For men, a muscular chest is a badge of pride. However, women can also benefit from strengthening and training the muscles of their chests. Both men and women can use the following exercises to build a stronger, more defined upper body.

Anatomy of the Pectoralis Major

  • Origin – Clavicular head, anterior sternum, costal cartilages 1 to 7, the sternal end rib 6, aponeurosis of the external oblique
  • Insertion – Lateral lip intertubercular sulcus of the humerus
  • Nervous innervation – Medial and lateral pectoral nerves (clavicular head C5, sternocostal head C6/7/8, T1)
  • Function – Flexion, adduction, and medial rotation of the arm at the glenohumeral joint; clavicular head causes flexion of the extended arm; sternoclavicular head causes extension of the flexed arm
  • Arterial supply – Pectoral artery (thoracoacromial trunk, the second branch of the axillary artery)
  • Venous drainage – Pectoral vein (drains into the subclavian vein)

Strengthening Exercise For Pectoralis Major

180-Degree Twisting Dumbbell Bench Press

If you’re like me and have suffered a torn pec while benching, you’ll agree that the barbell bench press is not ideal for everyone. I also find that my shoulders take over when I’m doing the flat and incline bench, so I prefer to use the dumbbell chest press instead.

But I don’t just do any chest press. I add a twist literally in order to utilize the benefits of a supine or reverse grip. A study performed in my home town of Toronto determined that when subjects used a supinated grip during an isometric hold of the flat bench press, it resulted in increased activity for the upper portion of the pectoralis major as compared to a regular pronated grip.

Execution

180-Degree Twisting Dumbbell Bench Press

  • Lie back on a bench holding two dumbbells with a standard grip (palms forward) and arms extended over your chest.
  • Slowly lower the dumbbells to your outer chest, then press and rotate 180 degrees as you push back up to starting position. You should have a supine grip with your pinkies inward and palms facing your face at the top of the movement. Hold this peak contraction for 2 seconds before lowering it into the next rep.
  • Keep your shoulders back and down during the press to maximize pec involvement and minimize delt takeover.

Close-Grip Weighted Push-Up

The push-up is a great exercise, but you have to do it a certain way in order to maximize chest activity. Try using the close-grip weighted push-up as a finishing move after you’re done trashing your chest with the weights. The narrow hand position brings out the inner pecs and the added weight across the back elevates this from an everyday move to a pec destroyer.

Push-Ups

Before the invention of barbells or dumbbells, push-ups were the best way to build a bigger chest. They also go a long way in building stronger shoulders and arms. To activate more of your pectoral muscles, change the position of your hands. The wider you place your hands, the more your pecs are activated. If you narrow your hands you’ll use more of your triceps.

Begin with hands directly under your shoulders with your legs straight behind you. Then slowly slide your hands out 2 to 3 inches further than shoulder width. Keep your back straight and slowly lower your chest to the ground. As you descend toward the ground, keep your arms at a 90-degree angle. Once your chest touches to ground or is slightly hovering above it, push your body back up. Perform three sets of eight to 12 repetitions.

You can also add weight to push-ups by having a gym partner or friend place a moderate weight plate on your back before you start your set.

Dumbbell Flyes

This exercise works the upper portion of your chest. You’ll need two dumbbells for this exercise. Lie down on a bench with your feet flat on the floor.

Begin by placing a dumbbell in each hand and holding it above your shoulders. Keeping a slight bend in your arms, slowly lower the dumbbells down towards your side your arms should come to shoulder level or slightly below.

Raise your arms back to the starting position with your pinkies pointed toward each other — and squeeze your chest together at the top. Perform three sets of eight to 12 repetitions.

Bench Press

Compared to the flat bench press, the incline bench press is the best exercise for building three-dimensional chess. Like the incline dumbbell fly above, the incline bench press works the upper pectoral muscles near your collarbone.

Begin by lying on an incline bench set at 30 to 45 degrees — the higher the incline the more involved your shoulder muscles become. Grab the barbell with your hands, maintaining a shoulder-width distance.

Lower the bar until it touches your chest, inhaling as you lower it. Pause for a brief second and then press the weight off your chest, exhale as you press. Pause at the top for a moment, take a deep breath, and repeat the exercise. Perform three sets of eight to 12 repetitions.

Dips

Dips have become one of the lost treasures of building a stronger and more defined chest. Unlike grabbing a pair of dumbbells for bench presses, it’s not an easy exercise. And thanks to this, many people skip over dips, but they’re also missing out on one of the best ways to increase strength and size in their upper bodies.

Using either a dip station or two straight parallel bars, start by placing each hand on the bars. With your feet dangling below you and your arms fully extended a directly underneath your shoulders, begin the movement by bracing your core.

From this position, bend your elbow and slowly lower yourself until your chest dips below the plane of the handles you’re holding. You’ll feel a huge stretch in your chest. Once you feel that stretch, push through your wrists, triceps, and chest until you come back to the fully extended starting position.

Perform three to four sets of eight to 10 reps. Dips should always be the first exercise in your training block for the day. This will keep your chest muscles at their freshest and prevent you from using too much of your shoulder to get your body back up.

Dumbbell Pull-Over

The dumbbell pullover was one of Arnold Schwarzenegger’s favorite chest building exercises. It targets the sternal portion of your chest and even requires a little work from your latissimus dorsi in your back.

Place a dumbbell on a flat bench, then sit down in front of a bench. Place your upper back on the bench, keeping your hips slightly flexed. With the dumbbell on the bench, beside your head, grab the dumbbell with both hands by placing them under the plate of the dumbbell.

Move the dumbbell over your chest and keep a slight bend in your elbows. This is your starting position. Keep your elbows slightly bent throughout, and lower the dumbbell behind your head, until upper arms are in-line with your torso. Then pull the dumbbell up and over your chest, back to the starting position. Perform three sets of 10 to 12 reps.

Cable Crossover 21s

Cable work is a great addition to free weights.

  • It provides constant tension throughout the range of motion. But can it match the same level of muscle activation? Perhaps so, according to a recent study sponsored by the American Council on Exercise that investigated the EMG activity of nine common chest exercises. A team of researchers from the University of Wisconsin found that the bent-forward cable crossover produced nearly the same pectoralis major stimulation as the barbell bench press, which was rated the highest.
  • The beauty of the cable crossover is that you can adjust the pulleys to any height you want, which is why I recommend cable crossover 21s. You get the benefit of high, mid-level, and low crossovers in one triset, attacking your chest from all angles. Remember to keep the arms and body stationary so that you perform the exercise from the shoulders. This will help maximize the stretch and contraction of the chest during each rep.

Mid Cable Crossover

Second 7 reps (middle position)

  • Move the cables to chest height, grab the handles, and get into the base position.
  • Push the handles out and in front of your chest with the palms facing each other.
  • Resist the weight as you open up in a wide arc. Pause when you feel a slight stretch in your chest, then squeeze back to the center with the elbows slightly bent and locked in place. Perform 7 reps in this position.

High Cable Crossover

Final 7 reps (high position)

  • Move the cables just above your head, grab the handles, and move back into the base position.
  • Press the handles down and in front of your upper abdominals with palms facing inward.
  • Open your arms back and up until you feel a good stretch across the pecs, pause, and then squeeze back in and under your chest. Perform your last 7 reps in this position.

Kettlebell Fly

Kettlebells are harder to grip than dumbbells, which makes you work harder for each rep. Using kettlebells for chest flyes will cause your pecs to recruit more muscle fibers to fight the weight hanging below your palms. Start with kettlebells that are 10 pounds lighter than what you would use on a standard dumbbell fly.

If you find yourself bending your elbows during the lowering phase, choose a lighter weight to ensure proper form. You want this to be a full-range fly, not a half-fly, half-press.

Execution

Kettlebell Fly

  • Hold the kettlebells over your chest as you did in the press, but turn your palms to face each other.
  • Using a wide arc from the shoulders, lower your arms with elbows slightly bent until you feel a good stretch across the chest. Pause and contract the pecs against the extra resistance that the kettlebells provide at the bottom range.
  • Squeeze your pecs as you bring your arms back up in a wide hugging motion. Keep your shoulders back and squeeze your pecs together at the top of the motion.

Forward-Leaning Dip

  • The dip is no joke. It’s a tough compound exercise that makes great use of your bodyweight. However, dips are usually performed in an upright position to target the triceps. By simply adding a forward lean to this already-effective exercise, you’ll stimulate more chest activity.
  • You can attempt to do this on your own, but if you really want to get the proper angle you’ll need a training partner to help you get into the right position. You can easily make it more challenging by adding weight via chains or a belt.
  • A word of caution for people with any shoulder issues Start with a small range of motion and listen to your body to determine how deep you can go. I always advise getting a full range of motion, but not at the risk of injury.

Execution

Low Cable Crossover, First 7 reps (low position)

  • Starting with the cables in the lowest position, grab the handles and move into a staggered stance with one foot forward and one foot back. Lean forward slightly from the hip. This is your base position for all three movements.
  • With the handles out at your sides and an underhand grip, squeeze the cables up and in to eye level using a scooping motion. Perform 7 reps in this position.

Foward-Leaning Dip

  • Place your hands on the bars and push yourself up until your elbows are locked. Cross your legs back with your knees bent, core tight, and hamstrings and glutes braced.
  • Have your training partner hold and pull your legs back until you’re in a forward-leaning position, using just enough assistance to get you into the right angle. Your body should be at approximately a 30-degree angle to the ground.
  • Lower yourself until your shoulders are lower than your elbows, or you feel a good stretch across the chest. Listen to your body and don’t push through shoulder pain.
  • Push yourself up by extending your elbows to 180 degrees for a full range of motion. Visualize the pec squeeze as you drive up.


References

How can I strengthen my breast muscles/ Pectoralis Major


Loading

If the article is helpful, please Click to Star Icon and Rate This Post!
[Total: 0 Average: 0]

What Exercise Strengthens Pectoralis Major

What Exercise Strengthens Pectoralis Major/Pectoralis major is the superior most and largest muscle of the anterior chest wall. It is a thick, fan-shaped muscle that lies underneath the breast tissue and forms the anterior wall of the axilla. Its origin lies anterior surface of the medial half of the clavicle, the anterior surface of the sternum, the first 7 costal cartilages, the sternal end of the sixth rib, and the aponeurosis of the external oblique of the anterior abdominal wall. The insertion of the pectoralis major is at the lateral lip of the intertubercular sulcus of the humerus. There are 2 heads of the pectoralis major, the clavicular and the sternocostal, which reference their area of origin. The sternocostal head is described as having between 2 to 7 distinct segments.

What Exercise Strengthens Pectoralis Major

Your chest muscles are responsible for four different movement patterns of the shoulder joint: flexion (side-arming a baseball), adduction (flapping your arms), internal rotation of the arm (think arm wrestling) and of course, keeping your arms attached to the trunk of your body. For men, a muscular chest is a badge of pride. However, women can also benefit from strengthening and training the muscles of their chests. Both men and women can use the following exercises to build a stronger, more defined upper body.

Anatomy of the Pectoralis Major

  • Origin – Clavicular head, anterior sternum, costal cartilages 1 to 7, the sternal end rib 6, aponeurosis of the external oblique
  • Insertion – Lateral lip intertubercular sulcus of the humerus
  • Nervous innervation – Medial and lateral pectoral nerves (clavicular head C5, sternocostal head C6/7/8, T1)
  • Function – Flexion, adduction, and medial rotation of the arm at the glenohumeral joint; clavicular head causes flexion of the extended arm; sternoclavicular head causes extension of the flexed arm
  • Arterial supply – Pectoral artery (thoracoacromial trunk, the second branch of the axillary artery)
  • Venous drainage – Pectoral vein (drains into the subclavian vein)

Strengthening Exercise For Pectoralis Major

180-Degree Twisting Dumbbell Bench Press

  • If you’re like me and have suffered a torn pec while benching, you’ll agree that the barbell bench press is not ideal for everyone. I also find that my shoulders take over when I’m doing the flat and incline bench, so I prefer to use the dumbbell chest press instead.
  • But I don’t just do any chest press. I add a twist literally in order to utilize the benefits of a supine or reverse grip. A study performed in my home town of Toronto determined that when subjects used a supinated grip during an isometric hold of the flat bench press, it resulted in increased activity for the upper portion of the pectoralis major as compared to a regular pronated grip.

Execution

180-Degree Twisting Dumbbell Bench Press

  • Lie back on a bench holding two dumbbells with a standard grip (palms forward) and arms extended over your chest.
  • Slowly lower the dumbbells to your outer chest, then press and rotate 180 degrees as you push back up to starting position. You should have a supine grip with your pinkies inward and palms facing your face at the top of the movement. Hold this peak contraction for 2 seconds before lowering it into the next rep.
  • Keep your shoulders back and down during the press to maximize pec involvement and minimize delt takeover.

Close-Grip Weighted Push-Up

  • The push-up is a great exercise, but you have to do it a certain way in order to maximize chest activity. Try using the close-grip weighted push-up as a finishing move after you’re done trashing your chest with the weights. The narrow hand position brings out the inner pecs and the added weight across the back elevates this from an everyday move to a pec destroyer.

Push-Ups

  • Before the invention of barbells or dumbbells, push-ups were the best way to build a bigger chest. They also go a long way in building stronger shoulders and arms. To activate more of your pectoral muscles, change the position of your hands. The wider you place your hands, the more your pecs are activated. If you narrow your hands you’ll use more of your triceps.
  • Begin with hands directly under your shoulders with your legs straight behind you. Then slowly slide your hands out 2 to 3 inches further than shoulder width. Keep your back straight and slowly lower your chest to the ground. As you descend toward the ground, keep your arms at a 90-degree angle. Once your chest touches to ground or is slightly hovering above it, push your body back up. Perform three sets of eight to 12 repetitions.
  • You can also add weight to push-ups by having a gym partner or friend place a moderate weight plate on your back before you start your set.

Dumbbell Flyes

  • This exercise works the upper portion of your chest. You’ll need two dumbbells for this exercise. Lie down on a bench with your feet flat on the floor.
  • Begin by placing a dumbbell in each hand and holding it above your shoulders. Keeping a slight bend in your arms, slowly lower the dumbbells down towards your side your arms should come to shoulder level or slightly below.
  • Raise your arms back to the starting position with your pinkies pointed toward each other — and squeeze your chest together at the top. Perform three sets of eight to 12 repetitions.

Bench Press

  • Compared to the flat bench press, the incline bench press is the best exercise for building three-dimensional chess. Like the incline dumbbell fly above, the incline bench press works the upper pectoral muscles near your collarbone.
  • Begin by lying on an incline bench set at 30 to 45 degrees — the higher the incline the more involved your shoulder muscles become. Grab the barbell with your hands, maintaining a shoulder-width distance.
  • Lower the bar until it touches your chest, inhaling as you lower it. Pause for a brief second and then press the weight off your chest, exhale as you press. Pause at the top for a moment, take a deep breath, and repeat the exercise. Perform three sets of eight to 12 repetitions.

Dips

  • Dips have become one of the lost treasures of building a stronger and more defined chest. Unlike grabbing a pair of dumbbells for bench presses, it’s not an easy exercise. And thanks to this, many people skip over dips, but they’re also missing out on one of the best ways to increase strength and size in their upper bodies.
  • Using either a dip station or two straight parallel bars, start by placing each hand on the bars. With your feet dangling below you and your arms fully extended a directly underneath your shoulders, begin the movement by bracing your core.
  • From this position, bend your elbow and slowly lower yourself until your chest dips below the plane of the handles you’re holding. You’ll feel a huge stretch in your chest. Once you feel that stretch, push through your wrists, triceps, and chest until you come back to the fully extended starting position.
  • Perform three to four sets of eight to 10 reps. Dips should always be the first exercise in your training block for the day. This will keep your chest muscles at their freshest and prevent you from using too much of your shoulder to get your body back up.

Dumbbell Pull-Over

  • The dumbbell pullover was one of Arnold Schwarzenegger’s favorite chest building exercises. It targets the sternal portion of your chest and even requires a little work from your latissimus dorsi in your back.
  • Place a dumbbell on a flat bench, then sit down in front of a bench. Place your upper back on the bench, keeping your hips slightly flexed. With the dumbbell on the bench, beside your head, grab the dumbbell with both hands by placing them under the plate of the dumbbell.
  • Move the dumbbell over your chest and keep a slight bend in your elbows. This is your starting position. Keep your elbows slightly bent throughout, and lower the dumbbell behind your head, until upper arms are in-line with your torso. Then pull the dumbbell up and over your chest, back to the starting position. Perform three sets of 10 to 12 reps.

Cable Crossover 21s

Cable work is a great addition to free weights.

  • It provides constant tension throughout the range of motion. But can it match the same level of muscle activation? Perhaps so, according to a recent study sponsored by the American Council on Exercise that investigated the EMG activity of nine common chest exercises. A team of researchers from the University of Wisconsin found that the bent-forward cable crossover produced nearly the same pectoralis major stimulation as the barbell bench press, which was rated the highest.
  • The beauty of the cable crossover is that you can adjust the pulleys to any height you want, which is why I recommend cable crossover 21s. You get the benefit of high, mid-level, and low crossovers in one triset, attacking your chest from all angles. Remember to keep the arms and body stationary so that you perform the exercise from the shoulders. This will help maximize the stretch and contraction of the chest during each rep.

Mid Cable Crossover

Second 7 reps (middle position)

  • Move the cables to chest height, grab the handles, and get into the base position.
  • Push the handles out and in front of your chest with the palms facing each other.
  • Resist the weight as you open up in a wide arc. Pause when you feel a slight stretch in your chest, then squeeze back to the center with the elbows slightly bent and locked in place. Perform 7 reps in this position.

High Cable Crossover

Final 7 reps (high position)

  • Move the cables just above your head, grab the handles, and move back into the base position.
  • Press the handles down and in front of your upper abdominals with palms facing inward.
  • Open your arms back and up until you feel a good stretch across the pecs, pause, and then squeeze back in and under your chest. Perform your last 7 reps in this position.

Kettlebell Fly

  • Kettlebells are harder to grip than dumbbells, which makes you work harder for each rep. Using kettlebells for chest flyes will cause your pecs to recruit more muscle fibers to fight the weight hanging below your palms. Start with kettlebells that are 10 pounds lighter than what you would use on a standard dumbbell fly.
  • If you find yourself bending your elbows during the lowering phase, choose a lighter weight to ensure proper form. You want this to be a full-range fly, not a half-fly, half-press.

Execution

Kettlebell Fly

  • Hold the kettlebells over your chest as you did in the press, but turn your palms to face each other.
  • Using a wide arc from the shoulders, lower your arms with elbows slightly bent until you feel a good stretch across the chest. Pause and contract the pecs against the extra resistance that the kettlebells provide at the bottom range.
  • Squeeze your pecs as you bring your arms back up in a wide hugging motion. Keep your shoulders back and squeeze your pecs together at the top of the motion.

Forward-Leaning Dip

  • The dip is no joke. It’s a tough compound exercise that makes great use of your bodyweight. However, dips are usually performed in an upright position to target the triceps. By simply adding a forward lean to this already-effective exercise, you’ll stimulate more chest activity.
  • You can attempt to do this on your own, but if you really want to get the proper angle you’ll need a training partner to help you get into the right position. You can easily make it more challenging by adding weight via chains or a belt.
  • A word of caution for people with any shoulder issues Start with a small range of motion and listen to your body to determine how deep you can go. I always advise getting a full range of motion, but not at the risk of injury.

Execution

Low Cable Crossover, First 7 reps (low position)

  • Starting with the cables in the lowest position, grab the handles and move into a staggered stance with one foot forward and one foot back. Lean forward slightly from the hip. This is your base position for all three movements.
  • With the handles out at your sides and an underhand grip, squeeze the cables up and in to eye level using a scooping motion. Perform 7 reps in this position.

Foward-Leaning Dip

  • Place your hands on the bars and push yourself up until your elbows are locked. Cross your legs back with your knees bent, core tight, and hamstrings and glutes braced.
  • Have your training partner hold and pull your legs back until you’re in a forward-leaning position, using just enough assistance to get you into the right angle. Your body should be at approximately a 30-degree angle to the ground.
  • Lower yourself until your shoulders are lower than your elbows, or you feel a good stretch across the chest. Listen to your body and don’t push through shoulder pain.
  • Push yourself up by extending your elbows to 180 degrees for a full range of motion. Visualize the pec squeeze as you drive up.


References

What Exercise Strengthens Pectoralis Major


Loading

If the article is helpful, please Click to Star Icon and Rate This Post!
[Total: 0 Average: 0]

Can you walk with a Jumper’s the knee?

Can you walk with a Jumper’s the knee?/Jumper’s the knee also called patellar tendinopathy, is a painful condition of the knee caused by small tears in the patellar tendon that mainly occurs in sports requiring strenuous jumping. The tears are typically caused by accumulated stress on the patellar or quadriceps tendon. As the name implies, the condition is common in athletes from jumping sports such as volleyball, track (long and high jump), and basketball. The condition has a male predominance. Contrary to traditional belief, the jumper’s knee does not involve inflammation of the knee extensor tendons.

Jumper’s knee, or patellar tendinopathy (PT), is a chronic overuse injury of the patellar tendon. The prevalence is particularly high in jump sports athletes, such as in elite basketball players and volleyball players, respectively 32% and 45 %. However, also the prevalence among non-elite athletes is substantial and varies between 14.4% and 2.5% for different sports. Athletes with PT are often forced to reduce their training and competition levels because of patellar tendon pain. In some cases, athletes even have to quit their sporting activities. It is without a doubt that this condition can have an enormous impact on sports participation.

Stages of Jumper’s Knee

Depending on the duration of symptoms, jumper’s knee can be classified into 1 of 4 stages

  • Stage 1 – Pain only after activity, without functional impairment
  • Stage 2 – Pain during and after activity, although the patient is still able to perform satisfactorily in his or her sport
  • Stage 3 – Prolonged pain during and after activity, with increasing difficulty in performing at a satisfactory level
  • Stage 4 – Complete tendon tear requiring surgical repair

Can you walk with a Jumper's the knee?

Causes of Jumper’s Knee

It is an overuse injury from repetitive overloading of the extensor mechanism of the knee. The microtears exceed the body’s healing mechanism unless the activity is stopped.

  • Running – Jumping or bounding are more common overall than Running
  • Athletes in jumping sports – High jump, Basketball, Football, Gymnastics
  • Pain after Exercise, especially prolonged Exercise and with knee flexion
  • Quadriceps tightness or weakness
  • Hamstring tightness
  • Ankle dorsiflexion muscle weakness (from prior ankle injury)
  • Overweight (increased BMI)
  • Systemic lupus erythematosus
  • Rheumatoid arthritis
  • Diabetes mellitus
  • Paget’s disease
  • Knee local corticosteroid injections and repetitive trauma to the knee extensor tendon
  • Leg Length Discrepancy
  • Pes Cavus
  • Insidious overall onset
  • Later – During Exercise and while at rest
  • Among the risk factors for patellar tendonitis are low ankle dorsiflexion, weak gluteal muscles, and muscle tightness, particularly in the calves, quadriceps muscle, and hamstrings.[rx]

Symptoms of Jumper’s Knee

Tenderness on palpation of the tendon, together with a characteristic history
  • Pain and tenderness around your patellar tendon.
  • Swelling.
  • Pain with jumping, running or walking.
  • Pain when bending or straightening your leg.
  • Tenderness behind the lower part of your kneecap.
  • pain below the kneecap, especially during sports, climbing stairs and bending the knee
  • A swollen knee joint
  • Knee stiffness
  • Leg or calf weakness
  • Pain when bending the knee
  •  Strength – Knee extension weakness and Predisposing findings
    • Ankle dorsiflexion weakness
    • Hamstring tightness
    • Heel cord tightness
    • Quadriceps muscle tightness
  • Pain and decreased depth on single leg decline squat (LR+ 4 and LR- 0.5)
    • Extend unaffected knee
    • Squat with the affected leg

Diagnosis of Jumper’s Knee

Physical exam

  • Tenderness to palpation of the patellar tendon, just inferior to the patella, is the hallmark of the diagnosis. A clinical pearl is to palpate the tendon with the knee in extension as opposed to flexion. Palpation in flexion may mask a subtle jumper’s knee.
  • The patient may also have swelling of the tendon, and crepitus of the tendon with motion. Patients will also have pain with resisted knee extension.
  • A thorough knee exam including palpation of the joint lines, ligamentous and patellar stability and range of motion should also be performed to rule out other pathology.

Differential Diagnosis

Patellar tendon rupture

  • It can occur as an acute injury. Patients will have sudden, severe pain in the front of their knee and their knee will buckle. A defect can usually be appreciated in the patellar tendon, though sometimes this is difficult to assess if severe swelling is present. The patient will not be able to perform a straight leg raise, and they will have an extensor lag (lack of full active extension in the setting of full passive extension).
  • X-rays will show patella Alta (or high riding patella), and MRI will show the patellar tendon tear. Patients with patellar tendon ruptures should be placed in a knee immobilizer and referred to an orthopedic surgeon for urgent repair.

Patella fracture

  • It can occur as an acute injury. The patient will have pain over the patella itself. Diagnosis is usually made on an x-ray. Place in a knee immobilizer and refer to an orthopedic surgeon.

Patella chondromalacia (patellofemoral syndrome)

  • Presents with anterior knee pain. Pain is particularly bad with going up and downstairs. The pain with this condition is more proximal than with the jumper’s knee, and patients usually have no tenderness to palpation of the patellar tendon on the exam. Most often this is a diagnosis of exclusion.

Meniscus tears

  • Will have pain along the joint line. The pain is usually more lateral or medial than the jumper’s knee, but on occasion, the pain can be in the midline. Patients usually complain of clicking or popping in their knees. An MRI is diagnostic.

Fat pad syndrome

  • Inflammation of the fat pad that lies deep to the patellar tendon. Symptoms can be similar to jumper’s knee, but pain is around the tendon, and not on it. This may represent a spectrum of jumper’s knee and not a distinct entity. Regardless, the initial treatment is the same as that for the jumper’s knee.

Bone lesions

  • Tumors or infections are rare causes of anterior knee pain.

Radiograph

  • X-rays are usually negative for patients with jumper’s knee. On occasion, the x-ray can show shadows consistent with soft tissue swelling around the patellar tendon. In chronic cases, the x-ray may show calcifications in the patellar tendon. X-rays are most useful for ruling out concomitant pathology.

Advanced imaging

  • An MRI is usually not necessary in the early stages of the disease when the diagnosis is obvious on clinical exam. For more severe or chronic cases, an MRI can show if there are tears in the patella tendon. MRI’s are also most useful for ruling out concomitant pathology. For patients that cannot obtain an MRI, an ultrasound can also be diagnostic. However, an ultrasound will give limited information on intra-articular pathology.

Treatment of Jumper’s Knee

Treatment of Jumper’s Knee

Treatment for jumper’s knee includes

  • Rest and take a break from sports
  • Ice
  • Taping or wearing a knee support or strap just under the patella
  • Sitting with the leg raised
  • Massage therapy
  • Strengthening and stretching muscles through physical therapy or an at-home exercise program

Medication

  • Topical Medications – These prescription-strength creams, gels, ointments, patches, and sprays help relieve pain and inflammation through the skin.
  • NSAIDs – Prescription-strength drugs that reduce both pain and inflammation. Ibuprofen to help with pain and swelling. Pain medicines and anti-inflammatory drugs help to relieve pain and stiffness, allowing for increased mobility and exercise. There are many common over-the-counter medicines called non-steroidal anti-inflammatory drugs (NSAIDs). They include etodolacaceclofenacetoricoxib, ibuprofen, and naproxen.
  • Calcium & vitamin D3 – To improve bone health and healing tendon. As a general rule, men and women age 50 and older should consume 1,200 milligrams of calcium a day, and 600 international units of vitamin D a day.
  • Glucosamine & DiacereinChondroitin sulfate – can be used to tightening the loose tendon, cartilage, ligament, and cartilage, ligament regenerates cartilage or inhabits the further degeneration of cartilage, ligament.

Jumper’s Knee Surgery

  • If your injury is severe and other treatments have failed, you may be required to have surgery. The procedure consists of the doctor making a longitudinal or transverse incision over the patella tendon and then removing the abnormal tissue. After the surgery, it could take anywhere from 6 to 12 months to fully recover and begin training again. You should check with your doctor before beginning rehab and strengthening exercises after surgery.


Physical Therapy for Jumper’s Knee

Most patients respond to a conservative management program such as the one suggested below.

  • Activity modification – Decrease activities that increase kneecap and upper leg pressure (for example, jumping or squatting). Certain “loading” exercises may be prescribed.
  • Cryotherapy – Apply ice for 20 to 30 minutes, 4 to 6 times per day, especially after activity.
  • Joint motion and kinematics assessment – Hip, knee, and ankle joint range of motion are evaluated.
  • Strengthening – Specific exercises are often prescribed.
  • Other sport-specific joint, muscle, and tendon therapies may be prescribed.
  • Ultrasound or phonophoresis (ultrasound delivered medication) – may decrease pain symptoms. A special brace with a cutout for the kneecap and lateral stabilizer or taping may improve patellar tracking and provide stability. Sometimes arch supports or orthotics are used to improve foot and leg stability, which can reduce symptoms and help prevent future injury.

 The treatment of jumper’s knee is often specific to the degree of involvement.

Stage 1

  • Stage I, which is characterized by pain only after activity and no undue functional impairment, is often treated with cryotherapy. The patient should use ice packs or ice massage after terminating the activity that exacerbates the pain and later again that evening. If aching persists, a course of regularly prescribed anti-inflammatory medications should be administered for 10 to14 days.

Stage II

  • In stage II, the patient has pain both during and after activity but is still able to participate in the sport satisfactorily. The pain may interfere with sleep. At this point, activities that cause increased loading of the patellar tendon (for example, running or jumping) should be avoided.
  • A comprehensive physical therapy program, as discussed above, should be implemented. For pain relief, the knee should be protected by avoiding high loads to the patellar tendon, and cryotherapy should continue. The athlete should be instructed in alternative conditioning to avoid injury to the affected area.
  • Once the pain improves, therapy should focus on knee, ankle, and hip joint range of motion, flexibility, and strengthening. If the pain becomes increasingly intense and if the athlete becomes more concerned about his or her performance, a local corticosteroid injection may be considered. The doctor will explain the pros and cons of these injections.

Stage III

  • In stage III, the patient’s pain is sustained, and performance and sport participation are adversely affected. Though discomfort increases, therapeutic measures similar to those described above should be continued along with not participating in activities that may worsen or prevent recovery from the injury. Relative rest for an extended period (for instance 3 to 6 weeks) may be necessary for stage III. Often, the athlete will be encouraged to continue an alternative cardiovascular and strength-training program.
  • If the condition does not improve with treatment, surgery may be considered. Some athletes will not be able to continue to participate in activities that worsen or prevent recovery from the problem.
Stage IV

  • Tendon rupture requires surgical repair.

Medical Issues and Complications

  • Knee immobilization is not recommended because it results in stiffness and may lead to other muscle or joint problems, further prolonging an athlete’s return to activity.

Consultations

  • Consultation with a physical medicine and rehabilitation specialist or an orthopedic specialist is recommended, particularly for Stage I cases that do not respond to conservative treatment and more severe cases (Stages II, III, and IV). Primary care sports medicine physicians can also be consulted.

Recovery Phase

Physical Therapy

  • An in-depth, stage-specific description of a conservative therapy program is described above. In brief, in the recovery phase, the athlete and therapist should work to restore pain-free joint range of motion and muscle flexibility, symmetric strength in the lower extremities, and joint sensation. Sport-specific training, including high-level sport-specific exercises, should then be initiated.

Consultations

  • Consultation with a physical medicine and rehabilitation specialist or an orthopedic specialist is recommended, particularly for Stage I cases that do not respond to conservative treatment or more severe cases (Stages II, III, IV).

Surgical Intervention

  • Surgical intervention is indicated for stage IV, and refractory stage III tendinopathy as noted above.

Maintenance Phase

Physical Therapy

An in-depth, stage-specific description of a conservative therapy program is described above. Briefly, once in the maintenance phase, the athlete should complete a sport-specific training program before returning to competition. The physician and physical therapist can assist the athlete in determining when to return to competition based on the patient’s symptoms, current physical examination findings, and functional test results. Once the athlete returns to play, he or she must work to maintain gains in flexibility and strength.

Rehabilitation Exercises

Stretching – Stretch

  • (1) flexors of the hip and knee (hamstrings, gastrocnemius, iliopsoas, rectus femoris, adductors),
  • (2) extensors of the hip and knee (quadriceps, gluteals),
  • (3) the iliotibial band (a large tendon on the outside of the hip and upper leg), and
  • (4) the surrounding tissues and structures of the kneecap.

Stretching Exercises

Test Flexibility

  • Lay on a flat surface, like a bench or couch.
  • Pull your knee up to your chest with your leg bent at the knee and your hands gripped under the knee.
  • Starting with this will prepare you for other stretches.

Quadriceps Stretch

  • In a standing position bring your leg up behind you to hold your toes in your hand.
  • Try to keep your knees together and to pull your leg up straight behind you, not to the side.
  • You will feel a stretch at the front of the leg.
  • Try to hold this position for 10 seconds when you first begin rehab and work up to 30 seconds when inflammation has gone down.

Strengthening Exercises

Can you walk with a Jumper's the knee?

Thera-Band Knee Flexion (Prone)

  • Tie the TheraBand Resistance Band into a loop and secure one end close to the floor.
  • Lay on your stomach and place the other end of the loop around your ankle.
  • Begin with your knee straight and bend your knee against the band.
  • Hold and slowly return.

Thera Band Lunge

Can you walk with a Jumper's the knee?


  • Start in a standing position with one leg in front of the other.
  • Hold the ends of the TheraBand Resistance Band in each hand while standing in the middle of the band with the front foot.
  • Bend the front knee, so the thigh is horizontal while the back knee goes towards the floor.
  • Try not to rest your back knee on the floor, instead of hover over it.
  • Hold and return to the starting position.

Prevention of Jumper’s Knee

  • It’s important to warm up before and cool down after exercising to prevent patellar tendonitis
  • Wear shoes that fit well and support your arch
  • Gradually increase the intensity of your workouts to reduce your risk of injury.


References

Can you walk with a Jumper's the knee?


Loading

If the article is helpful, please Click to Star Icon and Rate This Post!
[Total: 0 Average: 0]

Prepatellar Bursitis; Causes, Symptoms, Diagnosis, Treatment

Prepatellar Bursitis is a condition where the bursa in the front of the kneecap gets inflamed. Bursae are little, jelly-filled sacs located throughout the body providing cushioning to the bones and soft tissues. However, sometimes the bursa may become irritated and produce too much fluid. This causes it to swell and puts pressure on the adjoining knee parts.

Bursitis is an inflammation in one of the small, fluid-filled sacs (bursae) often found near joints in the body. It can be very painful and limit mobility. The inflammation can result when too much pressure is put on one of these sacs (a bursa).

Bursae are fluid-filled sac-like structures located between mobile structures of the musculoskeletal system, between skin and bone, or between the joints. There are upward of 150 superficial and deep bursae located in between bone, muscle, tendons, and skin. Small amounts of synovial fluid are produced within the bursa and reduce friction by lubrication. Inflammation of the bursa causes excess fluid production and leads to swelling and irritation, known as bursitis. This inflammation can be caused by prolonged pressure, overuse, inflammatory and crystalloid arthritis, and direct injury or trauma. Common locations of bursitis include prepatellar, olecranon, and trochanteric.

Prepatellar Bursitis

Causes of Prepatellar Bursitis

  • Pressure from constantly kneeling down
  • Activities such as plumbing, gardening and roofing
  • A direct blow to the front of the knee
  • Direct fall on the knee in sports such as football and wrestling.
  • Health conditions such as Rheumatoid Arthritis or Gout
  • Bacterial infection through insect bite or wound
  • Direct trauma/blow to the anterior knee
  • Frequent falls on the knee
  • Constant friction – between the skin and the patella can be a cause of this condition. By the impact, the damaged blood vessels in the knee result in inflammation and swelling of the bursa. Actually, a bacterial seeding of the bursal sac caused by a hematoma is rare, because of the limited vascular supply of the bursal tissue.
  • Infection – Typically for a septic prepatellar bursitis is a break in the skin near the bursa, which leads to swelling and pain around this area. This happens when a bacteria (for example S.
  • Co-existing inflammatory disease– rheumatoid arthritis, gout etc.

Symptoms of Prepatellar Bursitis

  • Pain that increases after physical activity
  • Inflammation in the front of the kneecap
  • Difficulty in straightening or flexing the knee
  • Fluid and redness in the affected area
  • Fever
  • Swelling over, above or below the kneecap.
  • Limited motion of the knee.
  • Redness and warmth at the site of the bursa.
  • Painful movement of the knee.
  • Tenderness and warmth to touch
  • Painful and limited ROM at the knee
  • If the bursitis is caused by an infection, pain is associated with fever and chills.


Diagnosis of Prepatellar Bursitis

Routine blood work is somewhat unhelpful in the diagnosis and distinguishing septic bursitis versus non-infectious bursitis.

  • Blood count (WBC) – may not differ between infectious and non-infectious bursitis and may not even be elevated above the normal range.
  • C-reactive protein (CRP) – and erythrocyte sedimentation rate (ESR) usually are elevated in septic bursitis.
  • A uric blood acid – level should also be checked if suspicion of underlying crystal arthropathy exists.
  • Antinuclear antibody and rheumatoid factor – can be ordered in chronic cases or when the underlying autoimmune disease is suspected.
  • Ultrasound is particularly helpful for visualizing cobblestoning of the fat overlying a bursa, which can help differentiate cellulitis from infectious bursitis. Color Doppler can likewise be used to show signs of infection, such as hyperemia of the bursa and the surrounding tissues.
  • X-Ray Plain film radiography is usually performed, but it is unnecessary and unhelpful in most cases of septic bursitis. Spurs may be seen in chronic cases of bursitis, but joint effusions are not normally present.
  • Computed tomography (CT) and magnetic resonance imagining (MRI) – are not needed unless suspicion for osteomyelitis or septic arthritis exists, or if the physician is evaluating a severe case of septic bursitis in which surgical management may be necessary.
Prepatellar Bursitis

Quadriceps. femoris muscle. Tendon of. quadriceps. femoris muscle. Patella. Medial patellar. retinaculum. Lateral patellar. retinaculum. Tibial collateral. ligament. Fibular. collateral. ligament. Patellar ligament. Fibula. Tibia. (c) Anterior view of right knee. Figure 8.8c.

Treatment of Prepatellar Bursitis

Non-Surgical Treatment

The acronym P.R.I.C.E. can be used to remember an approach to treating muscle and joint injuries, especially sports-related injuries like strains and sprains. But this approach is also helpful for bursitis. P.R.I.C.E. stands for:

  • P as in protection _ This means protecting the affected area from pressure or bumps. A splint might be useful for this purpose. Walking aids are sometimes a good idea too, to help relieve the pressure on a leg or foot.
  • R as in rest – Make sure to rest the joint. Particularly if the bursitis is work-related, you may need a note from the doctor to take some time off. Physiotherapists and occupational therapists can offer more tips on what to be careful of at home or at work also in the long term, to prevent bursitis from coming back.
  • I as in ice – Cool packs or a moist, cooling wrap can relieve the symptoms. It’s important to wrap the ice or cool pack in a towel or cloth first. Never put it directly on your skin – it could harm the skin otherwise.
  • C as in compression – An elastic compression bandage that’s not too tight can prevent the inflamed area from becoming more swollen. Putting a tightly wrapped bandage or a special cuff around a joint such as an elbow or a knee will also automatically keep the joint from moving too much.
  • E as in elevating – If your knee or lower leg is affected, it can be helpful to put your feet up (elevate) several times a day to keep the swelling down.


Medication

Non-steroidal anti-inflammatory drugs (NSAIDs) can relieve pain, reduce inflammation and help keep swelling down. For this reason, some people take them in addition to following the P.R.I.C.E. treatment approach.

  • Antibiotics – Antibiotic therapy should initially be aimed at the most likely organisms and tailored as needed to gram-stain and culture results. Methicillin-resistant Staphylococcus aureus coverage with oral clindamycin, doxycycline, and trimethoprim-sulfamethoxazole is recommended for empiric therapy until culture results are finalized. If there is a severe local infection or in an immunocompromised patient, admission for intravenous vancomycin is most appropriate. For those patients with a penicillin allergy, the recommended treatment is ciprofloxacin and rifampin.
  • NSAIDsNon-steroidal anti-inflammatory drugs (NSAIDs) may be prescribed by the doctor to reduce pain and discomfort. Short-term use of an anti-inflammatory drug, such as aspirin, ibuprofen or naproxen sodium can help relieve pain.
  • Corticosteroid medication –Tablet form corticosteroid can be used depending on the condition of the patient, the doctor may sap the bursa with the help of a needle and inject it with corticosteroid medication. This brings down the swelling to a great extent.
  • Draining the bursa – The more the fluid builds up in the bursa, the more it swells up, and the more painful it becomes. A doctor can puncture the bursa with a hollow needle (cannula) to draw out the excess fluid. But this technique is usually not a permanent solution – even when repeated several times: The fluid quickly fills up again, and each time it is drained there is a risk that bacteria could infect the bursa. This procedure can also be done to find out whether bacteria are involved. The fluid that is taken is then tested for germs in a lab.
  • Steroid injections – If a bursa has become inflamed following overuse and doctors are certain that bacteria are not involved, steroids can be used to treat the inflammation. The drug is injected right into the bursa. Usually, these steroid injections are only given if other treatments haven’t led to improvement after about ten days. They may cause an infection or loss of tissue.

Physiotherapy

Many patients with knee bursitis start to feel better within a few weeks of the injury. Your physiotherapy treatment will aim to

  • Reduce pain and inflammation, this is achieved with the application of electrical modalities, ice, therapeutic taping and education regarding activity modification
  • Normalize your knee joint range of motion.
  • Strengthen your knee muscles, quadriceps, and hamstrings.
  • Strengthen your lower limb, calves, hip, and pelvic muscles.
  • Normalize your muscle lengths.
  • Improve your proprioception, agility, and balance.
  • Improve your technique and function walking, running, squatting, hopping and landing.
  • Minimize your chance of re-aggravation.

Surgical Treatment

If the swelling persists, surgical removal of the bursa may be required to treat the condition. This helps the incomplete recovery of the patient from Kneecap Bursitis.

Home Remedies of Prepatellar Bursitis

  • Rest your knee – Discontinue the activity that caused knee bursitis and avoid movements that worsen your pain.
  • Apply ice – Apply an ice pack to your knee for 20 minutes at a time several times a day until the pain goes away and your knee no longer feels warm to the touch.
  • Apply compression –  Use of a compressive wrap or knee sleeve can help reduce swelling.
  • Elevate your knee – Prop your affected leg on pillows to help reduce swelling in your knee.
  • Put ice or a cold pack on your kneecap for 10 to 20 minutes at a time. Put a thin cloth between the ice and your skin.
  • After 3 days of using ice, you may use heat on your kneecap. You can use a hot water bottle, a heating pad set on low, or a warm, moist towel.
  • Prop up the sore leg on a pillow when you ice it or anytime you sit or lie down during the next 3 days. Try to keep it above the level of your heart. This will help reduce swelling.
  • Rest your knee. Stop any activities that cause pain. Switch to activities that do not stress your knee.
  • Take your medicines exactly as prescribed. Call your doctor or nurse call line if you think you are having a problem with your medicine.
  • To prevent and ease kneecap bursitis during work, play, and daily activities:
    • Wear kneepads when kneeling on hard surfaces. Avoid kneeling for too long at a time.
    • Strengthen and stretch your leg muscles.
    • Avoid deep knee bends.
  • You can slowly return to the activity that caused the pain, but do it with less effort until you can do it without pain or swelling. Be sure to warm up before and stretch after you do the activity


Prevention of Prepatellar Bursitis

To avoid knee bursitis or prevent its recurrence:

  • Wear kneepads – If you’re working on your knees or participating in sports that put your knees at risk, use padding to cushion and protect your knees. Use kneepads or supports for any sports, work, or household tasks that strain your knees.
  • Take breaks – If you’re on your knees for a period of time, take regular breaks to stretch your legs and rest your knees.
  • Avoid excessive squatting – Excessive or repetitious bending of your knees increases the force on your knee joints.
  • Achieve and maintain a healthy weight – This can help take the pressure off your knee joint.
  • Rest your knees from time to time. Stretch them so they stay limber. Don’t overdo it. If one type of exercise leaves you hurting, try something else. Ice your sore joint after activity.
  • Sit, don’t squat. Use a stool when you weed the garden. You’ll put less strain on your knees.
  • Stay at a healthy weight. Extra pounds put added pressure on your knees and could make your joint problems worse.

References

Prepatellar Bursitis


Loading

If the article is helpful, please Click to Star Icon and Rate This Post!
[Total: 0 Average: 0]

Swimmer’s Shoulder; Causes, Symptoms, Treatment

Swimmer’s shoulder is an umbrella term covering a range of painful shoulder overuse injuries that occur in swimmers. Because there are various parts of your shoulder that can be injured from your swimming stroke, your pain can be anything from a local pain near the shoulder joint, to a spreading pain that travels up your shoulder and neck or down into your arm. Being an overuse injury, it is caused by repeated trauma rather than a specific incident.

Swimmers have a significant potential for shoulder injuries due to the unique nature of the different strokes involved in swimming as well as the high volume of repetitions needed during training. Swimmer’s shoulder is a term that can represent numerous shoulder pathologies. These include impingement syndrome, rotator cuff tendinitis, labral injuries, instability secondary to ligamentous laxity or muscle imbalance/dysfunction, neuropathy from nerve entrapment, and anatomic variants. In order for the athlete to return to the sport in an appropriate and timely manner, the clinician must be able to differentiate between these different etiologies. 

Swimmer’s shoulder is the term used to describe the problem of shoulder pain in the competitive swimmer. Swimming is an unusual sport in that the shoulders and upper extremities are used for locomotion, while at the same time requiring above average shoulder flexibility and range of motion (ROM) for maximal efficiency. This is often associated with an undesirable increase in joint laxity. Furthermore, it is performed in a fluid medium, which offers more resistance to movement than air. This combination of unnatural demands can lead to a spectrum of overuse injuries seen in the swimmer’s shoulder, the most common of which is rotator cuff tendinitis.

Pathophysiology

Swimming strokes can be broken down into pull-through and recovery phases. The latissimus dorsi and the pectoralis major are the primary contributors to the propulsive forces of the swim stroke by adduction and internal rotation. The subscapularis and serratus anterior muscles also play an integral role in the freestyle stroke.  The freestyle stroke can be divided into six distinct parts/phases:

  • Hand entry
  • Forward reach
  • Pull through
  • Middle pull through
  • Hand exit
  • Middle recovery

It is important for the athlete to have a properly balanced shoulder regarding muscle strength. Improper muscle balancing can cause the onset of shoulder pain.  An absolute or sudden increase in training yardage and poor technique can also be associated with the onset of pain. The coaching staff can observe a dropped elbow during the recovery phase of the freestyle stroke as one of the early signs of possible injury.

Causes of Swimmer’s Shoulder

  • Overtraining
  • Not enough rest periods
  • Poor stroke mechanics
  • Poor breathing technique
  • Poor flexibility or range of motion
  • Decreased rotator cuff or shoulder blade (scapular muscle) strength
  • Poor core strength or stability
  • Decreased hip muscle strength
  • Shoulder pain in swimmers includes subacromial impingement,
  • Rotator cuff tendinopathy, labral pathology,
  • Suprascapular nerve entrapment, or any combination thereof.
  • Additionally, an injury may be accompanied or exacerbated by structural abnormalities including scapular dyskinesis, glenohumeral hyperlaxity, excess subluxation, glenohumeral internal rotation deficit (GIRD), or muscle strength imbalances.

Symptoms of Swimmer’s Shoulder

The most common swimmer’s shoulder symptoms include:

  • Reduced range of motion in your shoulder compared to your other shoulder.
  • Increased joint laxity than with the other shoulder.
  • Reduced strength when compared with your other shoulder.
  • If you’re experiencing shoulder pain while swimming, you should consult with a shoulder expert as soon as possible to avoid the problem from becoming worse stop swimming and rest your shoulder to help reduce the inflammation
  • Localized pain is felt in the affected part of the shoulder
  • Pain may extend to the neck and/or down the arm in some cases
  • Pain worsens while resting on the affected shoulder
  • Tenderness of the affected area
  • Decreased range of movement
  • The decrease in shoulder strength
  • Increased joint laxity

Technically speaking, some common characteristics of swimmer’s shoulder are

  • Bicep and supraspinatus tendon inflammation within the subacromial muscles in the back leading to shoulder impingement syndrome.
  • Training errors, like overloading, overtraining and particularly poor stroke technique.
  • The onset of symptoms tends to be linked with altered shoulder joint mobility, posture, muscle performance or neuromuscular control.
  • Many swimmers have innate ligamentous laxity while also having multidirectional shoulder instability, or basically, more joint movement.
  • However, due to the nature of swimming, all swimmers can develop imbalances in the muscle where the internal rotators and adductors of the arm over-develop. This can leave a weakness of the scapular stabilizers and external rotators, unfortunately, because they’re not being used as much.

Diagnosis of Swimmer’s Shoulder

  • Physical examination is the first step in the process of diagnosis
  • X-rays and other imagining techniques may be needed to assess the changes in the structure of the joint
  • The doctor may check for any change in the pattern of swimming stroke
  • The presence of ‘lazy elbow’ where the elbow on the affected side cannot be lifted to the normal height out of the water.

Shoulder Apprehension Test

  • Place the shoulder in maximum abduction and external rotation (90-90 position) and apply an anteriorly-directed force to the shoulder from behind. To be positive, it must elicit a feeling of apprehension or instability. Generally, the only discomfort is seen in swimmers rather apprehension or sense of instability.

Load and Shift Test

  • With the patient seated, stabilize the scapula to the thorax with one hand, while the other hand is placed across the posterior glenohumeral joint line and humeral head, and the webspace across the patient’s acromion. The index finger should the over the anterior GH joint line.
  • Load and shift of the humeral head across the stabilized scapula in an anteromedial direction to assess anterior stability, and in a posterolateral direction to assess posterior instability is done. Normal motion anteriorly is half of the distance of the humeral head, more movement is considered to be a sign of glenohumeral joint laxity.

Strength Assessment of Rotator Cuff

Subscapularis

  • Internal rotation movement against resistance
  • Lift-off test
    • Shoulder in internal rotation with the back of the patient’s hand against the small of the back.
    • The patient attempts to lift the hand away from the back against the examiner’s resistance.

Infraspinatus, teres minor

  • External Rotation against resistance [shoulder in the neutral position at the side and the elbow flexed to 90°.

Supraspinatus

  • Resisted shoulder elevation with the arms extended, internally rotated, and positioned in the scapular plane (approximately 30-45° anterior to the coronal plane).
  • If weak, retest the supraspinatus in the same arm position except with the arms externally rotated (ie, thumbs pointing upwards).

Sulcus Sign [Assessment of Joint Laxity]

The arm is pulled inferiorly and gap or sulcus is looked between the humeral head and lateral edge of the acromion. This indicates the inferior subluxation of the humeral head.

  • Grade 1 – Less than 1 fingerbreadth (< 1 cm)
  • Grade 2 – One fingerbreadth (1-2 cm)
  • Grade 3 – Greater than 1 fingerbreadth (> 2 cm)

Compare to the opposite shoulder (should be similar). If not then consider unilateral traumatic injury. In addition, check for generalized ligamentous laxity.

Tests for Labral Tear

  • A labral tear is suggested by a painful click that is noted during the recovery phase of an overhand stroke. Often, this click can be reproduced during the exam.

O’Brien test for Labral Tear [SLAP Lesion]

  • A downward force is applied with the extent in the forward flexed position, adducted 15° toward the midline, with the shoulder in the maximal internal rotation (thumb pointing down). A pain that occurs in this position and relieved when external rotation is done suggests a SLAP lesion.

Positive Neer impingement test

If a subacromial injection relieves pain associated with passive forward flexion >90°

  • Positive Hawkins test – positive if internal rotation and passive forward flexion to 90° causes pain
  • Jobe test – pain with resisted pronation and forward flexion to 90° indicates supraspinatus pathology
  • Painful Arc Test – pain with the arm abducted in the scapular plane from 60° to 120°  
  • Yocum Test – positive if pain reproduced with elbow elevation while ipsilateral hand placed on the contralateral shoulder. sensitive but nonspecific
  • Internal Impingement test – positive if the pain is elicited with the abduction and external rotation of the shoulder
  • Take medical history, with emphasis on pain, sleep disturbance, loss of function and treatments.
  • Perform a physical examination, documenting the range of motion, strength and shoulder impingement signs.

X-rays

  • X-rays are performed to rule out bony causes of shoulder pain like a stress fracture or lesion or loose body. X-rays should be obtained if the pain persists after 6 weeks of rest and rehabilitation.
  • The desirable x-rays are anteroposterior (AP) y-scapular or outlet view and axillary view of the shoulder.

Magnetic Resonance Imaging

  • MRI is able to tell about rotator cuff pathology and status of the bones, ligaments, and other tendons in the shoulder.
  • But in most of cases, the MRI is normal or in some cases may demonstrate some increased signal in the substance of the supraspinatus tendon. Fluid in the subacromial bursa may signify bursitis. MRI arthrogram with intraarticular gadolinium is able to depict labral tear.

Diagnostic Subacromial Injection

  • Subacromial injection of an anesthetics agent like lignocaine can be used for diagnosis. Immediate relief of pain following the injection suggests an injury of the rotator cuff and/or the overlying bursa. Intra-articular injection providing relief, on the other hand, suggests intraarticular pathology.


Treatment of Swimmer’s Shoulder

Swimmers Shoulder Treatment Options

  • Rest is important to allow the joint to heal
  • Application of ice packs may be recommended to reduce pain and inflammation
  • Sling or shoulder tape may give adequate support
  • Physiotherapy sessions may be recommended to improve strength and flexibility
  • Early Injury Treatment
  • Avoid the HARM Factors
  • Acupuncture and Dry Needling
  • Sub-Acute Soft Tissue Injury Treatment
  • Core Exercises
  • Scapular Stabilisation Exercises
  • Shoulder Exercises
  • Biomechanical Analysis
  • Proprioception & Balance Exercises
  • Medications
  • Posture Correction
  • Soft Tissue Massage
  • Brace or Support
  • Dry Needling
  • Electrotherapy & Local Modalities
  • Heat Packs
  • Joint Mobilisation Techniques
  • Kinesiology Tape
  • Neurodynamics
  • Prehabilitation
  • Scapulohumeral Rhythm Exercises
  • Strength Exercises
  • Stretching Exercises
  • Supportive Taping & Strapping
  • TENS Machine
  • Video Analysis
  • Yoga

Immediate Treatment

Identifying the involved tendons or muscles, the severity or stage of the problem and receiving proper diagnosis will result in the most efficient treatment. A proper plan of treatment includes:

  • Applying ice – Apply directly to the shoulder after training for around 20 minutes.
  • Use anti-inflammatory medications – Use for a few days after the injury to reduce inflammation.
  • Rest – This might mean total rest with no swimming for about 24 to 48 hours depending on the severity. Or, you may be able to swim, but decrease yardage while you avoid butterfly, backstroke or kicking only with your arms at your side. Wait a few days until you’re free of pain before you resume swim training.

Medication  

Your doctor may prescribe anti-inflammation pills. These could form a very important part of the treatment.

  • Analgesics – Prescription-strength drugs that relieve pain but not inflammation.
  • Antidepressants  – A Drug that blocks pain messages from your brain and boosts the effects of exorphins (your body’s natural painkillers).
  • Medication – Common pain remedies such as aspirinacetaminophen, ibuprofen, and naproxen can offer short-term relief. All are available in low doses without a prescription. Other medications, including muscle relaxants and anti-seizure medications, treat aspects of spinal stenoses, such as muscle spasms and damaged nerves.
  • Corticosteroid injections – Your doctor will inject a steroid such as prednisone into your back or neck. Steroids make the inflammation go down. However, because of side effects, they are used sparingly.
  • Manual Therapy – Your physical therapist may use manual techniques, such as gentle joint movements, soft-tissue massage, and shoulder stretches to get your shoulder moving properly so that the tendons and bursa avoid impingement.
  • Range-of-Motion Exercises –  You will learn exercises and stretches to help your shoulder and shoulder blade move properly, so you can return to reaching and lifting without pain.
  • Mobility and stretching – Stretches can be done on a daily basis assuming there is no pain. Stretching must be done regularly and continued throughout the rehabilitation process. Below are some important stretches would be performed in order to encourage a full range of motion and improved posture.

 Get professional passive care. This might include things like

  • Interferential current
  • Ultrasound
  • Trigger point work
  • Cross friction tendon massage
  • Adjustments to your neck or shoulder
  • Post-isometric relaxation of the muscles involved

Do rehabilitation exercises

  • These will strengthen your weak muscles (particularly your external shoulder rotators). You perform these exercises with minimal weights (three to five pounds) and perform them in an extremely controlled, specific manner. Perform these exercises a few times a week if you’ve ever had problems with your shoulders. Typically, it’s said that for each day you swim on a bad shoulder, you’ll require one day of rehab.

Modify your swimming training

  • It’s often said hand paddles aren’t good for your shoulders. But, Zoomers and other types of fins keep your body elevated in the water; therefore, they might help if you begin experiencing small problems with your shoulders during your workout. Ask the coach or a friend to check your body and arm position. They may even want to videotape you so you can take a look and the coach can discuss the stroke mechanics with you.

Shoulder Stretching and Dynamic Warm-Up

  • The shoulder is the most frequently stretched joint among swimmers. To date, swimmers have adopted stretches that target the static stabilizers of the GHJ. In the past, static stretches and pre-race rituals (i.e., ballistic windmill motion) were utilized in hopes of preventing injury [].
  • Recent research on swimmer’s flexibility suggests there is no indication that extraordinary shoulder joint motion or flexibility is necessary to achieve a fast, efficient stroke [, ]. In addition, there is no evidence that static stretching immediately before activity will reduce muscle injury rates [, ].
  • Many swimmers are generally flexible and possess loose connective tissue (general joint laxity) []. Because of their inherent laxity, swimmers should emphasize preserving the overall stability of the shoulder and less time on general static stretches [].
  • Instead, a dynamic warm-up has been found to produce short-term and long-term performance enhancements in power, agility, strength, muscle endurance, and anaerobic capacity [, , , ].
  • A dynamic warm-up tends to include some form of dynamic stretching, agility, and plyometric activities and specific motor pattern movements [].  Demonstrates dynamic warm-up which is specifically designed for the swimming population. Swimmers should employ a steady pace with each activity and avoid ballistic type motions.

Focused Strengthening Exercises

  • Dryland training has been an important part of strengthening programs among swimmers at different ages and skill levels. The main focus of these training programs seems to be the spine and core strengthening []. Strength deficits can play an important role in fatigue development.
  • The majority of swimmers demonstrated signs of scapular dyskinesis in the course of a 100-min swimming session []. Through EMG analysis of the painful shoulder, discovered muscle activity of the serratus anterior is significantly depressed through the important pull-through phase in swimmers with shoulder pain [].
  • Revealed in the course of a swim season the internal rotators of competitive swimmers become proportionally stronger when compared to their antagonists, increasing muscle imbalance, and the risk of an injury process [, ].
  • Fatigue may lead to a short-term decrease in acromiohumeral distance []. As a result, a dryland program focusing on the shoulder external rotators and the scapular stabilizers would be of benefit and should be recommended as routine prophylactic measures []. Strengthening internal rotators should be de-emphasized.

Rehabilitations of Swimmer’s Shoulder

Phase 1- Pain Relief and Anti-inflammatory Tip

As with most soft tissue injuries the initial treatment is RICE – Rest, Ice, Compression and Elevation.

  • In the early phase, you’ll most likely be unable to fully lift your arm or sleep comfortably. You should stop doing the movement or activity that provoked the shoulder pain in the first place and avoid doing anything that causes pain in your shoulder.
  • You may need to wear a sling or have your shoulder taped to provide pain relief. In some cases, it may mean that you need to sleep relatively upright or with pillow support.
  • Ice is a simple and effective modality to reduce your pain and swelling. Apply for 20-30 minutes every 2 to 4 hours during the initial phase, or when you notice that your injury is warm or hot.
  • Anti-inflammatory medication (if tolerated) and natural substances (eg arnica) may help reduce your pain and swelling. However, it is best to avoid anti-inflammatory drugs during the initial 48 to 72 hours when they may encourage additional bleeding. Most people can tolerate paracetamol as pain-reducing medication. As you improve, supportive taping will help to both support the injured soft tissue and reduce excessive swelling.

Your osteopath will utilize a range of pain relief techniques including joint mobilizations and massage to assist you during this painful phase.

Phase 2- Regain Full Range of Motion

  • If you protect your injured rotator cuff structures appropriately the injured tissues will heal. Inflammed structures eg (tendonitis, bursitis) will settle when protected from additional damage.
  • Symptoms related to swimmers’ shoulders may take several weeks to improve. During this time it is important to create an environment that allows you to return to normal use quickly and prevent a recurrence.
  • It is important to lengthen and orientate your healing scar tissue via joint mobilizations, massage, shoulder muscle stretches and light active-assisted and active exercises.
  • Researchers have concluded that osteopathic treatment will improve your range of motion quicker and, in the long-term, improve your functional outcome.
  • In most cases, you will also have developed short or long-term protective tightness of your joint capsule (usually posterior) and some compensatory muscles. These structures need to be stretched to allow normal movement.
  • Signs that you have full soft tissue extensibility include being able to move your shoulder through a full range of motion. In the early stage, this may need to be passively helped (by someone else) eg. your osteopath. As you improve you will be able to do this under your own muscle power.

Phase 3- Restore Scapular Control

Your shoulder blade (scapula) is the base of your shoulder and arm movements.

  • Normal shoulder blade-shoulder movement – known as scapulohumeral rhythm is required for a pain-free and powerful shoulder function. Alteration of this movement pattern results in impingement and subsequent injury.
  • Researchers have identified poor scapulohumeral rhythm as a major cause of rotator cuff impingement. Any deficiencies will be an important component of your rehabilitation. Plus, they have identified scapular stabilization exercises as a key ingredient for successful rehabilitation.

Phase 4- Restore Normal Neck Scapulo-Thoracic Shoulder Function

It may be difficult to comprehend, but your neck and upper back (thoracic spine) are very important in the rehabilitation of shoulder pain and injury.

  • Neck or spine dysfunction can not only refer pain directly to your shoulder, but it can affect a nerve’s electrical energy, causing weakness and altered movement patterns.
  • Plus, painful spinal structures from poor posture or injury do not provide your shoulder or scapular muscles with a solid pain-free base to act upon.
  • In most cases, especially chronic shoulders, some treatment directed at your neck or upper back will be required to ease your pain, improve your shoulder movement and stop the pain or injury returning.

Phase 5- Restore Rotator Cuff Strength

  • It may seem odd that you don’t attempt to restore the strength of your rotator cuff until a later stage in the rehabilitation. However, if a structure is injured we need to provide nature with an opportunity to undertake primary healing before we load the structures with anti-gravity and resistance exercises.
  • Having said that, researchers have discovered the importance of strengthening the rotator cuff muscles with a successful rehabilitation program. These exercises need to be progressed in both load and position to accommodate for which specific rotator cuff tendons are injured and whether or not you have a secondary condition such as bursitis.

Phase 6 – Restore Technique, Speed, Power, and Agility

Swimming requires repetitive arm actions, which place enormous forces on your body (contractile and non-contractile).

  • In order to prevent a recurrence as you return to swimming, your osteopath will guide you with exercises to address these important components of rehabilitation to both prevent a recurrence and improve your sporting performance.
  • Depending on what your training or competitive program entails, a speed, agility, technique correction, and power program will be customized to prepare you for swimming-specific training.

Phase 7 – Return to Swimming

  • Depending on the demands of your swimming season, you will require individual exercises and a progressed training regime to enable a safe and injury-free return to swimming.
  • Your osteopath will discuss your goals, time frames and training schedules with you to optimize you for a complete return to swimming.
  • The perfect outcome will have you performing at full speed, power, agility and function with the added knowledge that a thorough rehabilitation program has minimized your chance of future injury.


Prevention

Tips for Improving Stroke Mechanics

It’s important to gradually increase the intensity and length of swims to avoid overtraining. Allow the body proper rest periods between competitions and training sessions.

Below we’ve outlined the swim stroke techniques for each stroke to help prevent common swimming injuries.

Freestyle stroke

  • When breathing, keep the head in line with the body to avoid neck pain or numbness and tingling in the arms.
  • Rotate the body toward the breathing side to avoid turning the neck too far and over-reaching with the arms.
  • Breathe equally to both sides to prevent excess stress on one side of the neck.

Backstroke

  • Weak muscles in the front of the neck will tire more quickly than strong ones, resulting in neck soreness with increased laps.
  • Swimmers just starting to swim this stroke should gradually increase both distance and intensity.
  • Rotating the body properly with each stroke also will help decrease stress on the neck and shoulders.

Breaststroke

  • Keep the head in line with the body to avoid increased stress on the neck.
  • Strong thigh and hip muscles will make for a stronger kick and a faster swim.
  • Leg strength will also help decrease the stress and strain placed on the knees as swimming distance increases.

Butterfly

  • The proper timing of this stroke decreases the possibility of the neck, shoulder, or back pain.
  • Focusing on a strong kick and upper body will aid in body position, as well as breathing.

References


Loading

If the article is helpful, please Click to Star Icon and Rate This Post!
[Total: 0 Average: 0]

Latissimus Dorsi Muscle Pain; Causes, Symptoms

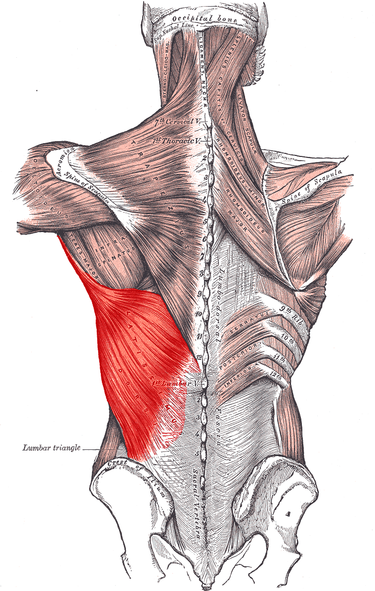
Latissimus Dorsi Muscle Pain/Latissimus Dorsi Muscle is a broad, flat muscle that occupies the majority of the lower posterior thorax. The muscle’s primary function is of the upper extremity but is also considered to be a respiratory accessory muscle. Due to this muscle’s broad attachment on the spinous processes, ongoing research is looking at what, if any, role the muscle plays in the trunk movement. Currently, the evidence is mixed on how much influence this muscle has on spine extension, lateral flexion, or rotation. Even though the muscle has a broad attachment to the trunk and strong actions on the humerus, the use of this muscle for surgical transposition appears to have a limited effect on or restriction of normal function.

The latissimus dorsi muscle is a broad, flat muscle that occupies the majority of the lower posterior thorax. The muscle’s primary function is of the upper extremity but is also considered to be a respiratory accessory muscle. Due to this muscle’s broad attachment on the spinous processes, ongoing research is looking at what, if any, role the muscle plays in the trunk movement. Currently, the evidence is mixed on how much influence this muscle has on spine extension, lateral flexion, or rotation. Even though the muscle has a broad attachment to the trunk and strong actions on the humerus, the use of this muscle for surgical transposition appears to have a limited effect on or restriction of normal function.

Origin of Latissimus Dorsi Muscle

Depending on the origin, one can distinguish four parts

  • Vertebral part – originating from the spinous processes of the 7th to 12th thoracic vertebrae and the thoracolumbar fascia
  • Iliacal part – starting from the iliac crest
  • Costal part – having origins from the 9th to 12th ribs
  • Scapular part – starting from the inferior angle of the scapula (inconstant)
  • Thoracolumbar fascia.
  • The inferior angle of the scapula.
  • Lower three or four ribs.

All fibers together attach to the floor of the intertubercular sulcus of the humerus between the pectoralis major and teres major. During its course, the fibers turn spirally around the teres major (torsion) so that the lower part of the latissimus dorsi inserts proximally at the humerus and the upper part more distally.

Insertion

The floor of the intertubercular (bicipital) groove of the humerus.

Actions of Latissimus Dorsi Muscle

Depression, adducts, extends and internally rotates the arm at the shoulder[rx]


Latissimus Dorsi Muscle

Primary Actions of the Latissimus Dorsi

Adduction of the arm at the shoulder

  • Agonists: Pectoralis Major, Teres Major, Triceps Brachii (long head)
  • Antagonists: Deltoid (middle) Supraspinatus

Extension of the arm at the shoulder

  • Angonists: Deltoid (posterior) Triceps brachii (long head), Pectoralis Major (sternal head)
  • Antagonists: Deltoid (anterior) Biceps brachii, Coracobrachialis, Pectoralis Major (clavicular head)

Internal rotation of the arm at the shoulder

  • Agonists: Subscapularis, Deltoid (anterior), Pectoralis Major, Teres Major
  • Antagonists: Infraspinatus, Teres minor, Deltoid (posterior)

Secondary Actions of the Latissimus Dorsi

Assists with the extension of the trunk

  • Agonists: Longissimus thoracis, Iliocostalis lumborum, Iliocostalis thoracic
  • Antagonists: Rectus abdominis

Assists with flexion of the trunk

  • Agonist: Rectus abdominis
  • Antagonists: Longissimus thoracis, Iliocostalis lumborum, Iliocostalis thoracic

Assists with lateral flexion of the trunk

  • Agonist: Quadratus lumborum, Rectus abdominis
  • Antagonists: Longissimus thoracis, Iliocostalis lumborum, Iliocostalis thoracic

Assists with anterior and lateral pelvic tilt

  • Agonist: Rectus abdominis
  • Antagonists: Semitendinosus, Semimembranosus, Biceps femoris

Assists with depression of the scapula

  • Agonists: Serratus Anterior (lower fibers), Trapezius (lower fibers), Pectoralis minor
  • Antagonists: Levator Scapulae, Trapezius (upper fibers)

Assist with protraction of the scapula

Assists with deep inspiration and forced expiration 

Latissimus Dorsi Muscle

Nerve supply of Latissimus Dorsi Muscle

The latissimus dorsi is innervated by the sixth, seventh, and eighth cervical nerves through the thoracodorsal (long scapular) nerve. Electromyography suggests that it consists of six groups of muscle fibers that can be independently coordinated by the central nervous system.[rx]

Blood Supply of Latissimus Dorsi Muscle

The thoracodorsal nerve runs with the thoracodorsal artery and vein to supply the latissimus dorsi muscle. The nerve is close to the lymphatic vessels of the axilla, which are relevant during axillary lymph node dissection procedures. The subscapular lymph nodes are located in the posterior axillary fold, receiving lymph from the posterior thoracic wall and scapular region. Injury to the thoracodorsal nerve during axillary lymph node dissection is less frequent than other complications, including lymphedema and seroma formation.


What are the Symptoms of Latissimus Dorsi Pain?

The latissimus dorsi muscle covers the width of the middle and lower back and is more commonly known as the lats.

It may be difficult to tell whether the pain is located in the latissimus dorsi or other muscles in the shoulders or back. When the latissimus dorsi is injured, a person may feel pain in several places, including

These could be symptoms of a more severe condition.

Causes of Latissimus Dorsi Muscle Pain

The most common causes of pain result from overuse of the muscle and poor technique when working out.

The latissimus dorsi is used in everyday activities, including:

  • expanding the chest for breathing
  • pushing against armrests of a chair to stand
  • weightlifting with the upper body
  • rowing
  • throwing
  • performing bench-presses
  • overuse of the muscle
  • poor technique
  • exercising without warming up
  • have poor posture
  • continually reach overhead
  • chop wood
  • frequently shovel
  • golf
  • play baseball
  • row
  • ski
  • swim
  • play tennis
  • do exercises such as pull-ups or lat pulldowns

It is possible to tear the latissimus dorsi, and athletes are at a particular risk. Some athletes most likely to injure this muscle include:

  • water skiers
  • golfers
  • pitchers
  • gymnasts

Treatment of Latissimus Dorsi Muscle Pain

Treating for latissimus dorsi pain usually involves rest and physical therapy. While you rest, your doctor may recommend something called the RICE protocol:

  • R: resting your back and shoulders from, and cutting back on, physical activities
  • I: icing the painful area with an ice pack or cold compress
  • C: using compression by applying an elastic bandage
  • E: elevating the area by sitting upright or placing pillows behind your upper back or shoulder

You can also take nonsteroidal anti-inflammatory drugs, such as aspirin or ibuprofen, to help with the pain. If you have severe pain, your doctor may prescribe something stronger. Alternative treatments, such as cryotherapy or acupuncture, may also help.

Exercises For Relief of Latissimus Dorsi Muscle Pain

Make a complete back workout by including exercises for your upper back and lower back.
  • One Arm Row on One Leg
  • Lat Pulls With Bands.
  • Barbell Rows
  • Dumbbell Pullovers
  • Renegade Row.
  • Pull-Ups
  • Dumbbell Rows.
  • One Arm Row.
  • Certain exercises can alleviate pain associated with the latissimus dorsi and strengthen the muscle to prevent further injury.
  • It is essential that a person consult an expert, such as a doctor or personal trainer, to ensure that the exercises are right for them and that they are using correct form.
  • The following two exercises can reduce latissimus dorsi pain. A doctor can recommend how often a person should perform these exercises. Never continue an exercise that is painful or too uncomfortable:

Back bow

Latissimus Dorsi Muscle Pain

The back bow yoga pose can help reduce pain and strengthen the muscle. This pose is often referred to as “the Superman,” because it resembles how he flies.

To perform back bow:

  • Lay facedown on a yoga mat.
  • Extend straightened legs and arms away from the body, so that the arms are in front of the head.
  • Use the back to raise the shoulders and extended limbs toward the ceiling.
  • Hold the position for 10 seconds before lowering.

Pelvic raise or lift

  • To perform this exercise, a person should:
  • Lay flat on the back with the arms at the sides.
  • Bend the legs so that the heels are closer to the buttocks.
  • Lift the pelvis toward the ceiling.
  • Slowly lower it to the floor, keeping the hands and feet in place.


Prevention

A person can make certain lifestyle changes to prevent latissimus dorsi pain. These include:

  • using proper form during sports and exercise
  • avoiding overuse of the muscle
  • applying a heating pad to the area before exercising
  • warming up and cooling down before and after a workout
  • stretching gently after warming up and before cooling down
  • staying hydrated
  • getting occasional massages

References

Latissimus Dorsi Muscle Pain


Loading

If the article is helpful, please Click to Star Icon and Rate This Post!
[Total: 0 Average: 0]

Treatment Rehabilitation of Triceps Tendon Rupture

Treatment Rehabilitation of Triceps Tendon Rupture/Triceps Tendon Tear is a large, thick muscle on the dorsal part of the upper arm. It often appears as the shape of a horseshoe at the back part of the arm. The main function of the triceps is for extension of the elbow joint. It is composed of three heads (tri = three, cep = head): a long head, a lateral head, and a medial head. The tendons all have different origins, but the three heads combine to form a single tendon distally. The long head originates from the infraglenoid tubercle of the scapula while both the lateral head and the medial head both originate from the humerus. The lateral intermuscular septum is what separates the dorsal part from the arm from the ventral part which is where the flexors of the arm are (biceps, brachialis, and brachioradialis). The three heads converge into a single tendon, and this tendon attaches to the proximal portion of the olecranon process (the bony prominence of the elbow) located on the upper portion of the ulna.

Triceps tendon tear is one of the least commonly recognized major tendon tears. Bilateral triceps tendon tears are especially rare. We present a case of simultaneous complete tears of bilateral triceps tendons secondary to a fall. The anatomy, etiology, image findings, and current literature are discussed.

Anatomy of Triceps Tendon Rupture

Long head—The origin of the long head is the infra-glenoid tubercle of the scapula. Because it attaches the scapula, the long head not only extends the elbow, but will also have a small action on the glenohumeral, or shoulder joint. With the arm adducted, the triceps muscle acts to hold the head of the humerus in the glenoid cavity. This action can help prevent any displacement of the humerus. The long head also assists with the extension and adduction of the arm at the shoulder joint. The lateral head is also active during extension forearm at the elbow joint when the forearm is supinated or pronated.

Medial head—The origin of the medial head is at the dorsal humerus, inferior to the radial groove, and connecting to the intermuscular septum. The medial head does not attach to the scapula and therefore has no action on the glenohumeral joint whether that be with stabilization or movement. The medial head is active, however during extension of the forearm at the elbow joint when the forearm is supinated or pronated.

Lateral head—The lateral head originates at the dorsal humerus as well, but unlike the medial head, it is superior to the radial groove where it fuses to the lateral intermuscular septum. This head is considered to be the strongest head of the three. It is active during the extension of the forearm at the elbow joint when the forearm is supinated or pronated.

Causes Of Triceps Tendon Rupture

  • Mechanism of injury – The two described mechanisms for acute tears of the triceps are direct contact trauma, such as a fall or hitting fixed resistance with the posterior elbow[,,,]. Weightlifting[,,,,] was the most common sport associated with acute tears and was often associated with a history of steroid use[,,]. American football[,] and general sports injuries[], as well as direct lacerations[] have all also been reported as mechanism
  • Trauma – Injuries to the triceps, such as a muscle tear from placing too much force on the muscle, can lead to pain.
  • Repetitive stress – Repeating the same shoulder motions, again and again, can stress your triceps muscles and tendons. Baseball, tennis, rowing, and weightlifting are examples of sports activities that can put you at risk for overuse tears. Many jobs and routine chores can cause overuse of tears, as well.
  • Lack of blood supply – As we get older, the blood supply in our triceps brachiilessens. Without a good blood supply, the body’s natural ability to repair tendon damage is impaired. This can ultimately lead to a tendon tear.
  • Bone spurs – As we age, bone spurs (bone overgrowth) often develop on the underside of the acromion bone. When we lift our arms, the spurs rub on the triceps brachii muscle. This condition is called shoulder impingement, and over time will weaken the tendon and make it more likely to tear.
  • Sudden forceful  fall down
  • Road traffic accident
  • Falls – Falling onto an outstretched hand is one of the most common causes of injury.
  • Sports injuries – Many Injury occurs during contact sports or sports in which you might fall onto an outstretched hand — such as in-line skating or snowboarding.
  • Motor vehicle crashes – Motor vehicle crashes can cause necks of femur fracture to break, sometimes into many pieces, and often require surgical repair.
  • Have osteoporosis –  a disease that weakens your bones
  • Eave low muscle mass or poor muscle strength – or lack agility and have poor balance (these conditions make you more likely to fall)
  • Walk or do other activities in the snow or on the ice – or do activities that require a lot of forwarding momenta, such as in-line skating and skiing
  • Wave an inadequate intake of calcium or vitamin D
  • Football or soccer, especially on artificial turf
  • Rugby
  • Horseback riding
  • Hockey
  • Skiing
  • Snowboarding
  • In-line skating
  • Jumping on a trampoline

Symptoms Of Triceps Tendon Rupture

Depending on the cause of your shoulder pain you may experience:

  • Pain deep in the shoulder joint, in the back or the front of the shoulder and the upper part of the arm. Sometimes the pain in the shoulder can be described as a ‘catching pain’. The location and type of pain is likely to relate to the structure causing the pain
  • Reduced movement, and pain when moving your shoulder.
  • The weakness of the shoulder/upper arm. Depending on the condition, there may be a sensation of the joint slipping out and back into the joint socket, or the shoulder can become completely dislodged (dislocated)
  • Sensations of pins and needles (tingling) and burning pain. This is more likely to be associated with nerves from the neck than the shoulder joint itself.
  • Lack of movement after a shoulder dislocation. This is usually due to pain. Complete rotator cuff tears and injury to the axillary nerve both cause weakness in moving the arm away from the body. These problems require close clinical examination.

Symptoms Of Triceps Tendon Rupture

  • Pain in the muscle after impact.
  • Pain and difficulty when lifting the arm to the side.
  • Tender to touch the muscle.
  • Bruising appears.
  • There may be some swelling.

Diagnosis of Triceps Tendon Rupture


Grading

While histologic grading of the severity of tendinopathic changes remains separate from the clinical presentation and MRI and/or intra-operative findings, there are some noteworthy pathologic patterns associated with increasing grades of severity of tendinopathy.

Grade 0

  • Tenocytes are normal in appearance
  • Myxoid degenerative material not present
  • Collagen remains arranged in tight, cohesive bundles
  • Blood vessels arranged inconspicuously between collagen bundles

Grade I

  • Tenocytes are rounded
  • Myxoid degenerative material present in small amounts between collagen bundles
  • Collagen remains arranged in discrete bundles, but a slight separation between bundles becomes apparent
  • Capillary clustering is evident (less than 1 cluster per 10 high-power fields)

Grade II

  • Tenocytes are rounded and enlarged
  • Myxoid degenerative material evident in moderate to large amounts
  • Collagen bundles lose discrete organization as the separation between individual fibers and bundles increases
  • Capillary clustering is increased (1 to 2 clusters per 10 high-power fields)

Grade III

  • Tenocytes are rounded and enlarged with abundant cytoplasm and lacuna
  • Myxoid degenerative material abundant
  • Collagen disorganized, loss of microarchitecture
  • Capillary clustering is increased (greater than 2 clusters per 10 high-power fields)

Bicipital groove palpation Direct palpation over the patient’s bicipital groove elicits a painful response in the setting of pathology.

Speed’s test – A positive test consists of pain elicited in the bicipital groove when the patient attempts to forward elevate the shoulder against examiner resistance; the elbow is slightly flexed, and the forearm is supinated.

Uppercut test  The involved shoulder is positioned at neutral, the elbow is flexed to 90 degrees, the forearm is supinated, and the patient makes a fist.  The examiner instructs the patient to perform a boxing “uppercut” punch while placing his or her hand over the patient’s fist to resist the upward motion. A positive test is pain or a painful pop over the anterior shoulder near the bicipital groove region.

Ferguson’s test The arm is stabilized against the patient’s trunk, and the elbow is flexed to 90 degrees with the forearm pronated. The examiner manually resists supination while the patient also externally rotated the arm against resistance. A positive test is noted if the patient reports pain over the bicipital groove and/or subluxation of the LHB tendon.

Dynamic tests for bicipital groove symptoms

  • The examiner brings the patients shoulder to 90 degrees of abduction and 90 degrees of external rotation. The examiner passively rotates the shoulder at this position in an attempt to elicit the patient-reported audible “popping” or “clicking” sensations. Sometimes passively maneuvering the shoulder from the extension to cross-body plan is helpful in eliciting instability symptoms.
  • At the 90/90 shoulder abduction/external rotation position, the patient is asked to “throw forward” while the examiner resists this forward motion. A positive test for groove pain must be localized to the anterior aspect of the shoulder to enhance diagnostic sensitivity and specificity.

Other Changes Associated with Tendinopathy

Tenosynovium

  • Irrespective of histologic grade of tendinopathy, the surrounding bicipital sheath/synovium demonstrates varying degrees of synovial hypertrophy, hyperplasia, and proliferation

Low-Grade Degenerative Tendinopathy

  • Total cellularity (cell density, cells/ mm): Minimal increase
  • Apoptotic index (percent relative to the total number of cells counted): Minimal increase

Moderate Grade Degenerative Tendinopathy

  • Total cellularity (cell density, cells/ mm): Peak increase
  • Apoptotic index (percent relative to the total number of cells counted): Moderate increase

Severe Grade Degenerative Tendinopathy

  • Total cellularity (cell density, cells/ mm): Decreases
  • Apoptotic index (% relative to the total number of cells counted): Peak increase

Histologic studies have consistently reported that irrespective of patient age, the severity of symptoms, and duration of symptoms, acute inflammatory changes are rarely evident upon histologic specimen analysis.

In 2004, Habermeyer and colleagues identified 4 different subtypes of soft tissue injury groups. These types were similar to those described by Braun and colleagues, also noting 4 different types of soft tissue pulley lesions during shoulder arthroscopy.

  • Type I SGHL lesion, isolated
  • Type II SGHL lesion and partial articular-sided supraspinatus tendon tear
  • Type III – SGHL lesion and deep surface tear of the subscapularis tendon
  • Type IV – SGHL lesion combined with a partial articular-sided supraspinatus and subscapularis tendon tears

Bennett’s classification system subdivides biceps soft tissue pulley lesions into types I to V.

  • Type I  Intra-articular subscapularis injury
  • Type II – Medial band of CHL incompetent
  • Type III – Subscapularis and the medial band of the CHL are both compromised; LHBT dislocates intra-articularly, medially
  • Type IV  A lateral band of CHL along with a leading-edge injury of the subscapularis; Can lead to LHBT dislocation anterior to the subscapularis
  • Type V – All soft tissue pulley components are disrupted

Walch classified biceps pulley lesions based on the observed LHBT instability pattern.

  • Type I  SGHL/CHL injury; Superior LHBT subluxation at the proximal groove entrance; Subscapularis remains intact, preventing frank LHBT dislocation
  • Type II  At least partial subscapularis injury is seen in association with the onset of pathology; Medial LHBT subluxation or dislocation
  • Type III  Secondary to proximal humerus fracture; usually a lesser tuberosity fracture that is prone to malunion or nonunion

Ultrasound (US) 

Ultrasound (US) is highly operator-dependent but is touted as a fast, cost-effective tool for diagnosing LHBT pathology. Characteristic findings include tendon thickening, tenosynovitis, and synovial sheath hypertrophy, and fluid surrounding the tendon in the bicipital groove. The ability to perform a dynamic examination increases the sensitivity and specificity for detecting subtle instability.

Magnetic Resonance Imaging

Magnetic resonance imaging (MRI) is useful in evaluating the LHBT, bicipital groove, and any fluid or edema that may be indicative of pathology. MRI helps define other associated shoulder pathologies, and in the setting of LHBT instability, particular attention should be given to evaluating for concomitant subscapularis injury.

MR Arthrography

Many studies have suggested MR arthrography (MRA) as the best imaging modality for the detection of triceps soft tissue pulley lesions.  Walch previously described the “pulley sign” on MRA, suggesting a lesion to the soft tissue pulley structures.  The “pulley sign” is an extra-articular collection of contrast material anterior to the upper subscapularis muscle. A 2012 study established MRA criteria for diagnosing biceps pulley lesions. The findings on MRA included:

  • LHBT displacement relative to subscapularis tendon on oblique sagittal series; Up to 86% sensitive, 98% specific
  • LHBT tendinopathy on oblique sagittal image series; Up to 93% sensitive, 96% specific
  • Medial LHBT subluxation on axial image series; Up to 64% sensitive, 100% specific
  • Discontinuity of the SGHL; Up to 89% sensitive, 83% specific

Treatment Of Triceps Tendon Rupture

Non-Pharmacological 

  • Rest – Rest, ice and heat are the initial steps to take to rehabilitate your muscles. Resting allows the muscle strain to heal, while ice reduces the inflammation and dulls your pain. Apply ice on a 15-minute on, 15-minute off schedule for the first day for grade 1 strains. Grade 1 strains are injuries that feel tight but do not produce pain or visible swelling of the shoulder area. Continue icing for several days for grade 2 and 3 strains. Strains of this severity will cause pain and hamper your mobility.
  • Stretching and Strengthening Stretching and strengthening you’re can help you recover from an injury and prevent future strains. Stretching can begin as soon as you are pain-free, and include the barbell stretch. Stand with your arms at your sides. Bring your arms up to shoulder height, keeping your elbows straight and arms out in front of you.
  • Massage Sports massage may be a part of your rehab program. A sports massage, administered by a certified professional, keeps your muscles loose and limber and warms the injured tissues. Grade 1 deltoid injuries may be massaged after the first two days of rest and icing; more severe strains or tears may require up to a week’s healing time before the massage is possible.
  • Ultrasound – Grade 3 injuries can benefit from more advanced rehab techniques, including ultrasound and electrical stimulation. These types of treatments must be performed by certified professionals and may include your athletic trainer or physical therapist. Ultrasound treatments send sound waves into the deltoid muscle; electrical stimulation provides the injured tissues a low-grade electrical current. Both of these treatments can reduce pain and inflammation.


Medication

In Severe Condition of the Proximal Biceps Tendon Rupture

Physical Therapy Management

Physical therapy has been commonly used for the treatment of tendinopathies: initially focusing on unloading followed by reloading the affected tendon.

  • This may start with isometric training if the pain is the primary issue progressing into eccentric training and eventually concentric loading as with other forms of tendon rehab.
  • Stretching and strengthening programs are a common component of most therapy programs. Therapists also use other modalities, including ultrasound, iontophoresis, deep transverse friction massage, low-level laser therapy, and hyperthermia; however evidence for these modalities has low quality.
  • The physical therapist must consider both the patient’s subjective response to injury and the physiological mechanisms of tissue healing; both are essential in relation to a patient’s return to optimal performance.

As a preface to a discussion of the goals of treatment during injury rehabilitation, two points must be made:

  • Healing tissue must not be overstressed and a very slow heavy loading program should be undertaken. During tissue healing, controlled therapeutic stress is necessary to optimize collagen matrix formation, but too much stress can damage new structures and slow the patient’s rehabilitation
  • The patient must meet specific objectives to progress from one phase of healing to the next. These objectives may depend on ROM, strength, or activity. It is the responsibility of the physical therapist to establish these guidelines

Exercise therapy should include

  • Restoring a pain-free range of motion – Pain-free range can be achieved with such activities as PROM, Active-Assisted Range of Motion (AAROM), and mobilization via manual therapy
  • Proper scapulothoracic rhythm.
  • Painful activities such as abduction and overhead activities should be avoided in the early stages of recovery as it can exacerbate symptoms
  • Strengthening program consisting of heavy slow loading should begin with an emphasis on the scapular stabilizers, rotator cuff, and biceps tendon


References

Loading

If the article is helpful, please Click to Star Icon and Rate This Post!
[Total: 0 Average: 0]
Translate »