Category Archive Musculoskeletal System

Knee Medial Collateral Ligament Injury – Symptoms, Treatment

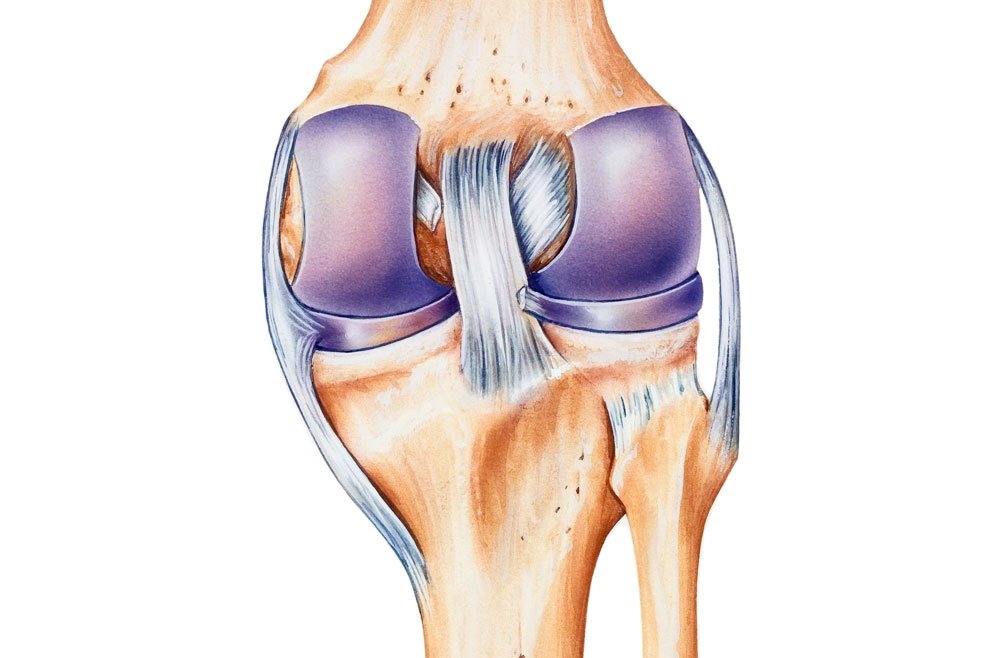
Knee Medial Collateral Ligament Injury (MCL) is a flat band of connective tissue that runs from the medial epicondyle of the femur to the medial condyle of the tibia. Its role is to provide valgus stability to the knee joint. MCL injuries often occur in sports, especially in skiing; in fact, 60% of skiing knee injuries involve the MCL.

Medial collateral ligament (MCL) injury is one of the most common knee injuries, especially in young athletic patients. Most MCL injuries can be managed conservatively with good results. However, a complete understanding of knee anatomy and the involved structures is necessary to make intelligent treatment decisions. We will review the anatomy and biomechanics of the MCL, classification systems for MCL injuries, and operative and nonoperative treatment for acute and chronic MCL injuries.

The tibial collateral ligament, also known as the medial collateral ligament (MCL), is a ligament extending from the medial epicondyle of the femur to the posteromedial crest of the tibia. The ligament is a broad and strong band that mainly functions to stabilize the knee joint in the coronal plane on the medial side.

Types of Knee Medial Collateral Ligament Injury

Doctors categorize MCL injuries according to the following criteria

  • Grade I tear –  This is a slight tear (or stretch) of the MCL. Both ends of the ligament are still attached to the bone, but a portion of the ligament may sag and be less taut. Recovery usually takes 1 to 2 weeks; therapy may not be needed.
  • Grade II tear – This is a slightly more severe tear of the MCL, with a portion of the ligament sagging. Pain and swelling is usually more severe than with a grade I tear. Kids usually need 3 to 4 weeks of rest and sometimes therapy.
  • Grade III tear – With this type of injury, the MCL breaks in half. Many kids are unable to bend the knee or bear weight on it without pain. They might be unstable while walking, and the knee may sometimes “give out.” Kids with this injury need to wear a knee brace and undergo rehab therapy for 6 weeks or longer.

Causes of Knee Medial Collateral Ligament Injury

MCL injuries are regularly seen in contact and non-contact sports and often occur in the following instances:

  • Motor vehicle accidents – A “dashboard injury” occurs when the driver’s or passenger’s bent knee slams against the dashboard, pushing in the shinbone just below the knee and causing a tear.
  • Contact sports – Athletes in sports such as football and soccer can tear their ligament when they fall on a bent knee with their foot pointed down. The shinbone hits the ground first and it moves backward. Being tackled when your knee is bent also can cause this injury.
  • The knee is hit directly – especially during sports like soccer, rugby, and football
  • A person lands on a bent knee – such as during a fall or misstep
  • Landing directly on the front of the shinbone – such as when a dancer comes down from a leap and falls
  • A person makes cutting or pivoting maneuvers – such as when an athlete plants a foot and shifts directions
  • A person lands on one leg – which can happen after a jump in basketball or volleyball
  • A direct blow to the bent knee in an automobile injury
  • A sports-related injury in which the knee bends
  • Pulling on the ligament in a twisting injury or hyperextension
  • A misstep on uneven terrain
  • When the knee is hit directly on its outer side, such as from a football tackle
  • As a result of cutting maneuvers, when an athlete plants a foot and forcefully shifts direction
  • Squatting or lifting heavy objects, such as weight lifting
  • Landing awkwardly on the knee, such as when jumping in volleyball
  • Hyperextending the knee, such as when skiing
  • Through repeated stress to the knee, which causes the ligament to lose its elasticity (like a worn-out rubber band)

While sports injuries are the most common cause of MCL tears and sprains, any direct blow, such as during a car accident, can cause the ligament to be damaged.

Symptoms of Knee Medial Collateral Ligament Injury

A person who experiences an MCL injury typically reports a combination of the following symptoms:

  • A “popping” sound – when the injury occurs. This sound is usually a sign of a grade II or grade III tear.
  • Immediate sharp pain – from the inner section of the knee.
  • Immediate swelling – at the inner knee. Swelling may increase and spread to the actual knee joint 1 or 2 days following the injury.
  • Tenderness –  around the inner knee. This area may be painful to the touch.
  • Increased pain – a few hours after the injury.
  • Bruising around the knee – especially around the location of the MCL (inner knee).
  • Noticeable looseness – in the knee. A person may be able to feel looseness around the inner knee when walking. The knee may feel as if it has a greater range of motion than normal.
  • Knee stiffness – may make walking, sitting down, rising from a chair or climbing stairs difficult. A person may have trouble bending or straightening the knee.
  • The feeling of knee instability – may be particularly noticeable during activities that strain the knee, such as going downstairs or pivoting on one leg. The knee may feel as if it is about to give out. Instability is usually associated with more severe MCL tears.
  • Pain when bearing weight – such as when walking, sitting down, or rising from a chair.

Diagnosis of Knee Medial Collateral Ligament Injury

Stage

The severity and symptoms of a knee ligament sprain depend on the degree of stretching or tearing of the knee ligament. You may notice an audible snap or tearing sound at the time of your ligament injury.

  • In a mild, Grade I MCL sprain –  the knee ligament has a slight stretch, but they don’t tear. Although the knee joint may not hurt or swell very much, a mild ligament sprain can increase the risk of a repeat injury.
  • With a moderate Grade II MCL sprain – the knee ligament tears partially. Knee swelling and bruising are common, and the use of the knee joint is usually painful and challenging. You may have some complaints of instability or a feeling of the knee giving way.
    With a severe Grade III MCL sprain – the ligament tears completely, causing swelling and sometimes bleeding under the skin. As a result, the joint is unstable and can be difficult to bear weight. You may have a feeling of the knee giving way. Often there will be no pain or severe pain that subsides quickly following a grade 3 tear as all of the pain fibers are torn at the time of injury. With these more severe tears, other structures are at risk of injury, including the meniscus or ACL.

Physical Exam

Testing of the knee joint should be done using the following techniques and the findings compared to the contralateral, normal knee:[rx][rx]

  • Valgus stress at 0° and 20° – This test puts direct stress on the medial knee structures, reproducing the mechanism of injury. Valgus stress testing is done with the patient supine on the exam table. The lower extremity, supported by the examiner, is abducted. The examiner’s fingers monitor the medial joint space for gapping while placing the opposite hand on the ankle. The knee is placed in 20° of flexion. The examiner then uses their own thigh as a fulcrum at the knee and applies a valgus force (pulling the foot and ankle away from the patient’s body). The force is then used to establish the amount of gapping present within the joint. It has been reported that 20° of flexion is best for isolating the MCL, allowing the practitioner to establish the degree of injury (see Classification). Additional testing is done at 0° to determine if a Grade III injury is present.[rx][rx]
  • Valgus stress testing –  is the best way to test the integrity of the MCL directly. The patient should be positioned supine with the hip abducted on the affected side so that the leg is unsupported off the table. The knee should be brought into 30 degrees of flexion. The examiner should grasp the ankle with one hand and push the ankle laterally while applying a valgus force to the knee with the other hand.
  • Anteromedial drawer test – This test is performed with the patient supine with the knee flexed to 80-90°. The foot is externally rotated 10-15° and the examiner supplies an anterior and external rotational force. The joint can then be evaluated for tibial anteromedial rotation, taking care to recognize the possibility of posterolateral corner instability giving similar rotational test results. As always, compare the test in the opposite knee.[rx][rx][rx]
  • Dial Test (anteromedial rotation test) – This test should be executed with the patient lying both supine and prone. When the patient is supine, the knees must be flexed 30° off the table. The thigh is then stabilized and the foot externally rotated. The examiner watches for the tibial tubercle of the affected knee to rotate as the foot rotates, comparing it to the contralateral knee. A positive test will show the rotation of greater than 10-15° of rotation compared to the opposite knee. This is most easily assessed with a hand placed over the tibia while testing. When the patient is prone, the knee is flexed to 90° and both feet are externally rotated and compared, noting the difference from the non-injured joint. Similar to the anteromedial drawer test, a false positive test can result from a posterolateral corner injury. Testing at both 30° and 90° helps to distinguish between these injuries: one should monitor where the tibial rotation occurs (anteromedial or posterolateral) in the supine position and also assess for medial or lateral joint line gapping to differentiate between these two injuries.[rx][rx][rx]

Imaging Test

  • X-rays – use low levels of radiation and give doctors a view of a person’s bones. Although MCL injuries do not show up on standard X-ray exams, they are a relatively inexpensive, fast way to rule out other possible injuries that might be causing the symptoms. Additionally, a stress X-ray—where a physician applies a valgus force to the knee during the exam—can help to determine the degree of ligamentous injury.
  • Magnetic resonance imaging (MRI) – shows a detailed view of the soft tissue surrounding the knee joint. An MRI can also help a doctor determine the location and grade of an MCL tear.
  • Ultrasound imaging – uses high-frequency sound waves to build a picture of the knee’s tissues. Ultrasound can be utilized in situations when an MRI is not recommended. Ultrasound may also be used in an urgent care setting to make an immediate assessment, allowing the injury to be treated more quickly.

Treatment of Knee Medial Collateral Ligament Injury

Nonsurgical

Most everyone who has an MCL injury will be advised by a health care professional to follow the RICE method:

  • Rest – Activities that irritates the knee, such as pivoting and walking for long periods of time, should be avoided until the symptoms get better.
  • Ice – A person may be advised to apply ice packs to the knee to help reduce swelling and decrease pain. Apply ice with a compressive wrap for 20 minutes and repeat every 3-4 hours for the first 24-48 hours.
  • Compression – Wearing a tight, elastic bandage around the knee can help stop swelling.
  • Elevation – Keeping the knee propped up above the waist can help decrease swelling.
  • Wear a knee cap – that allows the knee to move forward and backward but restricts side-to-side movement. Apply minimally restrictive lateral hinge brace (grade II or III injuries).
  • Use crutches – to avoid weight-bearing. Crutches are not needed in all cases. Dispense crutches; allow weight-bearing as tolerated.
  • Bracing – Your knee must be protected from the same sideways force that caused the injury. You may need to change your daily activities to avoid risky movements. Your doctor may recommend a brace to protect the injured ligament from stress. To further protect your knee, you may be given crutches to keep you from putting weight on your

Medication

If the injury is severe and pain is intolerable the following medicine can be considered to prescribe

  • Take anti-inflammatory medications – Non-steroidal anti-inflammatory drugs (NSAIDs), like will help with pain and swelling. However, these drugs can have side effects, such as an increased risk of bleeding and ulcers. They should be only used occasionally unless your doctor specifically says otherwise.
  • Antibiotic – Cefuroxime or Azithromycin, or  Flucloxacillin or any other cephalosporin/quinolone antibiotic must be used to prevent infection or clotted blood remove to prevent furthers swelling and edema.
  • NSAIDs – Prescription-strength drugs that reduce both pain and inflammation. Pain medicines and anti-inflammatory drugs help to relieve pain and stiffness, allowing for increased mobility and exercise. There are many common over-the-counter medicines called non-steroidal anti-inflammatory drugs (NSAIDs). They include and KetorolacAceclofenacNaproxen, Etoricoxib.
  • Corticosteroids – Also known as oral steroids, these medications reduce inflammation.
  • Muscle Relaxants –  These medications provide relief from associated muscle spasms.
  • Neuropathic Agents – Drugs(pregabalin & gabapentin) that address neuropathic—or nerve-related—pain. This includes burning, numbness, and tingling.
  • Opioids – Also known as narcotics, these medications are intense pain relievers that should only be used under a doctor’s careful supervision.
  • Topical Medications – These prescription-strength creams, gels, ointments, patches, and sprays help relieve pain and inflammation through the skin.
  • Calcium & vitamin D3 – to improve bone health and healing fracture. As a general rule, men and women age 50 and older should consume 1,200 milligrams of calcium a day, and 600 international units of vitamin D a day.
  • Antidepressants – A drug that blocks pain messages from your brain and boosts the effects of endorphins (your body’s natural painkillers).
  • Glucosamine & DiacereinChondroitin sulfate – can be used to tightening the loose tension, cartilage, ligament, and cartilage, ligament regenerates cartilage or inhabits the further degeneration of cartilage, ligament. They are structural components of articular cartilage, and the thought is that a supplement will aid in the health of articular cartilage.
  • Intra-articular corticosteroid injections – may be useful for symptomatic injury especially where there is a considerable inflammatory component. The delivery of the corticosteroid directly into the knee may reduce local inflammation associated with injury and minimize the systemic effects of the steroid.
  • Intra-articular hyaluronic acid injections (HA) – injections are another injectable option for a knee injury. HA is a glycosaminoglycan that is found throughout the human body and is an important component of synovial fluid and articular cartilage. HA breaks down during the process of ligament injury and contributes to the loss of articular cartilage as well as stiffness and pain. Local delivery of HA into the joint acts as a lubricant and may help increase the natural production of HA in the joint.
  • Platelet-rich plasma (PRP) injection – newer therapy where a blood sample is taken from the patient, spun in a centrifuge, growth factors are isolated and then they are injected back into the affected site to stimulate faster healing.

Surgery

  • Knee arthroscopy – minimally invasive surgical procedure to diagnose and repair an MCL injury; small incisions are made in the knee and a camera is inserted to visualize the injury and determine treatment.

Physiotherapy

Depending on the grade of injury, you can start to feel better within days to just a few weeks of the damage. Your physiotherapy treatment will aim to:

  • Reduce pain and inflammation.
  • Normalize joint range of motion.
  • Strengthen your knee: esp quadriceps (esp VMO) and hamstrings.
  • Strengthen your lower limb: calves, hip and pelvis muscles.
  • Improve patellofemoral (knee cap) alignment
  • Normalize your muscle lengths
  • Improve your proprioception, agility and balance
  • Improve your technique and function, e.g. walking, running, squatting, hopping and landing.
  • Guide return to sports activities and exercises
  • Minimize your chance of re-injury.

Exercises

A physical therapist will be able to advise on strengthening exercises to aid recovery after an MCL tear. Some possible exercises may include:

Exercise to restore range of motion and increase strength. These exercises typically include gentle stretches and strengthening exercises. People may also do upper body workouts and swim in order to keep up general conditioning. Some people may work with a physical therapist for guided treatment.

1. Hamstring curl

  • Stand up straight, engaging the stomach muscles.
  • Stand on one leg and slowly bend the opposite knee by bringing the heel up toward the buttocks.
  • Hold for 30 seconds before repeating on the other side of the body.
  • A person can hold on to a chair or table for support if needed.

2. Wall slide

  • Standing up straight, with both feet flat on the ground, place the back firmly against a wall.
  • Slowly slide down, keeping the back against the wall until reaching a squatting position.
  • Hold for 30 seconds.
  • Push up from the feet to stand up, keeping the back flat against the wall.
  • Repeat 10 to 15 times.

3. Chair squat

  • Standing on one leg, slowly squat toward sitting down onto a chair.
  • Return to a standing position, again standing on one leg.
  • Bend at the waist and keep the body in a straight line when standing.
  • A person may need to build up to sitting fully on the chair

Subsequent treatment

  • Begin active range-of-motion exercises in cold whirlpool at least twice daily.
  • Begin straight-leg raises and electrical muscle stimulation (if available).
  • Maintain general conditioning with upper body ergometer or swimming.

Goal one: Walking unassisted without a limp

  • Discard crutches.
  • Continue range of motion, isometric strengthening, and conditioning exercises.

Goal two: 90 degrees of knee flexion

  • Begin stair climber and bicycle ergometer with seat high; gradually lower seat.
  • Begin isotonic progressive restrictive exercise for quadriceps and hamstrings; supplement with isokinetic exercise if available.
  • Continue range of motion and conditioning exercises.

Goal Three: Full knee motion

  • Begin running and functional exercise program.
  • For example:
    • Jog 1 mile.

    • Five successive 100-yard sprints at half speed.

    • Five successive 100-yard sprints at three-quarters speed.

    • Five successive 100-yard sprints at full speed.

    • Five zigzag sprints at half speed.

    • Five zigzag sprints at full speed.

  • Other agility drills (e.g. Cariocas).
  • Continue conditioning.

Goal four: Complete entire running program in one session

  • May return to competition if the athlete has minimal pain, full range of motion, and 90 percent of normal strength.
  • Continue to use a brace for all sports participation for the remainder of the season.

Rehabilitation

The rehabilitation for a non-operative treatment can be split into four phases:

  • Phase one is from one to two weeks. Phase one consists of controlling the swelling of the knee by applying ice for 15 minutes every two hours (first two days). The rest of the week the frequency can be reduced to three times a day. Use ice as tolerated and as needed based on symptoms. In the begin, the patient needs to use crutches. Early weight bearing is encouraged because patients who increasing their weight-bearing, they can progressively reduce their dependence on crutches. Afterward, progress to one crutch and let the patient stop using the crutches only when normal gait is possible. Another aim of this phase is to try to maintain the ability to straighten and bend the knee from 0° to 90° knee flexion. For achieving the range of motion of the knee it is important to emphasize full extension and progress flexion as tolerated. Pain-free stretches for the hamstrings, quads, groin and calf muscles (in particular) are suggested. At last, there are therapeutic exercises. The patient may begin with static strengthening exercises (as soon as pain allows it). They consist for example of Quadricpes sets, straight leg raises, range-of-motion exercises, sitting hip flexion, side-lying hip abduction, standing hip extension, standing, and hamstring curls. As soon as patients can tolerate it, they are encouraged to ride a stationary bike to improve the range of motion of the knee. This would ensure accelerated healing. The amount of time and effort on the stationary bike is increased as tolerated. Obviously, every patient is different and these are not the standard exercises that have to be given to patients. There are no limits on upper extremity workouts that do not affect the injured knee[rx]. It’s important that the patient rests from all painful activities (use crutches if necessary), and that the MCL is well protected (by wearing a stabilized knee brace).
  • Starting at week three-phase two begins – The aims for the range of motion are the same as in phase one. Progress to 20 minutes of biking. Increase also the resistance as tolerated by the patient. Biking will ensure healing, rebuild strength, and maintain aerobic conditioning. The physiotherapist can give other exercises like Hamstring curls, leg presses (double-leg), and step-ups. As a precaution, the patient has the chance to be examined by a physician every three weeks to verify the healing of the ligament[rx].
  • Phase three starts from week five –  A major goal for this phase: full weight-bearing on the injured knee. Discontinue the use of a brace when ambulating with full weight-bearing is possible and there is no gait deviation. The range of motion has to be fully achieved and had to be symmetrical with the not injured knee. The therapeutic exercises are the same as in phase two. They may benefit progression. We continue with cold therapy and compression to eliminate swelling. In this phase, you can commence with balance and proprioceptive activities. To maintain aerobic fitness the patient can use the stepper or (if possible) may begin to swim. As a precaution, the patient has the chance to be examined by a physician every five to six weeks. When needed, you can be allowed to make stress radiography as a precaution.[rx]
  • Six weeks after injuring the knee, phase four can begin – Discontinue wearing the brace during the gait. Athletics can wear the brace for competition through the competitive season for at least three months. Cold therapy still needs to be applied. The aim of the therapeutic exercises is more focused on sport-specific or daily movements. The intensity of the strengthening exercises needs to be increased and instead of double leg exercises, we change to single-leg exercises. The patient may start running again at a comfortable pace (make sure the patient doesn’t make sudden changes of direction). As a precaution, it is best to return the competition once full motion and strength is returned and when the patient passes a sport functional test[rx].

How to do the exercises

Knee flexion with heel slide

Picture of how to do knee flexion with heel slide

slide 1 of 10, Knee flexion with heel slide,

  • Lie on your back with your knees bent.
  • Slide your heel back by bending your affected knee as far as you can. Then hook your other foot around your ankle to help pull your heel even farther back.
  • Hold for about 6 seconds, then rest for up to 10 seconds.
  • Repeat 8 to 12 times.

Heel slides on a wall

Pictures of how to do heel slides on a wall

slide 2 of 10, Heel slides on a wall,

  • Lie on the floor close enough to a wall so that you can place both legs up on the wall. Your hips should be as close to the wall as is comfortable for you.
  • Start with both feet resting on the wall. Slowly let the foot of your affected leg slide down the wall until you feel a stretch in your knee.
  • Hold for 15 to 30 seconds.
  • Then slowly slide your foot up to where you started.
  • Repeat 2 to 4 times.

Quad sets

Picture of how to do quadriceps exercise

slide 3 of 10, Quad sets,

  • Sit with your affected leg straight and supported on the floor or a firm bed. Place a small, rolled-up towel under your knee. Your other leg should be bent, with that foot flat on the floor.
  • Tighten the thigh muscles of your affected leg by pressing the back of your knee down into the towel.
  • Hold for about 6 seconds, then rest for up to 10 seconds.
  • Repeat 8 to 12 times.

Short-arc quad

Picture of how to do short-arc quad exercise

slide 4 of 10, Short-arc quad,

  • Lie on your back with your knees bent over a foam roll or a large rolled-up towel.
  • Lift the lower part of your affected leg and straighten your knee by tightening your thigh muscle. Keep the bottom of your knee on the foam roll or rolled-up towel.
  • Hold your knee straight for about 6 seconds, then slowly bend your knee and lower your leg back to the floor. Rest for up to 10 seconds between repetitions.
  • Repeat 8 to 12 times.

Straight-leg raises to the front

Picture of how to do straight-leg raise exercise

slide 5 of 10, Straight-leg raises to the front,

  • Lie on your back with your good knee bent so that your foot rests flat on the floor. Your affected leg should be straight. Make sure that your low back has a normal curve. You should be able to slip your hand in between the floor and the small of your back, with your palm touching the floor and your back touching the back of your hand.
  • Tighten the thigh muscles in your affected leg by pressing the back of your knee flat down to the floor. Hold your knee straight.
  • Keeping the thigh muscles tight and your leg straight, lift your affected leg up so that your heel is about 30 centimeters off the floor. Hold for about 6 seconds, then lower slowly.
  • Relax for up to 10 seconds between repetitions.
  • Repeat 8 to 12 times.

Hamstring set (heel dig)

Picture of how to do seated hamstring exercise

slide 6 of 10, Hamstring set (heel dig),

  • Sit with your affected leg bent. Your good leg should be straight and supported on the floor.
  • Tighten the muscles on the back of your bent leg (hamstring) by pressing your heel into the floor.
  • Hold for about 6 seconds, then rest for up to 10 seconds.
  • Repeat 8 to 12 times.

Hip adduction

Picture of how to do hip adduction exercise

slide 7 of 10, Hip adduction,

  • Sit on the floor with your knees bent.
  • Place a pillow between your knees.
  • Put your hands slightly behind your hips for support.
  • Squeeze the pillow by tightening the muscles on the inside of your thighs.
  • Hold for 6 seconds, then rest for up to 10 seconds.
  • Repeat 8 to 12 times.

Hip abduction

Picture of how to do hip abduction exercise

slide 8 of 10, Hip abduction,

  • Sit on the floor with your affected knee close to a wall.
  • Bend your affected knee but keep the other leg straight in front of you.
  • Place a pillow between the outside of your knee and the wall.
  • Put your hands slightly behind your hips for support.
  • Push the outside of your knee against the pillow and the wall.
  • Hold for 6 seconds, then rest for up to 10 seconds.
  • Repeat 8 to 12 times.

Lateral step-up

Picture of how to do lateral step-up exercise

slide 9 of 10, Lateral step-up,

  • Stand sideways on the bottom step of a staircase with your injured leg on the step and your other foot on the floor. Hold on to the banister or wall.
  • Use your injured leg to raise yourself up, bringing your other foot level with the stair step. Make sure to keep your hips level as you do this. And try to keep your knee moving in a straight line with your middle toe. Do not put the foot you are raising on the stair step.
  • Slowly lower your foot back down.
  • Repeat 8 to 12 times.

Wall squats with ball

Picture of how to do wall squats with ball

slide 10 of 10, Wall squats with ball,

  • Stand with your back facing a wall. Place your feet about a shoulder-width apart.
  • Place the therapy ball between your back and the wall, and move your feet out in front of you so they are about 30 centimetres in front of your hips.
  • Keep your arms at your sides, or put your hands on your hips.
  • Slowly squat down as if you are going to sit in a chair, rolling your back over the ball as you squat. The ball should move with you but stay pressed into the wall.
  • Be sure that your knees do not go in front of your toes as you squat.
  • Hold for 6 seconds.
  • Slowly rise to your standing position.
  • Repeat 8 to 12 times.

How do I get ready for a knee ligament repair?

  • Your healthcare provider will explain the procedure to you and offer you the chance to ask any questions that you might have about the procedure.
  • You will be asked to sign a consent form that gives your permission to do the procedure. Read the form carefully and ask questions if something is not clear.
  • In addition to a complete medical history, your healthcare provider may perform a complete physical exam to ensure you are in good health before undergoing the procedure. You may undergo blood tests or other diagnostic tests.
  • Tell your healthcare provider if you are sensitive to or are allergic to any medicines, latex, tape, and anesthetic agents (local and general).
  • Tell your healthcare provider of all medicines (prescribed and over-the-counter) and herbal supplements that you are taking.
  • Tell your healthcare provider if you have a history of bleeding disorders or if you are taking any anticoagulant (blood-thinning) medicines, aspirin, or other medicines that affect blood clotting. It may be necessary for you to stop these medicines before the procedure.
  • If you are pregnant or suspect that you are pregnant, you should notify your healthcare provider.
  • You will be asked to fast for 8 hours before the procedure, generally after midnight.
  • You may receive a sedative prior to the procedure to help you relax. Because the sedative may make you drowsy, you will need to arrange for someone to drive you home.
  • You may meet with a physical therapist prior to your surgery to discuss rehabilitation.
  • Arrange for someone to help around the house for a week or two after you are discharged from the hospital.
  • Based on your health condition, your healthcare provider may request other specific preparations.

What happens during a knee ligament repair?

Knee ligament repair may be done on an outpatient basis or rarely as part of your stay in a hospital. Procedures may vary depending on your condition and your healthcare provider’s practices.

Knee ligament repair may be performed while you are asleep under general anesthesia, or while you are awake under spinal anesthesia. If spinal anesthesia is used, you will have no feeling from your waist down. Your healthcare provider will discuss this with you in advance.

Generally, knee ligament repair surgery follows this process:

  • You will be asked to remove clothing and will be given a gown to wear.
  • An intravenous (IV) line may be started in your arm or hand.
  • You will be positioned on the operating table.
  • The anesthesiologist will continuously monitor your heart rate, blood pressure, breathing, and blood oxygen level during the surgery.
  • The skin over the surgical site will be cleansed with an antiseptic solution.
  • The healthcare provider will make several small incisions in the knee area.
  • The healthcare provider will do the surgery using an arthroscope (a small tube-shaped instrument that is inserted into a joint). The healthcare provider may reattach the torn ligament or reconstruct the torn ligament by using a portion (graft) of the patellar tendon (that connects the kneecap to the tibia), the hamstring tendon (from the back of the thigh), or other autografts. The tendon graft may come from the person (autograft) or from an organ donor (allograft).
  • The healthcare provider will drill small holes in the tibia and femur where the torn ligament was attached.
  • The healthcare provider will thread the graft through the holes and attach it with surgical staples, screws, or other
    means. Bone eventually grows around the graft.
  • The incision will be closed with stitches or surgical staples.
  • A sterile bandage or dressing will be applied.

What happens after a knee ligament repair?

After the surgery, you will be taken to the recovery room for observation. Your recovery process will vary depending on the type of anesthesia that is given. Once your blood pressure, pulse, and breathing are stable and you are alert, you will be taken to your hospital room or discharged to your home. Knee ligament repair is usually done on an outpatient basis.

You may be given crutches and a knee immobilizer before you go home.

Once you are home, it is important to keep the surgical area clean and dry. Your healthcare provider will give you specific bathing instructions. The stitches or surgical staples will be removed during a follow-up office visit.

Take a pain reliever for soreness as recommended by your healthcare provider. Aspirin or certain other pain medicines may increase the chance of bleeding. Be sure to take only recommended medicines.

To help reduce swelling, you may be asked to elevate your leg and apply an ice bag to the knee several times per day for the first few days. Your healthcare provider will arrange for an exercise program to help you regain muscle strength, stability, and range of motion. Physical therapy is a key part of recovery.

Tell your healthcare provider if you have any of the following:

  • Fever or chills
  • Redness, swelling, bleeding, or another drainage from the incision site
  • Increased pain around the incision site
  • Numbness or tingling in the leg
  • Calf swelling or tenderness

You may resume your normal diet unless your healthcare provider advises you differently.

Because of the limited mobility, it may be hard for a few weeks to resume your normal daily activities. You may need someone at home to assist you. You should not drive until your healthcare provider tells you to. Other activity restrictions may apply. Full recovery from the surgery and rehab may take several months.

Your healthcare provider may give you additional or alternate instructions after the procedure, depending on your particular situation.

Next steps

Before you agree to the test or the procedure make sure you know:

  • The name of the test or procedure
  • The reason you are having the test or procedure
  • What results to expect and what they mean
  • The risks and benefits of the test or procedure
  • What the possible side effects or complications are
  • When and where you are to have the test or procedure
  • Who will do the test or procedure and what that person’s qualifications are
  • What would happen if you did not have the test or procedure
  • Any alternative tests or procedures to think about
  • When and how you will get the results
  • Who to call after the test or procedure if you have questions or problems
  • How much you will have to pay for the test or procedure

References

Loading

If the article is helpful, please Click to Star Icon and Rate This Post!
[Total: 0 Average: 0]

MCL Tear – Causes, Symptoms, Diagnosis, Treatment

MCL Tear/Medial Collateral Ligament Injury (MCL) is a flat band of connective tissue that runs from the medial epicondyle of the femur to the medial condyle of the tibia. Its role is to provide valgus stability to the knee joint. MCL injuries often occur in sports, especially in skiing; in fact, 60% of skiing knee injuries involve the MCL.

The tibial collateral ligament, also known as the medial collateral ligament (MCL), is a ligament extending from the medial epicondyle of the femur to the posteromedial crest of the tibia. The ligament is a broad and strong band that mainly functions to stabilize the knee joint in the coronal plane on the medial side.

Types of Medial Collateral Ligament Injuries

Doctors categorize MCL injuries according to the following criteria

  • Grade I tear –  This is a slight tear (or stretch) of the MCL. Both ends of the ligament are still attached to the bone, but a portion of the ligament may sag and be less taut. Recovery usually takes 1 to 2 weeks; therapy may not be needed.
  • Grade II tear – This is a slightly more severe tear of the MCL, with a portion of the ligament sagging. Pain and swelling is usually more severe than with a grade I tear. Kids usually need 3 to 4 weeks of rest and sometimes therapy.
  • Grade III tear – With this type of injury, the MCL breaks in half. Many kids are unable to bend the knee or bear weight on it without pain. They might be unstable while walking, and the knee may sometimes “give out.” Kids with this injury need to wear a knee brace and undergo rehab therapy for 6 weeks or longer.

Causes of Medial Collateral Ligament Injury

MCL injuries are regularly seen in contact and non-contact sports and often occur in the following instances:

  • Motor vehicle accidents – A “dashboard injury” occurs when the driver’s or passenger’s bent knee slams against the dashboard, pushing in the shinbone just below the knee and causing a tear.
  • Contact sports – Athletes in sports such as football and soccer can tear their ligament when they fall on a bent knee with their foot pointed down. The shinbone hits the ground first and it moves backward. Being tackled when your knee is bent also can cause this injury.
  • The knee is hit directly – especially during sports like soccer, rugby, and football
  • A person lands on a bent knee – such as during a fall or misstep
  • Landing directly on the front of the shinbone – such as when a dancer comes down from a leap and falls
  • A person makes cutting or pivoting maneuvers – such as when an athlete plants a foot and shifts directions
  • A person lands on one leg – which can happen after a jump in basketball or volleyball
  • A direct blow to the bent knee in an automobile injury
  • A sports-related injury in which the knee bends
  • Pulling on the ligament in a twisting injury or hyperextension
  • A misstep on uneven terrain
  • When the knee is hit directly on its outer side, such as from a football tackle
  • As a result of cutting maneuvers, when an athlete plants a foot and forcefully shifts direction
  • Squatting or lifting heavy objects, such as weight lifting
  • Landing awkwardly on the knee, such as when jumping in volleyball
  • Hyperextending the knee, such as when skiing
  • Through repeated stress to the knee, which causes the ligament to lose its elasticity (like a worn-out rubber band)

While sports injuries are the most common cause of MCL tears and sprains, any direct blow, such as during a car accident, can cause the ligament to be damaged.

Symptoms of Medial Collateral Ligament Injury

A person who experiences an MCL injury typically reports a combination of the following symptoms:

  • A “popping” sound – when the injury occurs. This sound is usually a sign of a grade II or grade III tear.
  • Immediate sharp pain – from the inner section of the knee.
  • Immediate swelling – at the inner knee. Swelling may increase and spread to the actual knee joint 1 or 2 days following the injury.
  • Tenderness –  around the inner knee. This area may be painful to the touch.
  • Increased pain – a few hours after the injury.
  • Bruising around the knee – especially around the location of the MCL (inner knee).
  • Noticeable looseness – in the knee. A person may be able to feel looseness around the inner knee when walking. The knee may feel as if it has a greater range of motion than normal.
  • Knee stiffness – may make walking, sitting down, rising from a chair or climbing stairs difficult. A person may have trouble bending or straightening the knee.
  • The feeling of knee instability – may be particularly noticeable during activities that strain the knee, such as going downstairs or pivoting on one leg. The knee may feel as if it is about to give out. Instability is usually associated with more severe MCL tears.
  • Pain when bearing weight – such as when walking, sitting down, or rising from a chair.

Diagnosis of Medial Collateral Ligament Injury

Stage

The severity and symptoms of a knee ligament sprain depend on the degree of stretching or tearing of the knee ligament. You may notice an audible snap or tearing sound at the time of your ligament injury.

  • In a mild, Grade I MCL sprain –  the knee ligament has a slight stretch, but they don’t tear. Although the knee joint may not hurt or swell very much, a mild ligament sprain can increase the risk of a repeat injury.
  • With a moderate Grade II MCL sprain – the knee ligament tears partially. Knee swelling and bruising are common, and the use of the knee joint is usually painful and challenging. You may have some complaints of instability or a feeling of the knee giving way.
    With a severe Grade III MCL sprain – the ligament tears completely, causing swelling and sometimes bleeding under the skin. As a result, the joint is unstable and can be difficult to bear weight. You may have a feeling of the knee giving way. Often there will be no pain or severe pain that subsides quickly following a grade 3 tear as all of the pain fibers are torn at the time of injury. With these more severe tears, other structures are at risk of injury, including the meniscus or ACL.

Physical Exam

Testing of the knee joint should be done using the following techniques and the findings compared to the contralateral, normal knee:[rx][rx]

  • Valgus stress at 0° and 20° – This test puts direct stress on the medial knee structures, reproducing the mechanism of injury. Valgus stress testing is done with the patient supine on the exam table. The lower extremity, supported by the examiner, is abducted. The examiner’s fingers monitor the medial joint space for gapping while placing the opposite hand on the ankle. The knee is placed in 20° of flexion. The examiner then uses their own thigh as a fulcrum at the knee and applies a valgus force (pulling the foot and ankle away from the patient’s body). The force is then used to establish the amount of gapping present within the joint. It has been reported that 20° of flexion is best for isolating the MCL, allowing the practitioner to establish the degree of injury (see Classification). Additional testing is done at 0° to determine if a Grade III injury is present.[rx][rx]
  • Valgus stress testing –  is the best way to test the integrity of the MCL directly. The patient should be positioned supine with the hip abducted on the affected side so that the leg is unsupported off the table. The knee should be brought into 30 degrees of flexion. The examiner should grasp the ankle with one hand and push the ankle laterally while applying a valgus force to the knee with the other hand.
  • Anteromedial drawer test – This test is performed with the patient supine with the knee flexed to 80-90°. The foot is externally rotated 10-15° and the examiner supplies an anterior and external rotational force. The joint can then be evaluated for tibial anteromedial rotation, taking care to recognize the possibility of posterolateral corner instability giving similar rotational test results. As always, compare the test in the opposite knee.[rx][rx][rx]
  • Dial Test (anteromedial rotation test) – This test should be executed with the patient lying both supine and prone. When the patient is supine, the knees must be flexed 30° off the table. The thigh is then stabilized and the foot externally rotated. The examiner watches for the tibial tubercle of the affected knee to rotate as the foot rotates, comparing it to the contralateral knee. A positive test will show the rotation of greater than 10-15° of rotation compared to the opposite knee. This is most easily assessed with a hand placed over the tibia while testing. When the patient is prone, the knee is flexed to 90° and both feet are externally rotated and compared, noting the difference from the non-injured joint. Similar to the anteromedial drawer test, a false positive test can result from a posterolateral corner injury. Testing at both 30° and 90° helps to distinguish between these injuries: one should monitor where the tibial rotation occurs (anteromedial or posterolateral) in the supine position and also assess for medial or lateral joint line gapping to differentiate between these two injuries.[rx][rx][rx]

Imaging Test

  • X-rays – use low levels of radiation and give doctors a view of a person’s bones. Although MCL injuries do not show up on standard X-ray exams, they are a relatively inexpensive, fast way to rule out other possible injuries that might be causing the symptoms. Additionally, a stress X-ray—where a physician applies a valgus force to the knee during the exam—can help to determine the degree of ligamentous injury.
  • Magnetic resonance imaging (MRI) – shows a detailed view of the soft tissue surrounding the knee joint. An MRI can also help a doctor determine the location and grade of an MCL tear.
  • Ultrasound imaging – uses high-frequency sound waves to build a picture of the knee’s tissues. Ultrasound can be utilized in situations when an MRI is not recommended. Ultrasound may also be used in an urgent care setting to make an immediate assessment, allowing the injury to be treated more quickly.

Treatment of Medial Collateral Ligament Injury

Nonsurgical

Most everyone who has an MCL injury will be advised by a health care professional to follow the RICE method:

  • Rest – Activities that irritates the knee, such as pivoting and walking for long periods of time, should be avoided until the symptoms get better.
  • Ice – A person may be advised to apply ice packs to the knee to help reduce swelling and decrease pain. Apply ice with a compressive wrap for 20 minutes and repeat every 3-4 hours for the first 24-48 hours.
  • Compression – Wearing a tight, elastic bandage around the knee can help stop swelling.
  • Elevation – Keeping the knee propped up above the waist can help decrease swelling.
  • Wear a knee cap – that allows the knee to move forward and backward but restricts side-to-side movement. Apply minimally restrictive lateral hinge brace (grade II or III injuries).
  • Use crutches – to avoid weight-bearing. Crutches are not needed in all cases. Dispense crutches; allow weight-bearing as tolerated.
  • Bracing – Your knee must be protected from the same sideways force that caused the injury. You may need to change your daily activities to avoid risky movements. Your doctor may recommend a brace to protect the injured ligament from stress. To further protect your knee, you may be given crutches to keep you from putting weight on your

Medication

If the injury is severe and pain is intolerable the following medicine can be considered to prescribe

  • Take anti-inflammatory medications – Non-steroidal anti-inflammatory drugs (NSAIDs), like will help with pain and swelling. However, these drugs can have side effects, such as an increased risk of bleeding and ulcers. They should be only used occasionally unless your doctor specifically says otherwise.
  • Antibiotic – Cefuroxime or Azithromycin, or  Flucloxacillin or any other cephalosporin/quinolone antibiotic must be used to prevent infection or clotted blood remove to prevent furthers swelling and edema.
  • NSAIDs – Prescription-strength drugs that reduce both pain and inflammation. Pain medicines and anti-inflammatory drugs help to relieve pain and stiffness, allowing for increased mobility and exercise. There are many common over-the-counter medicines called non-steroidal anti-inflammatory drugs (NSAIDs). They include and KetorolacAceclofenacNaproxen, Etoricoxib.
  • Corticosteroids – Also known as oral steroids, these medications reduce inflammation.
  • Muscle Relaxants –  These medications provide relief from associated muscle spasms.
  • Neuropathic Agents – Drugs(pregabalin & gabapentin) that address neuropathic—or nerve-related—pain. This includes burning, numbness, and tingling.
  • Opioids – Also known as narcotics, these medications are intense pain relievers that should only be used under a doctor’s careful supervision.
  • Topical Medications – These prescription-strength creams, gels, ointments, patches, and sprays help relieve pain and inflammation through the skin.
  • Calcium & vitamin D3 – to improve bone health and healing fracture. As a general rule, men and women age 50 and older should consume 1,200 milligrams of calcium a day, and 600 international units of vitamin D a day.
  • Antidepressants – A drug that blocks pain messages from your brain and boosts the effects of endorphins (your body’s natural painkillers).
  • Glucosamine & DiacereinChondroitin sulfate – can be used to tightening the loose tension, cartilage, ligament, and cartilage, ligament regenerates cartilage or inhabits the further degeneration of cartilage, ligament. They are structural components of articular cartilage, and the thought is that a supplement will aid in the health of articular cartilage.
  • Intra-articular corticosteroid injections – may be useful for symptomatic injury especially where there is a considerable inflammatory component. The delivery of the corticosteroid directly into the knee may reduce local inflammation associated with injury and minimize the systemic effects of the steroid.
  • Intra-articular hyaluronic acid injections (HA) – injections are another injectable option for a knee injury. HA is a glycosaminoglycan that is found throughout the human body and is an important component of synovial fluid and articular cartilage. HA breaks down during the process of ligament injury and contributes to the loss of articular cartilage as well as stiffness and pain. Local delivery of HA into the joint acts as a lubricant and may help increase the natural production of HA in the joint.
  • Platelet-rich plasma (PRP) injection – newer therapy where a blood sample is taken from the patient, spun in a centrifuge, growth factors are isolated and then they are injected back into the affected site to stimulate faster healing.

Surgery

  • Knee arthroscopy – minimally invasive surgical procedure to diagnose and repair an MCL injury; small incisions are made in the knee and a camera is inserted to visualize the injury and determine treatment.

Physiotherapy

Depending on the grade of injury, you can start to feel better within days to just a few weeks of the damage. Your physiotherapy treatment will aim to:

  • Reduce pain and inflammation.
  • Normalize joint range of motion.
  • Strengthen your knee: esp quadriceps (esp VMO) and hamstrings.
  • Strengthen your lower limb: calves, hip and pelvis muscles.
  • Improve patellofemoral (knee cap) alignment
  • Normalize your muscle lengths
  • Improve your proprioception, agility and balance
  • Improve your technique and function, e.g. walking, running, squatting, hopping and landing.
  • Guide return to sports activities and exercises
  • Minimize your chance of re-injury.

Exercises

A physical therapist will be able to advise on strengthening exercises to aid recovery after an MCL tear. Some possible exercises may include:

Exercise to restore range of motion and increase strength. These exercises typically include gentle stretches and strengthening exercises. People may also do upper body workouts and swim in order to keep up general conditioning. Some people may work with a physical therapist for guided treatment.

1. Hamstring curl

  • Stand up straight, engaging the stomach muscles.
  • Stand on one leg and slowly bend the opposite knee by bringing the heel up toward the buttocks.
  • Hold for 30 seconds before repeating on the other side of the body.
  • A person can hold on to a chair or table for support if needed.

2. Wall slide

  • Standing up straight, with both feet flat on the ground, place the back firmly against a wall.
  • Slowly slide down, keeping the back against the wall until reaching a squatting position.
  • Hold for 30 seconds.
  • Push up from the feet to stand up, keeping the back flat against the wall.
  • Repeat 10 to 15 times.

3. Chair squat

  • Standing on one leg, slowly squat toward sitting down onto a chair.
  • Return to a standing position, again standing on one leg.
  • Bend at the waist and keep the body in a straight line when standing.
  • A person may need to build up to sitting fully on the chair

Subsequent treatment

  • Begin active range-of-motion exercises in cold whirlpool at least twice daily.
  • Begin straight-leg raises and electrical muscle stimulation (if available).
  • Maintain general conditioning with upper body ergometer or swimming.

Goal one: Walking unassisted without a limp

  • Discard crutches.
  • Continue range of motion, isometric strengthening, and conditioning exercises.

Goal two: 90 degrees of knee flexion

  • Begin stair climber and bicycle ergometer with seat high; gradually lower seat.
  • Begin isotonic progressive restrictive exercise for quadriceps and hamstrings; supplement with isokinetic exercise if available.
  • Continue range of motion and conditioning exercises.

Goal Three: Full knee motion

  • Begin running and functional exercise program.
  • For example:
    • Jog 1 mile.

    • Five successive 100-yard sprints at half speed.

    • Five successive 100-yard sprints at three-quarters speed.

    • Five successive 100-yard sprints at full speed.

    • Five zigzag sprints at half speed.

    • Five zigzag sprints at full speed.

  • Other agility drills (e.g. Cariocas).
  • Continue conditioning.

Goal four: Complete entire running program in one session

  • May return to competition if the athlete has minimal pain, full range of motion, and 90 percent of normal strength.
  • Continue to use a brace for all sports participation for the remainder of the season.

Rehabilitation

The rehabilitation for a non-operative treatment can be split into four phases:

  • Phase one is from one to two weeks. Phase one consists of controlling the swelling of the knee by applying ice for 15 minutes every two hours (first two days). The rest of the week the frequency can be reduced to three times a day. Use ice as tolerated and as needed based on symptoms. In the begin, the patient needs to use crutches. Early weight bearing is encouraged because patients who increasing their weight-bearing, they can progressively reduce their dependence on crutches. Afterward, progress to one crutch and let the patient stop using the crutches only when normal gait is possible. Another aim of this phase is to try to maintain the ability to straighten and bend the knee from 0° to 90° knee flexion. For achieving the range of motion of the knee it is important to emphasize full extension and progress flexion as tolerated. Pain-free stretches for the hamstrings, quads, groin and calf muscles (in particular) are suggested. At last, there are therapeutic exercises. The patient may begin with static strengthening exercises (as soon as pain allows it). They consist for example of Quadricpes sets, straight leg raises, range-of-motion exercises, sitting hip flexion, side-lying hip abduction, standing hip extension, standing, and hamstring curls. As soon as patients can tolerate it, they are encouraged to ride a stationary bike to improve the range of motion of the knee. This would ensure accelerated healing. The amount of time and effort on the stationary bike is increased as tolerated. Obviously, every patient is different and these are not the standard exercises that have to be given to patients. There are no limits on upper extremity workouts that do not affect the injured knee[rx]. It’s important that the patient rests from all painful activities (use crutches if necessary), and that the MCL is well protected (by wearing a stabilized knee brace).
  • Starting at week three-phase two begins – The aims for the range of motion are the same as in phase one. Progress to 20 minutes of biking. Increase also the resistance as tolerated by the patient. Biking will ensure healing, rebuild strength, and maintain aerobic conditioning. The physiotherapist can give other exercises like Hamstring curls, leg presses (double-leg), and step-ups. As a precaution, the patient has the chance to be examined by a physician every three weeks to verify the healing of the ligament[rx].
  • Phase three starts from week five –  A major goal for this phase: full weight-bearing on the injured knee. Discontinue the use of a brace when ambulating with full weight-bearing is possible and there is no gait deviation. The range of motion has to be fully achieved and had to be symmetrical with the not injured knee. The therapeutic exercises are the same as in phase two. They may benefit progression. We continue with cold therapy and compression to eliminate swelling. In this phase, you can commence with balance and proprioceptive activities. To maintain aerobic fitness the patient can use the stepper or (if possible) may begin to swim. As a precaution, the patient has the chance to be examined by a physician every five to six weeks. When needed, you can be allowed to make stress radiography as a precaution.[rx]
  • Six weeks after injuring the knee, phase four can begin – Discontinue wearing the brace during the gait. Athletics can wear the brace for competition through the competitive season for at least three months. Cold therapy still needs to be applied. The aim of the therapeutic exercises is more focused on sport-specific or daily movements. The intensity of the strengthening exercises needs to be increased and instead of double leg exercises, we change to single-leg exercises. The patient may start running again at a comfortable pace (make sure the patient doesn’t make sudden changes of direction). As a precaution, it is best to return the competition once full motion and strength is returned and when the patient passes a sport functional test[rx].

How to do the exercises

Knee flexion with heel slide

Picture of how to do knee flexion with heel slide

slide 1 of 10, Knee flexion with heel slide,

  • Lie on your back with your knees bent.
  • Slide your heel back by bending your affected knee as far as you can. Then hook your other foot around your ankle to help pull your heel even farther back.
  • Hold for about 6 seconds, then rest for up to 10 seconds.
  • Repeat 8 to 12 times.

Heel slides on a wall

Pictures of how to do heel slides on a wall

slide 2 of 10, Heel slides on a wall,

  • Lie on the floor close enough to a wall so that you can place both legs up on the wall. Your hips should be as close to the wall as is comfortable for you.
  • Start with both feet resting on the wall. Slowly let the foot of your affected leg slide down the wall until you feel a stretch in your knee.
  • Hold for 15 to 30 seconds.
  • Then slowly slide your foot up to where you started.
  • Repeat 2 to 4 times.

Quad sets

Picture of how to do quadriceps exercise

slide 3 of 10, Quad sets,

  • Sit with your affected leg straight and supported on the floor or a firm bed. Place a small, rolled-up towel under your knee. Your other leg should be bent, with that foot flat on the floor.
  • Tighten the thigh muscles of your affected leg by pressing the back of your knee down into the towel.
  • Hold for about 6 seconds, then rest for up to 10 seconds.
  • Repeat 8 to 12 times.

Short-arc quad

Picture of how to do short-arc quad exercise

slide 4 of 10, Short-arc quad,

  • Lie on your back with your knees bent over a foam roll or a large rolled-up towel.
  • Lift the lower part of your affected leg and straighten your knee by tightening your thigh muscle. Keep the bottom of your knee on the foam roll or rolled-up towel.
  • Hold your knee straight for about 6 seconds, then slowly bend your knee and lower your leg back to the floor. Rest for up to 10 seconds between repetitions.
  • Repeat 8 to 12 times.

Straight-leg raises to the front

Picture of how to do straight-leg raise exercise

slide 5 of 10, Straight-leg raises to the front,

  • Lie on your back with your good knee bent so that your foot rests flat on the floor. Your affected leg should be straight. Make sure that your low back has a normal curve. You should be able to slip your hand in between the floor and the small of your back, with your palm touching the floor and your back touching the back of your hand.
  • Tighten the thigh muscles in your affected leg by pressing the back of your knee flat down to the floor. Hold your knee straight.
  • Keeping the thigh muscles tight and your leg straight, lift your affected leg up so that your heel is about 30 centimeters off the floor. Hold for about 6 seconds, then lower slowly.
  • Relax for up to 10 seconds between repetitions.
  • Repeat 8 to 12 times.

Hamstring set (heel dig)

Picture of how to do seated hamstring exercise

slide 6 of 10, Hamstring set (heel dig),

  • Sit with your affected leg bent. Your good leg should be straight and supported on the floor.
  • Tighten the muscles on the back of your bent leg (hamstring) by pressing your heel into the floor.
  • Hold for about 6 seconds, then rest for up to 10 seconds.
  • Repeat 8 to 12 times.

Hip adduction

Picture of how to do hip adduction exercise

slide 7 of 10, Hip adduction,

  • Sit on the floor with your knees bent.
  • Place a pillow between your knees.
  • Put your hands slightly behind your hips for support.
  • Squeeze the pillow by tightening the muscles on the inside of your thighs.
  • Hold for 6 seconds, then rest for up to 10 seconds.
  • Repeat 8 to 12 times.

Hip abduction

Picture of how to do hip abduction exercise

slide 8 of 10, Hip abduction,

  • Sit on the floor with your affected knee close to a wall.
  • Bend your affected knee but keep the other leg straight in front of you.
  • Place a pillow between the outside of your knee and the wall.
  • Put your hands slightly behind your hips for support.
  • Push the outside of your knee against the pillow and the wall.
  • Hold for 6 seconds, then rest for up to 10 seconds.
  • Repeat 8 to 12 times.

Lateral step-up

Picture of how to do lateral step-up exercise

slide 9 of 10, Lateral step-up,

  • Stand sideways on the bottom step of a staircase with your injured leg on the step and your other foot on the floor. Hold on to the banister or wall.
  • Use your injured leg to raise yourself up, bringing your other foot level with the stair step. Make sure to keep your hips level as you do this. And try to keep your knee moving in a straight line with your middle toe. Do not put the foot you are raising on the stair step.
  • Slowly lower your foot back down.
  • Repeat 8 to 12 times.

Wall squats with ball

Picture of how to do wall squats with ball

slide 10 of 10, Wall squats with ball,

  • Stand with your back facing a wall. Place your feet about a shoulder-width apart.
  • Place the therapy ball between your back and the wall, and move your feet out in front of you so they are about 30 centimetres in front of your hips.
  • Keep your arms at your sides, or put your hands on your hips.
  • Slowly squat down as if you are going to sit in a chair, rolling your back over the ball as you squat. The ball should move with you but stay pressed into the wall.
  • Be sure that your knees do not go in front of your toes as you squat.
  • Hold for 6 seconds.
  • Slowly rise to your standing position.
  • Repeat 8 to 12 times.

How do I get ready for a knee ligament repair?

  • Your healthcare provider will explain the procedure to you and offer you the chance to ask any questions that you might have about the procedure.
  • You will be asked to sign a consent form that gives your permission to do the procedure. Read the form carefully and ask questions if something is not clear.
  • In addition to a complete medical history, your healthcare provider may perform a complete physical exam to ensure you are in good health before undergoing the procedure. You may undergo blood tests or other diagnostic tests.
  • Tell your healthcare provider if you are sensitive to or are allergic to any medicines, latex, tape, and anesthetic agents (local and general).
  • Tell your healthcare provider of all medicines (prescribed and over-the-counter) and herbal supplements that you are taking.
  • Tell your healthcare provider if you have a history of bleeding disorders or if you are taking any anticoagulant (blood-thinning) medicines, aspirin, or other medicines that affect blood clotting. It may be necessary for you to stop these medicines before the procedure.
  • If you are pregnant or suspect that you are pregnant, you should notify your healthcare provider.
  • You will be asked to fast for 8 hours before the procedure, generally after midnight.
  • You may receive a sedative prior to the procedure to help you relax. Because the sedative may make you drowsy, you will need to arrange for someone to drive you home.
  • You may meet with a physical therapist prior to your surgery to discuss rehabilitation.
  • Arrange for someone to help around the house for a week or two after you are discharged from the hospital.
  • Based on your health condition, your healthcare provider may request other specific preparations.

What happens during a knee ligament repair?

Knee ligament repair may be done on an outpatient basis or rarely as part of your stay in a hospital. Procedures may vary depending on your condition and your healthcare provider’s practices.

Knee ligament repair may be performed while you are asleep under general anesthesia, or while you are awake under spinal anesthesia. If spinal anesthesia is used, you will have no feeling from your waist down. Your healthcare provider will discuss this with you in advance.

Generally, knee ligament repair surgery follows this process:

  • You will be asked to remove clothing and will be given a gown to wear.
  • An intravenous (IV) line may be started in your arm or hand.
  • You will be positioned on the operating table.
  • The anesthesiologist will continuously monitor your heart rate, blood pressure, breathing, and blood oxygen level during the surgery.
  • The skin over the surgical site will be cleansed with an antiseptic solution.
  • The healthcare provider will make several small incisions in the knee area.
  • The healthcare provider will do the surgery using an arthroscope (a small tube-shaped instrument that is inserted into a joint). The healthcare provider may reattach the torn ligament or reconstruct the torn ligament by using a portion (graft) of the patellar tendon (that connects the kneecap to the tibia), the hamstring tendon (from the back of the thigh), or other autografts. The tendon graft may come from the person (autograft) or from an organ donor (allograft).
  • The healthcare provider will drill small holes in the tibia and femur where the torn ligament was attached.
  • The healthcare provider will thread the graft through the holes and attach it with surgical staples, screws, or other
    means. Bone eventually grows around the graft.
  • The incision will be closed with stitches or surgical staples.
  • A sterile bandage or dressing will be applied.

What happens after a knee ligament repair?

After the surgery, you will be taken to the recovery room for observation. Your recovery process will vary depending on the type of anesthesia that is given. Once your blood pressure, pulse, and breathing are stable and you are alert, you will be taken to your hospital room or discharged to your home. Knee ligament repair is usually done on an outpatient basis.

You may be given crutches and a knee immobilizer before you go home.

Once you are home, it is important to keep the surgical area clean and dry. Your healthcare provider will give you specific bathing instructions. The stitches or surgical staples will be removed during a follow-up office visit.

Take a pain reliever for soreness as recommended by your healthcare provider. Aspirin or certain other pain medicines may increase the chance of bleeding. Be sure to take only recommended medicines.

To help reduce swelling, you may be asked to elevate your leg and apply an ice bag to the knee several times per day for the first few days. Your healthcare provider will arrange for an exercise program to help you regain muscle strength, stability, and range of motion. Physical therapy is a key part of recovery.

Tell your healthcare provider if you have any of the following:

  • Fever or chills
  • Redness, swelling, bleeding, or another drainage from the incision site
  • Increased pain around the incision site
  • Numbness or tingling in the leg
  • Calf swelling or tenderness

You may resume your normal diet unless your healthcare provider advises you differently.

Because of the limited mobility, it may be hard for a few weeks to resume your normal daily activities. You may need someone at home to assist you. You should not drive until your healthcare provider tells you to. Other activity restrictions may apply. Full recovery from the surgery and rehab may take several months.

Your healthcare provider may give you additional or alternate instructions after the procedure, depending on your particular situation.

Next steps

Before you agree to the test or the procedure make sure you know:

  • The name of the test or procedure
  • The reason you are having the test or procedure
  • What results to expect and what they mean
  • The risks and benefits of the test or procedure
  • What the possible side effects or complications are
  • When and where you are to have the test or procedure
  • Who will do the test or procedure and what that person’s qualifications are
  • What would happen if you did not have the test or procedure
  • Any alternative tests or procedures to think about
  • When and how you will get the results
  • Who to call after the test or procedure if you have questions or problems
  • How much you will have to pay for the test or procedure

References

Loading

If the article is helpful, please Click to Star Icon and Rate This Post!
[Total: 0 Average: 0]

MCL Injury – Causes, Symptoms, Treatment

MCL Injury/Medial Collateral Ligament Injury (MCL) is a flat band of connective tissue that runs from the medial epicondyle of the femur to the medial condyle of the tibia. Its role is to provide valgus stability to the knee joint. MCL injuries often occur in sports, especially in skiing; in fact, 60% of skiing knee injuries involve the MCL.

The tibial collateral ligament, also known as the medial collateral ligament (MCL), is a ligament extending from the medial epicondyle of the femur to the posteromedial crest of the tibia. The ligament is a broad and strong band that mainly functions to stabilize the knee joint in the coronal plane on the medial side.

Types of Medial Collateral Ligament Injuries

Doctors categorize MCL injuries according to the following criteria

  • Grade I tear –  This is a slight tear (or stretch) of the MCL. Both ends of the ligament are still attached to the bone, but a portion of the ligament may sag and be less taut. Recovery usually takes 1 to 2 weeks; therapy may not be needed.
  • Grade II tear – This is a slightly more severe tear of the MCL, with a portion of the ligament sagging. Pain and swelling is usually more severe than with a grade I tear. Kids usually need 3 to 4 weeks of rest and sometimes therapy.
  • Grade III tear – With this type of injury, the MCL breaks in half. Many kids are unable to bend the knee or bear weight on it without pain. They might be unstable while walking, and the knee may sometimes “give out.” Kids with this injury need to wear a knee brace and undergo rehab therapy for 6 weeks or longer.

Causes of Medial Collateral Ligament Injury

MCL injuries are regularly seen in contact and non-contact sports and often occur in the following instances:

  • Motor vehicle accidents – A “dashboard injury” occurs when the driver’s or passenger’s bent knee slams against the dashboard, pushing in the shinbone just below the knee and causing a tear.
  • Contact sports – Athletes in sports such as football and soccer can tear their ligament when they fall on a bent knee with their foot pointed down. The shinbone hits the ground first and it moves backward. Being tackled when your knee is bent also can cause this injury.
  • The knee is hit directly – especially during sports like soccer, rugby, and football
  • A person lands on a bent knee – such as during a fall or misstep
  • Landing directly on the front of the shinbone – such as when a dancer comes down from a leap and falls
  • A person makes cutting or pivoting maneuvers – such as when an athlete plants a foot and shifts directions
  • A person lands on one leg – which can happen after a jump in basketball or volleyball
  • A direct blow to the bent knee in an automobile injury
  • A sports-related injury in which the knee bends
  • Pulling on the ligament in a twisting injury or hyperextension
  • A misstep on uneven terrain
  • When the knee is hit directly on its outer side, such as from a football tackle
  • As a result of cutting maneuvers, when an athlete plants a foot and forcefully shifts direction
  • Squatting or lifting heavy objects, such as weight lifting
  • Landing awkwardly on the knee, such as when jumping in volleyball
  • Hyperextending the knee, such as when skiing
  • Through repeated stress to the knee, which causes the ligament to lose its elasticity (like a worn-out rubber band)

While sports injuries are the most common cause of MCL tears and sprains, any direct blow, such as during a car accident, can cause the ligament to be damaged.

Symptoms of Medial Collateral Ligament Injury

A person who experiences an MCL injury typically reports a combination of the following symptoms:

  • A “popping” sound – when the injury occurs. This sound is usually a sign of a grade II or grade III tear.
  • Immediate sharp pain – from the inner section of the knee.
  • Immediate swelling – at the inner knee. Swelling may increase and spread to the actual knee joint 1 or 2 days following the injury.
  • Tenderness –  around the inner knee. This area may be painful to the touch.
  • Increased pain – a few hours after the injury.
  • Bruising around the knee – especially around the location of the MCL (inner knee).
  • Noticeable looseness – in the knee. A person may be able to feel looseness around the inner knee when walking. The knee may feel as if it has a greater range of motion than normal.
  • Knee stiffness – may make walking, sitting down, rising from a chair or climbing stairs difficult. A person may have trouble bending or straightening the knee.
  • The feeling of knee instability – may be particularly noticeable during activities that strain the knee, such as going downstairs or pivoting on one leg. The knee may feel as if it is about to give out. Instability is usually associated with more severe MCL tears.
  • Pain when bearing weight – such as when walking, sitting down, or rising from a chair.

Diagnosis of Medial Collateral Ligament Injury

Stage

The severity and symptoms of a knee ligament sprain depend on the degree of stretching or tearing of the knee ligament. You may notice an audible snap or tearing sound at the time of your ligament injury.

  • In a mild, Grade I MCL sprain –  the knee ligament has a slight stretch, but they don’t tear. Although the knee joint may not hurt or swell very much, a mild ligament sprain can increase the risk of a repeat injury.
  • With a moderate Grade II MCL sprain – the knee ligament tears partially. Knee swelling and bruising are common, and the use of the knee joint is usually painful and challenging. You may have some complaints of instability or a feeling of the knee giving way.
    With a severe Grade III MCL sprain – the ligament tears completely, causing swelling and sometimes bleeding under the skin. As a result, the joint is unstable and can be difficult to bear weight. You may have a feeling of the knee giving way. Often there will be no pain or severe pain that subsides quickly following a grade 3 tear as all of the pain fibers are torn at the time of injury. With these more severe tears, other structures are at risk of injury, including the meniscus or ACL.

Physical Exam

Testing of the knee joint should be done using the following techniques and the findings compared to the contralateral, normal knee:[rx][rx]

  • Valgus stress at 0° and 20° – This test puts direct stress on the medial knee structures, reproducing the mechanism of injury. Valgus stress testing is done with the patient supine on the exam table. The lower extremity, supported by the examiner, is abducted. The examiner’s fingers monitor the medial joint space for gapping while placing the opposite hand on the ankle. The knee is placed in 20° of flexion. The examiner then uses their own thigh as a fulcrum at the knee and applies a valgus force (pulling the foot and ankle away from the patient’s body). The force is then used to establish the amount of gapping present within the joint. It has been reported that 20° of flexion is best for isolating the MCL, allowing the practitioner to establish the degree of injury (see Classification). Additional testing is done at 0° to determine if a Grade III injury is present.[rx][rx]
  • Valgus stress testing –  is the best way to test the integrity of the MCL directly. The patient should be positioned supine with the hip abducted on the affected side so that the leg is unsupported off the table. The knee should be brought into 30 degrees of flexion. The examiner should grasp the ankle with one hand and push the ankle laterally while applying a valgus force to the knee with the other hand.
  • Anteromedial drawer test – This test is performed with the patient supine with the knee flexed to 80-90°. The foot is externally rotated 10-15° and the examiner supplies an anterior and external rotational force. The joint can then be evaluated for tibial anteromedial rotation, taking care to recognize the possibility of posterolateral corner instability giving similar rotational test results. As always, compare the test in the opposite knee.[rx][rx][rx]
  • Dial Test (anteromedial rotation test) – This test should be executed with the patient lying both supine and prone. When the patient is supine, the knees must be flexed 30° off the table. The thigh is then stabilized and the foot externally rotated. The examiner watches for the tibial tubercle of the affected knee to rotate as the foot rotates, comparing it to the contralateral knee. A positive test will show the rotation of greater than 10-15° of rotation compared to the opposite knee. This is most easily assessed with a hand placed over the tibia while testing. When the patient is prone, the knee is flexed to 90° and both feet are externally rotated and compared, noting the difference from the non-injured joint. Similar to the anteromedial drawer test, a false positive test can result from a posterolateral corner injury. Testing at both 30° and 90° helps to distinguish between these injuries: one should monitor where the tibial rotation occurs (anteromedial or posterolateral) in the supine position and also assess for medial or lateral joint line gapping to differentiate between these two injuries.[rx][rx][rx]

Imaging Test

  • X-rays – use low levels of radiation and give doctors a view of a person’s bones. Although MCL injuries do not show up on standard X-ray exams, they are a relatively inexpensive, fast way to rule out other possible injuries that might be causing the symptoms. Additionally, a stress X-ray—where a physician applies a valgus force to the knee during the exam—can help to determine the degree of ligamentous injury.
  • Magnetic resonance imaging (MRI) – shows a detailed view of the soft tissue surrounding the knee joint. An MRI can also help a doctor determine the location and grade of an MCL tear.
  • Ultrasound imaging – uses high-frequency sound waves to build a picture of the knee’s tissues. Ultrasound can be utilized in situations when an MRI is not recommended. Ultrasound may also be used in an urgent care setting to make an immediate assessment, allowing the injury to be treated more quickly.

Treatment of Medial Collateral Ligament Injury

Nonsurgical

Most everyone who has an MCL injury will be advised by a health care professional to follow the RICE method:

  • Rest – Activities that irritates the knee, such as pivoting and walking for long periods of time, should be avoided until the symptoms get better.
  • Ice – A person may be advised to apply ice packs to the knee to help reduce swelling and decrease pain. Apply ice with a compressive wrap for 20 minutes and repeat every 3-4 hours for the first 24-48 hours.
  • Compression – Wearing a tight, elastic bandage around the knee can help stop swelling.
  • Elevation – Keeping the knee propped up above the waist can help decrease swelling.
  • Wear a knee cap – that allows the knee to move forward and backward but restricts side-to-side movement. Apply minimally restrictive lateral hinge brace (grade II or III injuries).
  • Use crutches – to avoid weight-bearing. Crutches are not needed in all cases. Dispense crutches; allow weight-bearing as tolerated.
  • Bracing – Your knee must be protected from the same sideways force that caused the injury. You may need to change your daily activities to avoid risky movements. Your doctor may recommend a brace to protect the injured ligament from stress. To further protect your knee, you may be given crutches to keep you from putting weight on your

Medication

If the injury is severe and pain is intolerable the following medicine can be considered to prescribe

  • Take anti-inflammatory medications – Non-steroidal anti-inflammatory drugs (NSAIDs), like will help with pain and swelling. However, these drugs can have side effects, such as an increased risk of bleeding and ulcers. They should be only used occasionally unless your doctor specifically says otherwise.
  • Antibiotic – Cefuroxime or Azithromycin, or  Flucloxacillin or any other cephalosporin/quinolone antibiotic must be used to prevent infection or clotted blood remove to prevent furthers swelling and edema.
  • NSAIDs – Prescription-strength drugs that reduce both pain and inflammation. Pain medicines and anti-inflammatory drugs help to relieve pain and stiffness, allowing for increased mobility and exercise. There are many common over-the-counter medicines called non-steroidal anti-inflammatory drugs (NSAIDs). They include and KetorolacAceclofenacNaproxen, Etoricoxib.
  • Corticosteroids – Also known as oral steroids, these medications reduce inflammation.
  • Muscle Relaxants –  These medications provide relief from associated muscle spasms.
  • Neuropathic Agents – Drugs(pregabalin & gabapentin) that address neuropathic—or nerve-related—pain. This includes burning, numbness, and tingling.
  • Opioids – Also known as narcotics, these medications are intense pain relievers that should only be used under a doctor’s careful supervision.
  • Topical Medications – These prescription-strength creams, gels, ointments, patches, and sprays help relieve pain and inflammation through the skin.
  • Calcium & vitamin D3 – to improve bone health and healing fracture. As a general rule, men and women age 50 and older should consume 1,200 milligrams of calcium a day, and 600 international units of vitamin D a day.
  • Antidepressants – A drug that blocks pain messages from your brain and boosts the effects of endorphins (your body’s natural painkillers).
  • Glucosamine & DiacereinChondroitin sulfate – can be used to tightening the loose tension, cartilage, ligament, and cartilage, ligament regenerates cartilage or inhabits the further degeneration of cartilage, ligament. They are structural components of articular cartilage, and the thought is that a supplement will aid in the health of articular cartilage.
  • Intra-articular corticosteroid injections – may be useful for symptomatic injury especially where there is a considerable inflammatory component. The delivery of the corticosteroid directly into the knee may reduce local inflammation associated with injury and minimize the systemic effects of the steroid.
  • Intra-articular hyaluronic acid injections (HA) – injections are another injectable option for a knee injury. HA is a glycosaminoglycan that is found throughout the human body and is an important component of synovial fluid and articular cartilage. HA breaks down during the process of ligament injury and contributes to the loss of articular cartilage as well as stiffness and pain. Local delivery of HA into the joint acts as a lubricant and may help increase the natural production of HA in the joint.
  • Platelet-rich plasma (PRP) injection – newer therapy where a blood sample is taken from the patient, spun in a centrifuge, growth factors are isolated and then they are injected back into the affected site to stimulate faster healing.

Surgery

  • Knee arthroscopy – minimally invasive surgical procedure to diagnose and repair an MCL injury; small incisions are made in the knee and a camera is inserted to visualize the injury and determine treatment.

Physiotherapy

Depending on the grade of injury, you can start to feel better within days to just a few weeks of the damage. Your physiotherapy treatment will aim to:

  • Reduce pain and inflammation.
  • Normalize joint range of motion.
  • Strengthen your knee: esp quadriceps (esp VMO) and hamstrings.
  • Strengthen your lower limb: calves, hip and pelvis muscles.
  • Improve patellofemoral (knee cap) alignment
  • Normalize your muscle lengths
  • Improve your proprioception, agility and balance
  • Improve your technique and function, e.g. walking, running, squatting, hopping and landing.
  • Guide return to sports activities and exercises
  • Minimize your chance of re-injury.

Exercises

A physical therapist will be able to advise on strengthening exercises to aid recovery after an MCL tear. Some possible exercises may include:

Exercise to restore range of motion and increase strength. These exercises typically include gentle stretches and strengthening exercises. People may also do upper body workouts and swim in order to keep up general conditioning. Some people may work with a physical therapist for guided treatment.

1. Hamstring curl

  • Stand up straight, engaging the stomach muscles.
  • Stand on one leg and slowly bend the opposite knee by bringing the heel up toward the buttocks.
  • Hold for 30 seconds before repeating on the other side of the body.
  • A person can hold on to a chair or table for support if needed.

2. Wall slide

  • Standing up straight, with both feet flat on the ground, place the back firmly against a wall.
  • Slowly slide down, keeping the back against the wall until reaching a squatting position.
  • Hold for 30 seconds.
  • Push up from the feet to stand up, keeping the back flat against the wall.
  • Repeat 10 to 15 times.

3. Chair squat

  • Standing on one leg, slowly squat toward sitting down onto a chair.
  • Return to a standing position, again standing on one leg.
  • Bend at the waist and keep the body in a straight line when standing.
  • A person may need to build up to sitting fully on the chair

Subsequent treatment

  • Begin active range-of-motion exercises in cold whirlpool at least twice daily.
  • Begin straight-leg raises and electrical muscle stimulation (if available).
  • Maintain general conditioning with upper body ergometer or swimming.

Goal one: Walking unassisted without a limp

  • Discard crutches.
  • Continue range of motion, isometric strengthening, and conditioning exercises.

Goal two: 90 degrees of knee flexion

  • Begin stair climber and bicycle ergometer with seat high; gradually lower seat.
  • Begin isotonic progressive restrictive exercise for quadriceps and hamstrings; supplement with isokinetic exercise if available.
  • Continue range of motion and conditioning exercises.

Goal Three: Full knee motion

  • Begin running and functional exercise program.
  • For example:
    • Jog 1 mile.

    • Five successive 100-yard sprints at half speed.

    • Five successive 100-yard sprints at three-quarters speed.

    • Five successive 100-yard sprints at full speed.

    • Five zigzag sprints at half speed.

    • Five zigzag sprints at full speed.

  • Other agility drills (e.g. Cariocas).
  • Continue conditioning.

Goal four: Complete entire running program in one session

  • May return to competition if the athlete has minimal pain, full range of motion, and 90 percent of normal strength.
  • Continue to use a brace for all sports participation for the remainder of the season.

Rehabilitation

The rehabilitation for a non-operative treatment can be split into four phases:

  • Phase one is from one to two weeks. Phase one consists of controlling the swelling of the knee by applying ice for 15 minutes every two hours (first two days). The rest of the week the frequency can be reduced to three times a day. Use ice as tolerated and as needed based on symptoms. In the begin, the patient needs to use crutches. Early weight bearing is encouraged because patients who increasing their weight-bearing, they can progressively reduce their dependence on crutches. Afterward, progress to one crutch and let the patient stop using the crutches only when normal gait is possible. Another aim of this phase is to try to maintain the ability to straighten and bend the knee from 0° to 90° knee flexion. For achieving the range of motion of the knee it is important to emphasize full extension and progress flexion as tolerated. Pain-free stretches for the hamstrings, quads, groin and calf muscles (in particular) are suggested. At last, there are therapeutic exercises. The patient may begin with static strengthening exercises (as soon as pain allows it). They consist for example of Quadricpes sets, straight leg raises, range-of-motion exercises, sitting hip flexion, side-lying hip abduction, standing hip extension, standing, and hamstring curls. As soon as patients can tolerate it, they are encouraged to ride a stationary bike to improve the range of motion of the knee. This would ensure accelerated healing. The amount of time and effort on the stationary bike is increased as tolerated. Obviously, every patient is different and these are not the standard exercises that have to be given to patients. There are no limits on upper extremity workouts that do not affect the injured knee[rx]. It’s important that the patient rests from all painful activities (use crutches if necessary), and that the MCL is well protected (by wearing a stabilized knee brace).
  • Starting at week three-phase two begins – The aims for the range of motion are the same as in phase one. Progress to 20 minutes of biking. Increase also the resistance as tolerated by the patient. Biking will ensure healing, rebuild strength, and maintain aerobic conditioning. The physiotherapist can give other exercises like Hamstring curls, leg presses (double-leg), and step-ups. As a precaution, the patient has the chance to be examined by a physician every three weeks to verify the healing of the ligament[rx].
  • Phase three starts from week five –  A major goal for this phase: full weight-bearing on the injured knee. Discontinue the use of a brace when ambulating with full weight-bearing is possible and there is no gait deviation. The range of motion has to be fully achieved and had to be symmetrical with the not injured knee. The therapeutic exercises are the same as in phase two. They may benefit progression. We continue with cold therapy and compression to eliminate swelling. In this phase, you can commence with balance and proprioceptive activities. To maintain aerobic fitness the patient can use the stepper or (if possible) may begin to swim. As a precaution, the patient has the chance to be examined by a physician every five to six weeks. When needed, you can be allowed to make stress radiography as a precaution.[rx]
  • Six weeks after injuring the knee, phase four can begin – Discontinue wearing the brace during the gait. Athletics can wear the brace for competition through the competitive season for at least three months. Cold therapy still needs to be applied. The aim of the therapeutic exercises is more focused on sport-specific or daily movements. The intensity of the strengthening exercises needs to be increased and instead of double leg exercises, we change to single-leg exercises. The patient may start running again at a comfortable pace (make sure the patient doesn’t make sudden changes of direction). As a precaution, it is best to return the competition once full motion and strength is returned and when the patient passes a sport functional test[rx].

How to do the exercises

Knee flexion with heel slide

Picture of how to do knee flexion with heel slide

slide 1 of 10, Knee flexion with heel slide,

  • Lie on your back with your knees bent.
  • Slide your heel back by bending your affected knee as far as you can. Then hook your other foot around your ankle to help pull your heel even farther back.
  • Hold for about 6 seconds, then rest for up to 10 seconds.
  • Repeat 8 to 12 times.

Heel slides on a wall

Pictures of how to do heel slides on a wall

slide 2 of 10, Heel slides on a wall,

  • Lie on the floor close enough to a wall so that you can place both legs up on the wall. Your hips should be as close to the wall as is comfortable for you.
  • Start with both feet resting on the wall. Slowly let the foot of your affected leg slide down the wall until you feel a stretch in your knee.
  • Hold for 15 to 30 seconds.
  • Then slowly slide your foot up to where you started.
  • Repeat 2 to 4 times.

Quad sets

Picture of how to do quadriceps exercise

slide 3 of 10, Quad sets,

  • Sit with your affected leg straight and supported on the floor or a firm bed. Place a small, rolled-up towel under your knee. Your other leg should be bent, with that foot flat on the floor.
  • Tighten the thigh muscles of your affected leg by pressing the back of your knee down into the towel.
  • Hold for about 6 seconds, then rest for up to 10 seconds.
  • Repeat 8 to 12 times.

Short-arc quad

Picture of how to do short-arc quad exercise

slide 4 of 10, Short-arc quad,

  • Lie on your back with your knees bent over a foam roll or a large rolled-up towel.
  • Lift the lower part of your affected leg and straighten your knee by tightening your thigh muscle. Keep the bottom of your knee on the foam roll or rolled-up towel.
  • Hold your knee straight for about 6 seconds, then slowly bend your knee and lower your leg back to the floor. Rest for up to 10 seconds between repetitions.
  • Repeat 8 to 12 times.

Straight-leg raises to the front

Picture of how to do straight-leg raise exercise

slide 5 of 10, Straight-leg raises to the front,

  • Lie on your back with your good knee bent so that your foot rests flat on the floor. Your affected leg should be straight. Make sure that your low back has a normal curve. You should be able to slip your hand in between the floor and the small of your back, with your palm touching the floor and your back touching the back of your hand.
  • Tighten the thigh muscles in your affected leg by pressing the back of your knee flat down to the floor. Hold your knee straight.
  • Keeping the thigh muscles tight and your leg straight, lift your affected leg up so that your heel is about 30 centimeters off the floor. Hold for about 6 seconds, then lower slowly.
  • Relax for up to 10 seconds between repetitions.
  • Repeat 8 to 12 times.

Hamstring set (heel dig)

Picture of how to do seated hamstring exercise

slide 6 of 10, Hamstring set (heel dig),

  • Sit with your affected leg bent. Your good leg should be straight and supported on the floor.
  • Tighten the muscles on the back of your bent leg (hamstring) by pressing your heel into the floor.
  • Hold for about 6 seconds, then rest for up to 10 seconds.
  • Repeat 8 to 12 times.

Hip adduction

Picture of how to do hip adduction exercise

slide 7 of 10, Hip adduction,

  • Sit on the floor with your knees bent.
  • Place a pillow between your knees.
  • Put your hands slightly behind your hips for support.
  • Squeeze the pillow by tightening the muscles on the inside of your thighs.
  • Hold for 6 seconds, then rest for up to 10 seconds.
  • Repeat 8 to 12 times.

Hip abduction

Picture of how to do hip abduction exercise

slide 8 of 10, Hip abduction,

  • Sit on the floor with your affected knee close to a wall.
  • Bend your affected knee but keep the other leg straight in front of you.
  • Place a pillow between the outside of your knee and the wall.
  • Put your hands slightly behind your hips for support.
  • Push the outside of your knee against the pillow and the wall.
  • Hold for 6 seconds, then rest for up to 10 seconds.
  • Repeat 8 to 12 times.

Lateral step-up

Picture of how to do lateral step-up exercise

slide 9 of 10, Lateral step-up,

  • Stand sideways on the bottom step of a staircase with your injured leg on the step and your other foot on the floor. Hold on to the banister or wall.
  • Use your injured leg to raise yourself up, bringing your other foot level with the stair step. Make sure to keep your hips level as you do this. And try to keep your knee moving in a straight line with your middle toe. Do not put the foot you are raising on the stair step.
  • Slowly lower your foot back down.
  • Repeat 8 to 12 times.

Wall squats with ball

Picture of how to do wall squats with ball

slide 10 of 10, Wall squats with ball,

  • Stand with your back facing a wall. Place your feet about a shoulder-width apart.
  • Place the therapy ball between your back and the wall, and move your feet out in front of you so they are about 30 centimetres in front of your hips.
  • Keep your arms at your sides, or put your hands on your hips.
  • Slowly squat down as if you are going to sit in a chair, rolling your back over the ball as you squat. The ball should move with you but stay pressed into the wall.
  • Be sure that your knees do not go in front of your toes as you squat.
  • Hold for 6 seconds.
  • Slowly rise to your standing position.
  • Repeat 8 to 12 times.

How do I get ready for a knee ligament repair?

  • Your healthcare provider will explain the procedure to you and offer you the chance to ask any questions that you might have about the procedure.
  • You will be asked to sign a consent form that gives your permission to do the procedure. Read the form carefully and ask questions if something is not clear.
  • In addition to a complete medical history, your healthcare provider may perform a complete physical exam to ensure you are in good health before undergoing the procedure. You may undergo blood tests or other diagnostic tests.
  • Tell your healthcare provider if you are sensitive to or are allergic to any medicines, latex, tape, and anesthetic agents (local and general).
  • Tell your healthcare provider of all medicines (prescribed and over-the-counter) and herbal supplements that you are taking.
  • Tell your healthcare provider if you have a history of bleeding disorders or if you are taking any anticoagulant (blood-thinning) medicines, aspirin, or other medicines that affect blood clotting. It may be necessary for you to stop these medicines before the procedure.
  • If you are pregnant or suspect that you are pregnant, you should notify your healthcare provider.
  • You will be asked to fast for 8 hours before the procedure, generally after midnight.
  • You may receive a sedative prior to the procedure to help you relax. Because the sedative may make you drowsy, you will need to arrange for someone to drive you home.
  • You may meet with a physical therapist prior to your surgery to discuss rehabilitation.
  • Arrange for someone to help around the house for a week or two after you are discharged from the hospital.
  • Based on your health condition, your healthcare provider may request other specific preparations.

What happens during a knee ligament repair?

Knee ligament repair may be done on an outpatient basis or rarely as part of your stay in a hospital. Procedures may vary depending on your condition and your healthcare provider’s practices.

Knee ligament repair may be performed while you are asleep under general anesthesia, or while you are awake under spinal anesthesia. If spinal anesthesia is used, you will have no feeling from your waist down. Your healthcare provider will discuss this with you in advance.

Generally, knee ligament repair surgery follows this process:

  • You will be asked to remove clothing and will be given a gown to wear.
  • An intravenous (IV) line may be started in your arm or hand.
  • You will be positioned on the operating table.
  • The anesthesiologist will continuously monitor your heart rate, blood pressure, breathing, and blood oxygen level during the surgery.
  • The skin over the surgical site will be cleansed with an antiseptic solution.
  • The healthcare provider will make several small incisions in the knee area.
  • The healthcare provider will do the surgery using an arthroscope (a small tube-shaped instrument that is inserted into a joint). The healthcare provider may reattach the torn ligament or reconstruct the torn ligament by using a portion (graft) of the patellar tendon (that connects the kneecap to the tibia), the hamstring tendon (from the back of the thigh), or other autografts. The tendon graft may come from the person (autograft) or from an organ donor (allograft).
  • The healthcare provider will drill small holes in the tibia and femur where the torn ligament was attached.
  • The healthcare provider will thread the graft through the holes and attach it with surgical staples, screws, or other
    means. Bone eventually grows around the graft.
  • The incision will be closed with stitches or surgical staples.
  • A sterile bandage or dressing will be applied.

What happens after a knee ligament repair?

After the surgery, you will be taken to the recovery room for observation. Your recovery process will vary depending on the type of anesthesia that is given. Once your blood pressure, pulse, and breathing are stable and you are alert, you will be taken to your hospital room or discharged to your home. Knee ligament repair is usually done on an outpatient basis.

You may be given crutches and a knee immobilizer before you go home.

Once you are home, it is important to keep the surgical area clean and dry. Your healthcare provider will give you specific bathing instructions. The stitches or surgical staples will be removed during a follow-up office visit.

Take a pain reliever for soreness as recommended by your healthcare provider. Aspirin or certain other pain medicines may increase the chance of bleeding. Be sure to take only recommended medicines.

To help reduce swelling, you may be asked to elevate your leg and apply an ice bag to the knee several times per day for the first few days. Your healthcare provider will arrange for an exercise program to help you regain muscle strength, stability, and range of motion. Physical therapy is a key part of recovery.

Tell your healthcare provider if you have any of the following:

  • Fever or chills
  • Redness, swelling, bleeding, or another drainage from the incision site
  • Increased pain around the incision site
  • Numbness or tingling in the leg
  • Calf swelling or tenderness

You may resume your normal diet unless your healthcare provider advises you differently.

Because of the limited mobility, it may be hard for a few weeks to resume your normal daily activities. You may need someone at home to assist you. You should not drive until your healthcare provider tells you to. Other activity restrictions may apply. Full recovery from the surgery and rehab may take several months.

Your healthcare provider may give you additional or alternate instructions after the procedure, depending on your particular situation.

Next steps

Before you agree to the test or the procedure make sure you know:

  • The name of the test or procedure
  • The reason you are having the test or procedure
  • What results to expect and what they mean
  • The risks and benefits of the test or procedure
  • What the possible side effects or complications are
  • When and where you are to have the test or procedure
  • Who will do the test or procedure and what that person’s qualifications are
  • What would happen if you did not have the test or procedure
  • Any alternative tests or procedures to think about
  • When and how you will get the results
  • Who to call after the test or procedure if you have questions or problems
  • How much you will have to pay for the test or procedure

References

Loading

If the article is helpful, please Click to Star Icon and Rate This Post!
[Total: 0 Average: 0]

What Is Medial Collateral Ligament Injury?

What Is Medial Collateral Ligament Injury? /Medial Collateral Ligament Injury (MCL) is a flat band of connective tissue that runs from the medial epicondyle of the femur to the medial condyle of the tibia. Its role is to provide valgus stability to the knee joint. MCL injuries often occur in sports, especially in skiing; in fact, 60% of skiing knee injuries involve the MCL.

The tibial collateral ligament, also known as the medial collateral ligament (MCL), is a ligament extending from the medial epicondyle of the femur to the posteromedial crest of the tibia. The ligament is a broad and strong band that mainly functions to stabilize the knee joint in the coronal plane on the medial side.

Types of Medial Collateral Ligament Injuries

Doctors categorize MCL injuries according to the following criteria

  • Grade I tear –  This is a slight tear (or stretch) of the MCL. Both ends of the ligament are still attached to the bone, but a portion of the ligament may sag and be less taut. Recovery usually takes 1 to 2 weeks; therapy may not be needed.
  • Grade II tear – This is a slightly more severe tear of the MCL, with a portion of the ligament sagging. Pain and swelling is usually more severe than with a grade I tear. Kids usually need 3 to 4 weeks of rest and sometimes therapy.
  • Grade III tear – With this type of injury, the MCL breaks in half. Many kids are unable to bend the knee or bear weight on it without pain. They might be unstable while walking, and the knee may sometimes “give out.” Kids with this injury need to wear a knee brace and undergo rehab therapy for 6 weeks or longer.

Causes of Medial Collateral Ligament Injury

MCL injuries are regularly seen in contact and non-contact sports and often occur in the following instances:

  • Motor vehicle accidents – A “dashboard injury” occurs when the driver’s or passenger’s bent knee slams against the dashboard, pushing in the shinbone just below the knee and causing a tear.
  • Contact sports – Athletes in sports such as football and soccer can tear their ligament when they fall on a bent knee with their foot pointed down. The shinbone hits the ground first and it moves backward. Being tackled when your knee is bent also can cause this injury.
  • The knee is hit directly – especially during sports like soccer, rugby, and football
  • A person lands on a bent knee – such as during a fall or misstep
  • Landing directly on the front of the shinbone – such as when a dancer comes down from a leap and falls
  • A person makes cutting or pivoting maneuvers – such as when an athlete plants a foot and shifts directions
  • A person lands on one leg – which can happen after a jump in basketball or volleyball
  • A direct blow to the bent knee in an automobile injury
  • A sports-related injury in which the knee bends
  • Pulling on the ligament in a twisting injury or hyperextension
  • A misstep on uneven terrain
  • When the knee is hit directly on its outer side, such as from a football tackle
  • As a result of cutting maneuvers, when an athlete plants a foot and forcefully shifts direction
  • Squatting or lifting heavy objects, such as weight lifting
  • Landing awkwardly on the knee, such as when jumping in volleyball
  • Hyperextending the knee, such as when skiing
  • Through repeated stress to the knee, which causes the ligament to lose its elasticity (like a worn-out rubber band)

While sports injuries are the most common cause of MCL tears and sprains, any direct blow, such as during a car accident, can cause the ligament to be damaged.

Symptoms of Medial Collateral Ligament Injury

A person who experiences an MCL injury typically reports a combination of the following symptoms:

  • A “popping” sound – when the injury occurs. This sound is usually a sign of a grade II or grade III tear.
  • Immediate sharp pain – from the inner section of the knee.
  • Immediate swelling – at the inner knee. Swelling may increase and spread to the actual knee joint 1 or 2 days following the injury.
  • Tenderness –  around the inner knee. This area may be painful to the touch.
  • Increased pain – a few hours after the injury.
  • Bruising around the knee – especially around the location of the MCL (inner knee).
  • Noticeable looseness – in the knee. A person may be able to feel looseness around the inner knee when walking. The knee may feel as if it has a greater range of motion than normal.
  • Knee stiffness – may make walking, sitting down, rising from a chair or climbing stairs difficult. A person may have trouble bending or straightening the knee.
  • The feeling of knee instability – may be particularly noticeable during activities that strain the knee, such as going downstairs or pivoting on one leg. The knee may feel as if it is about to give out. Instability is usually associated with more severe MCL tears.
  • Pain when bearing weight – such as when walking, sitting down, or rising from a chair.

Diagnosis of Medial Collateral Ligament Injury

Stage

The severity and symptoms of a knee ligament sprain depend on the degree of stretching or tearing of the knee ligament. You may notice an audible snap or tearing sound at the time of your ligament injury.

  • In a mild, Grade I MCL sprain –  the knee ligament has a slight stretch, but they don’t tear. Although the knee joint may not hurt or swell very much, a mild ligament sprain can increase the risk of a repeat injury.
  • With a moderate Grade II MCL sprain – the knee ligament tears partially. Knee swelling and bruising are common, and the use of the knee joint is usually painful and challenging. You may have some complaints of instability or a feeling of the knee giving way.
    With a severe Grade III MCL sprain – the ligament tears completely, causing swelling and sometimes bleeding under the skin. As a result, the joint is unstable and can be difficult to bear weight. You may have a feeling of the knee giving way. Often there will be no pain or severe pain that subsides quickly following a grade 3 tear as all of the pain fibers are torn at the time of injury. With these more severe tears, other structures are at risk of injury, including the meniscus or ACL.

Physical Exam

Testing of the knee joint should be done using the following techniques and the findings compared to the contralateral, normal knee:[rx][rx]

  • Valgus stress at 0° and 20° – This test puts direct stress on the medial knee structures, reproducing the mechanism of injury. Valgus stress testing is done with the patient supine on the exam table. The lower extremity, supported by the examiner, is abducted. The examiner’s fingers monitor the medial joint space for gapping while placing the opposite hand on the ankle. The knee is placed in 20° of flexion. The examiner then uses their own thigh as a fulcrum at the knee and applies a valgus force (pulling the foot and ankle away from the patient’s body). The force is then used to establish the amount of gapping present within the joint. It has been reported that 20° of flexion is best for isolating the MCL, allowing the practitioner to establish the degree of injury (see Classification). Additional testing is done at 0° to determine if a Grade III injury is present.[rx][rx]
  • Valgus stress testing –  is the best way to test the integrity of the MCL directly. The patient should be positioned supine with the hip abducted on the affected side so that the leg is unsupported off the table. The knee should be brought into 30 degrees of flexion. The examiner should grasp the ankle with one hand and push the ankle laterally while applying a valgus force to the knee with the other hand.
  • Anteromedial drawer test – This test is performed with the patient supine with the knee flexed to 80-90°. The foot is externally rotated 10-15° and the examiner supplies an anterior and external rotational force. The joint can then be evaluated for tibial anteromedial rotation, taking care to recognize the possibility of posterolateral corner instability giving similar rotational test results. As always, compare the test in the opposite knee.[rx][rx][rx]
  • Dial Test (anteromedial rotation test) – This test should be executed with the patient lying both supine and prone. When the patient is supine, the knees must be flexed 30° off the table. The thigh is then stabilized and the foot externally rotated. The examiner watches for the tibial tubercle of the affected knee to rotate as the foot rotates, comparing it to the contralateral knee. A positive test will show the rotation of greater than 10-15° of rotation compared to the opposite knee. This is most easily assessed with a hand placed over the tibia while testing. When the patient is prone, the knee is flexed to 90° and both feet are externally rotated and compared, noting the difference from the non-injured joint. Similar to the anteromedial drawer test, a false positive test can result from a posterolateral corner injury. Testing at both 30° and 90° helps to distinguish between these injuries: one should monitor where the tibial rotation occurs (anteromedial or posterolateral) in the supine position and also assess for medial or lateral joint line gapping to differentiate between these two injuries.[rx][rx][rx]

Imaging Test

  • X-rays – use low levels of radiation and give doctors a view of a person’s bones. Although MCL injuries do not show up on standard X-ray exams, they are a relatively inexpensive, fast way to rule out other possible injuries that might be causing the symptoms. Additionally, a stress X-ray—where a physician applies a valgus force to the knee during the exam—can help to determine the degree of ligamentous injury.
  • Magnetic resonance imaging (MRI) – shows a detailed view of the soft tissue surrounding the knee joint. An MRI can also help a doctor determine the location and grade of an MCL tear.
  • Ultrasound imaging – uses high-frequency sound waves to build a picture of the knee’s tissues. Ultrasound can be utilized in situations when an MRI is not recommended. Ultrasound may also be used in an urgent care setting to make an immediate assessment, allowing the injury to be treated more quickly.

Treatment of Medial Collateral Ligament Injury

Nonsurgical

Most everyone who has an MCL injury will be advised by a health care professional to follow the RICE method:

  • Rest – Activities that irritates the knee, such as pivoting and walking for long periods of time, should be avoided until the symptoms get better.
  • Ice – A person may be advised to apply ice packs to the knee to help reduce swelling and decrease pain. Apply ice with a compressive wrap for 20 minutes and repeat every 3-4 hours for the first 24-48 hours.
  • Compression – Wearing a tight, elastic bandage around the knee can help stop swelling.
  • Elevation – Keeping the knee propped up above the waist can help decrease swelling.
  • Wear a knee cap – that allows the knee to move forward and backward but restricts side-to-side movement. Apply minimally restrictive lateral hinge brace (grade II or III injuries).
  • Use crutches – to avoid weight-bearing. Crutches are not needed in all cases. Dispense crutches; allow weight-bearing as tolerated.
  • Bracing – Your knee must be protected from the same sideways force that caused the injury. You may need to change your daily activities to avoid risky movements. Your doctor may recommend a brace to protect the injured ligament from stress. To further protect your knee, you may be given crutches to keep you from putting weight on your

Medication

If the injury is severe and pain is intolerable the following medicine can be considered to prescribe

  • Take anti-inflammatory medications – Non-steroidal anti-inflammatory drugs (NSAIDs), like will help with pain and swelling. However, these drugs can have side effects, such as an increased risk of bleeding and ulcers. They should be only used occasionally unless your doctor specifically says otherwise.
  • Antibiotic – Cefuroxime or Azithromycin, or  Flucloxacillin or any other cephalosporin/quinolone antibiotic must be used to prevent infection or clotted blood remove to prevent furthers swelling and edema.
  • NSAIDs – Prescription-strength drugs that reduce both pain and inflammation. Pain medicines and anti-inflammatory drugs help to relieve pain and stiffness, allowing for increased mobility and exercise. There are many common over-the-counter medicines called non-steroidal anti-inflammatory drugs (NSAIDs). They include and KetorolacAceclofenacNaproxen, Etoricoxib.
  • Corticosteroids – Also known as oral steroids, these medications reduce inflammation.
  • Muscle Relaxants –  These medications provide relief from associated muscle spasms.
  • Neuropathic Agents – Drugs(pregabalin & gabapentin) that address neuropathic—or nerve-related—pain. This includes burning, numbness, and tingling.
  • Opioids – Also known as narcotics, these medications are intense pain relievers that should only be used under a doctor’s careful supervision.
  • Topical Medications – These prescription-strength creams, gels, ointments, patches, and sprays help relieve pain and inflammation through the skin.
  • Calcium & vitamin D3 – to improve bone health and healing fracture. As a general rule, men and women age 50 and older should consume 1,200 milligrams of calcium a day, and 600 international units of vitamin D a day.
  • Antidepressants – A drug that blocks pain messages from your brain and boosts the effects of endorphins (your body’s natural painkillers).
  • Glucosamine & DiacereinChondroitin sulfate – can be used to tightening the loose tension, cartilage, ligament, and cartilage, ligament regenerates cartilage or inhabits the further degeneration of cartilage, ligament. They are structural components of articular cartilage, and the thought is that a supplement will aid in the health of articular cartilage.
  • Intra-articular corticosteroid injections – may be useful for symptomatic injury especially where there is a considerable inflammatory component. The delivery of the corticosteroid directly into the knee may reduce local inflammation associated with injury and minimize the systemic effects of the steroid.
  • Intra-articular hyaluronic acid injections (HA) – injections are another injectable option for a knee injury. HA is a glycosaminoglycan that is found throughout the human body and is an important component of synovial fluid and articular cartilage. HA breaks down during the process of ligament injury and contributes to the loss of articular cartilage as well as stiffness and pain. Local delivery of HA into the joint acts as a lubricant and may help increase the natural production of HA in the joint.
  • Platelet-rich plasma (PRP) injection – newer therapy where a blood sample is taken from the patient, spun in a centrifuge, growth factors are isolated and then they are injected back into the affected site to stimulate faster healing.

Surgery

  • Knee arthroscopy – minimally invasive surgical procedure to diagnose and repair an MCL injury; small incisions are made in the knee and a camera is inserted to visualize the injury and determine treatment.

Physiotherapy

Depending on the grade of injury, you can start to feel better within days to just a few weeks of the damage. Your physiotherapy treatment will aim to:

  • Reduce pain and inflammation.
  • Normalize joint range of motion.
  • Strengthen your knee: esp quadriceps (esp VMO) and hamstrings.
  • Strengthen your lower limb: calves, hip and pelvis muscles.
  • Improve patellofemoral (knee cap) alignment
  • Normalize your muscle lengths
  • Improve your proprioception, agility and balance
  • Improve your technique and function, e.g. walking, running, squatting, hopping and landing.
  • Guide return to sports activities and exercises
  • Minimize your chance of re-injury.

Exercises

A physical therapist will be able to advise on strengthening exercises to aid recovery after an MCL tear. Some possible exercises may include:

Exercise to restore range of motion and increase strength. These exercises typically include gentle stretches and strengthening exercises. People may also do upper body workouts and swim in order to keep up general conditioning. Some people may work with a physical therapist for guided treatment.

1. Hamstring curl

  • Stand up straight, engaging the stomach muscles.
  • Stand on one leg and slowly bend the opposite knee by bringing the heel up toward the buttocks.
  • Hold for 30 seconds before repeating on the other side of the body.
  • A person can hold on to a chair or table for support if needed.

2. Wall slide

  • Standing up straight, with both feet flat on the ground, place the back firmly against a wall.
  • Slowly slide down, keeping the back against the wall until reaching a squatting position.
  • Hold for 30 seconds.
  • Push up from the feet to stand up, keeping the back flat against the wall.
  • Repeat 10 to 15 times.

3. Chair squat

  • Standing on one leg, slowly squat toward sitting down onto a chair.
  • Return to a standing position, again standing on one leg.
  • Bend at the waist and keep the body in a straight line when standing.
  • A person may need to build up to sitting fully on the chair

Subsequent treatment

  • Begin active range-of-motion exercises in cold whirlpool at least twice daily.
  • Begin straight-leg raises and electrical muscle stimulation (if available).
  • Maintain general conditioning with upper body ergometer or swimming.

Goal one: Walking unassisted without a limp

  • Discard crutches.
  • Continue range of motion, isometric strengthening, and conditioning exercises.

Goal two: 90 degrees of knee flexion

  • Begin stair climber and bicycle ergometer with seat high; gradually lower seat.
  • Begin isotonic progressive restrictive exercise for quadriceps and hamstrings; supplement with isokinetic exercise if available.
  • Continue range of motion and conditioning exercises.

Goal Three: Full knee motion

  • Begin running and functional exercise program.
  • For example:
    • Jog 1 mile.

    • Five successive 100-yard sprints at half speed.

    • Five successive 100-yard sprints at three-quarters speed.

    • Five successive 100-yard sprints at full speed.

    • Five zigzag sprints at half speed.

    • Five zigzag sprints at full speed.

  • Other agility drills (e.g. Cariocas).
  • Continue conditioning.

Goal four: Complete entire running program in one session

  • May return to competition if the athlete has minimal pain, full range of motion, and 90 percent of normal strength.
  • Continue to use a brace for all sports participation for the remainder of the season.

Rehabilitation

The rehabilitation for a non-operative treatment can be split into four phases:

  • Phase one is from one to two weeks. Phase one consists of controlling the swelling of the knee by applying ice for 15 minutes every two hours (first two days). The rest of the week the frequency can be reduced to three times a day. Use ice as tolerated and as needed based on symptoms. In the begin, the patient needs to use crutches. Early weight bearing is encouraged because patients who increasing their weight-bearing, they can progressively reduce their dependence on crutches. Afterward, progress to one crutch and let the patient stop using the crutches only when normal gait is possible. Another aim of this phase is to try to maintain the ability to straighten and bend the knee from 0° to 90° knee flexion. For achieving the range of motion of the knee it is important to emphasize full extension and progress flexion as tolerated. Pain-free stretches for the hamstrings, quads, groin and calf muscles (in particular) are suggested. At last, there are therapeutic exercises. The patient may begin with static strengthening exercises (as soon as pain allows it). They consist for example of Quadricpes sets, straight leg raises, range-of-motion exercises, sitting hip flexion, side-lying hip abduction, standing hip extension, standing, and hamstring curls. As soon as patients can tolerate it, they are encouraged to ride a stationary bike to improve the range of motion of the knee. This would ensure accelerated healing. The amount of time and effort on the stationary bike is increased as tolerated. Obviously, every patient is different and these are not the standard exercises that have to be given to patients. There are no limits on upper extremity workouts that do not affect the injured knee[rx]. It’s important that the patient rests from all painful activities (use crutches if necessary), and that the MCL is well protected (by wearing a stabilized knee brace).
  • Starting at week three-phase two begins – The aims for the range of motion are the same as in phase one. Progress to 20 minutes of biking. Increase also the resistance as tolerated by the patient. Biking will ensure healing, rebuild strength, and maintain aerobic conditioning. The physiotherapist can give other exercises like Hamstring curls, leg presses (double-leg), and step-ups. As a precaution, the patient has the chance to be examined by a physician every three weeks to verify the healing of the ligament[rx].
  • Phase three starts from week five –  A major goal for this phase: full weight-bearing on the injured knee. Discontinue the use of a brace when ambulating with full weight-bearing is possible and there is no gait deviation. The range of motion has to be fully achieved and had to be symmetrical with the not injured knee. The therapeutic exercises are the same as in phase two. They may benefit progression. We continue with cold therapy and compression to eliminate swelling. In this phase, you can commence with balance and proprioceptive activities. To maintain aerobic fitness the patient can use the stepper or (if possible) may begin to swim. As a precaution, the patient has the chance to be examined by a physician every five to six weeks. When needed, you can be allowed to make stress radiography as a precaution.[rx]
  • Six weeks after injuring the knee, phase four can begin – Discontinue wearing the brace during the gait. Athletics can wear the brace for competition through the competitive season for at least three months. Cold therapy still needs to be applied. The aim of the therapeutic exercises is more focused on sport-specific or daily movements. The intensity of the strengthening exercises needs to be increased and instead of double leg exercises, we change to single-leg exercises. The patient may start running again at a comfortable pace (make sure the patient doesn’t make sudden changes of direction). As a precaution, it is best to return the competition once full motion and strength is returned and when the patient passes a sport functional test[rx].

How to do the exercises

Knee flexion with heel slide

Picture of how to do knee flexion with heel slide

slide 1 of 10, Knee flexion with heel slide,

  • Lie on your back with your knees bent.
  • Slide your heel back by bending your affected knee as far as you can. Then hook your other foot around your ankle to help pull your heel even farther back.
  • Hold for about 6 seconds, then rest for up to 10 seconds.
  • Repeat 8 to 12 times.

Heel slides on a wall

Pictures of how to do heel slides on a wall

slide 2 of 10, Heel slides on a wall,

  • Lie on the floor close enough to a wall so that you can place both legs up on the wall. Your hips should be as close to the wall as is comfortable for you.
  • Start with both feet resting on the wall. Slowly let the foot of your affected leg slide down the wall until you feel a stretch in your knee.
  • Hold for 15 to 30 seconds.
  • Then slowly slide your foot up to where you started.
  • Repeat 2 to 4 times.

Quad sets

Picture of how to do quadriceps exercise

slide 3 of 10, Quad sets,

  • Sit with your affected leg straight and supported on the floor or a firm bed. Place a small, rolled-up towel under your knee. Your other leg should be bent, with that foot flat on the floor.
  • Tighten the thigh muscles of your affected leg by pressing the back of your knee down into the towel.
  • Hold for about 6 seconds, then rest for up to 10 seconds.
  • Repeat 8 to 12 times.

Short-arc quad

Picture of how to do short-arc quad exercise

slide 4 of 10, Short-arc quad,

  • Lie on your back with your knees bent over a foam roll or a large rolled-up towel.
  • Lift the lower part of your affected leg and straighten your knee by tightening your thigh muscle. Keep the bottom of your knee on the foam roll or rolled-up towel.
  • Hold your knee straight for about 6 seconds, then slowly bend your knee and lower your leg back to the floor. Rest for up to 10 seconds between repetitions.
  • Repeat 8 to 12 times.

Straight-leg raises to the front

Picture of how to do straight-leg raise exercise

slide 5 of 10, Straight-leg raises to the front,

  • Lie on your back with your good knee bent so that your foot rests flat on the floor. Your affected leg should be straight. Make sure that your low back has a normal curve. You should be able to slip your hand in between the floor and the small of your back, with your palm touching the floor and your back touching the back of your hand.
  • Tighten the thigh muscles in your affected leg by pressing the back of your knee flat down to the floor. Hold your knee straight.
  • Keeping the thigh muscles tight and your leg straight, lift your affected leg up so that your heel is about 30 centimeters off the floor. Hold for about 6 seconds, then lower slowly.
  • Relax for up to 10 seconds between repetitions.
  • Repeat 8 to 12 times.

Hamstring set (heel dig)

Picture of how to do seated hamstring exercise

slide 6 of 10, Hamstring set (heel dig),

  • Sit with your affected leg bent. Your good leg should be straight and supported on the floor.
  • Tighten the muscles on the back of your bent leg (hamstring) by pressing your heel into the floor.
  • Hold for about 6 seconds, then rest for up to 10 seconds.
  • Repeat 8 to 12 times.

Hip adduction

Picture of how to do hip adduction exercise

slide 7 of 10, Hip adduction,

  • Sit on the floor with your knees bent.
  • Place a pillow between your knees.
  • Put your hands slightly behind your hips for support.
  • Squeeze the pillow by tightening the muscles on the inside of your thighs.
  • Hold for 6 seconds, then rest for up to 10 seconds.
  • Repeat 8 to 12 times.

Hip abduction

Picture of how to do hip abduction exercise

slide 8 of 10, Hip abduction,

  • Sit on the floor with your affected knee close to a wall.
  • Bend your affected knee but keep the other leg straight in front of you.
  • Place a pillow between the outside of your knee and the wall.
  • Put your hands slightly behind your hips for support.
  • Push the outside of your knee against the pillow and the wall.
  • Hold for 6 seconds, then rest for up to 10 seconds.
  • Repeat 8 to 12 times.

Lateral step-up

Picture of how to do lateral step-up exercise

slide 9 of 10, Lateral step-up,

  • Stand sideways on the bottom step of a staircase with your injured leg on the step and your other foot on the floor. Hold on to the banister or wall.
  • Use your injured leg to raise yourself up, bringing your other foot level with the stair step. Make sure to keep your hips level as you do this. And try to keep your knee moving in a straight line with your middle toe. Do not put the foot you are raising on the stair step.
  • Slowly lower your foot back down.
  • Repeat 8 to 12 times.

Wall squats with ball

Picture of how to do wall squats with ball

slide 10 of 10, Wall squats with ball,

  • Stand with your back facing a wall. Place your feet about a shoulder-width apart.
  • Place the therapy ball between your back and the wall, and move your feet out in front of you so they are about 30 centimetres in front of your hips.
  • Keep your arms at your sides, or put your hands on your hips.
  • Slowly squat down as if you are going to sit in a chair, rolling your back over the ball as you squat. The ball should move with you but stay pressed into the wall.
  • Be sure that your knees do not go in front of your toes as you squat.
  • Hold for 6 seconds.
  • Slowly rise to your standing position.
  • Repeat 8 to 12 times.

How do I get ready for a knee ligament repair?

  • Your healthcare provider will explain the procedure to you and offer you the chance to ask any questions that you might have about the procedure.
  • You will be asked to sign a consent form that gives your permission to do the procedure. Read the form carefully and ask questions if something is not clear.
  • In addition to a complete medical history, your healthcare provider may perform a complete physical exam to ensure you are in good health before undergoing the procedure. You may undergo blood tests or other diagnostic tests.
  • Tell your healthcare provider if you are sensitive to or are allergic to any medicines, latex, tape, and anesthetic agents (local and general).
  • Tell your healthcare provider of all medicines (prescribed and over-the-counter) and herbal supplements that you are taking.
  • Tell your healthcare provider if you have a history of bleeding disorders or if you are taking any anticoagulant (blood-thinning) medicines, aspirin, or other medicines that affect blood clotting. It may be necessary for you to stop these medicines before the procedure.
  • If you are pregnant or suspect that you are pregnant, you should notify your healthcare provider.
  • You will be asked to fast for 8 hours before the procedure, generally after midnight.
  • You may receive a sedative prior to the procedure to help you relax. Because the sedative may make you drowsy, you will need to arrange for someone to drive you home.
  • You may meet with a physical therapist prior to your surgery to discuss rehabilitation.
  • Arrange for someone to help around the house for a week or two after you are discharged from the hospital.
  • Based on your health condition, your healthcare provider may request other specific preparations.

What happens during a knee ligament repair?

Knee ligament repair may be done on an outpatient basis or rarely as part of your stay in a hospital. Procedures may vary depending on your condition and your healthcare provider’s practices.

Knee ligament repair may be performed while you are asleep under general anesthesia, or while you are awake under spinal anesthesia. If spinal anesthesia is used, you will have no feeling from your waist down. Your healthcare provider will discuss this with you in advance.

Generally, knee ligament repair surgery follows this process:

  • You will be asked to remove clothing and will be given a gown to wear.
  • An intravenous (IV) line may be started in your arm or hand.
  • You will be positioned on the operating table.
  • The anesthesiologist will continuously monitor your heart rate, blood pressure, breathing, and blood oxygen level during the surgery.
  • The skin over the surgical site will be cleansed with an antiseptic solution.
  • The healthcare provider will make several small incisions in the knee area.
  • The healthcare provider will do the surgery using an arthroscope (a small tube-shaped instrument that is inserted into a joint). The healthcare provider may reattach the torn ligament or reconstruct the torn ligament by using a portion (graft) of the patellar tendon (that connects the kneecap to the tibia), the hamstring tendon (from the back of the thigh), or other autografts. The tendon graft may come from the person (autograft) or from an organ donor (allograft).
  • The healthcare provider will drill small holes in the tibia and femur where the torn ligament was attached.
  • The healthcare provider will thread the graft through the holes and attach it with surgical staples, screws, or other
    means. Bone eventually grows around the graft.
  • The incision will be closed with stitches or surgical staples.
  • A sterile bandage or dressing will be applied.

What happens after a knee ligament repair?

After the surgery, you will be taken to the recovery room for observation. Your recovery process will vary depending on the type of anesthesia that is given. Once your blood pressure, pulse, and breathing are stable and you are alert, you will be taken to your hospital room or discharged to your home. Knee ligament repair is usually done on an outpatient basis.

You may be given crutches and a knee immobilizer before you go home.

Once you are home, it is important to keep the surgical area clean and dry. Your healthcare provider will give you specific bathing instructions. The stitches or surgical staples will be removed during a follow-up office visit.

Take a pain reliever for soreness as recommended by your healthcare provider. Aspirin or certain other pain medicines may increase the chance of bleeding. Be sure to take only recommended medicines.

To help reduce swelling, you may be asked to elevate your leg and apply an ice bag to the knee several times per day for the first few days. Your healthcare provider will arrange for an exercise program to help you regain muscle strength, stability, and range of motion. Physical therapy is a key part of recovery.

Tell your healthcare provider if you have any of the following:

  • Fever or chills
  • Redness, swelling, bleeding, or another drainage from the incision site
  • Increased pain around the incision site
  • Numbness or tingling in the leg
  • Calf swelling or tenderness

You may resume your normal diet unless your healthcare provider advises you differently.

Because of the limited mobility, it may be hard for a few weeks to resume your normal daily activities. You may need someone at home to assist you. You should not drive until your healthcare provider tells you to. Other activity restrictions may apply. Full recovery from the surgery and rehab may take several months.

Your healthcare provider may give you additional or alternate instructions after the procedure, depending on your particular situation.

Next steps

Before you agree to the test or the procedure make sure you know:

  • The name of the test or procedure
  • The reason you are having the test or procedure
  • What results to expect and what they mean
  • The risks and benefits of the test or procedure
  • What the possible side effects or complications are
  • When and where you are to have the test or procedure
  • Who will do the test or procedure and what that person’s qualifications are
  • What would happen if you did not have the test or procedure
  • Any alternative tests or procedures to think about
  • When and how you will get the results
  • Who to call after the test or procedure if you have questions or problems
  • How much you will have to pay for the test or procedure

References

Loading

If the article is helpful, please Click to Star Icon and Rate This Post!
[Total: 0 Average: 0]

Medial Collateral Ligament Injury – Symptoms, Treatment

Medial Collateral Ligament Injury (MCL) is a flat band of connective tissue that runs from the medial epicondyle of the femur to the medial condyle of the tibia. Its role is to provide valgus stability to the knee joint. MCL injuries often occur in sports, especially in skiing; in fact, 60% of skiing knee injuries involve the MCL.

The tibial collateral ligament, also known as the medial collateral ligament (MCL), is a ligament extending from the medial epicondyle of the femur to the posteromedial crest of the tibia. The ligament is a broad and strong band that mainly functions to stabilize the knee joint in the coronal plane on the medial side.

Types of Medial Collateral Ligament Injuries

Doctors categorize MCL injuries according to the following criteria

  • Grade I tear –  This is a slight tear (or stretch) of the MCL. Both ends of the ligament are still attached to the bone, but a portion of the ligament may sag and be less taut. Recovery usually takes 1 to 2 weeks; therapy may not be needed.
  • Grade II tear – This is a slightly more severe tear of the MCL, with a portion of the ligament sagging. Pain and swelling is usually more severe than with a grade I tear. Kids usually need 3 to 4 weeks of rest and sometimes therapy.
  • Grade III tear – With this type of injury, the MCL breaks in half. Many kids are unable to bend the knee or bear weight on it without pain. They might be unstable while walking, and the knee may sometimes “give out.” Kids with this injury need to wear a knee brace and undergo rehab therapy for 6 weeks or longer.

Causes of Medial Collateral Ligament Injury

MCL injuries are regularly seen in contact and non-contact sports and often occur in the following instances:

  • Motor vehicle accidents – A “dashboard injury” occurs when the driver’s or passenger’s bent knee slams against the dashboard, pushing in the shinbone just below the knee and causing a tear.
  • Contact sports – Athletes in sports such as football and soccer can tear their ligament when they fall on a bent knee with their foot pointed down. The shinbone hits the ground first and it moves backward. Being tackled when your knee is bent also can cause this injury.
  • The knee is hit directly – especially during sports like soccer, rugby, and football
  • A person lands on a bent knee – such as during a fall or misstep
  • Landing directly on the front of the shinbone – such as when a dancer comes down from a leap and falls
  • A person makes cutting or pivoting maneuvers – such as when an athlete plants a foot and shifts directions
  • A person lands on one leg – which can happen after a jump in basketball or volleyball
  • A direct blow to the bent knee in an automobile injury
  • A sports-related injury in which the knee bends
  • Pulling on the ligament in a twisting injury or hyperextension
  • A misstep on uneven terrain
  • When the knee is hit directly on its outer side, such as from a football tackle
  • As a result of cutting maneuvers, when an athlete plants a foot and forcefully shifts direction
  • Squatting or lifting heavy objects, such as weight lifting
  • Landing awkwardly on the knee, such as when jumping in volleyball
  • Hyperextending the knee, such as when skiing
  • Through repeated stress to the knee, which causes the ligament to lose its elasticity (like a worn-out rubber band)

While sports injuries are the most common cause of MCL tears and sprains, any direct blow, such as during a car accident, can cause the ligament to be damaged.

Symptoms of Medial Collateral Ligament Injury

A person who experiences an MCL injury typically reports a combination of the following symptoms:

  • A “popping” sound – when the injury occurs. This sound is usually a sign of a grade II or grade III tear.
  • Immediate sharp pain – from the inner section of the knee.
  • Immediate swelling – at the inner knee. Swelling may increase and spread to the actual knee joint 1 or 2 days following the injury.
  • Tenderness –  around the inner knee. This area may be painful to the touch.
  • Increased pain – a few hours after the injury.
  • Bruising around the knee – especially around the location of the MCL (inner knee).
  • Noticeable looseness – in the knee. A person may be able to feel looseness around the inner knee when walking. The knee may feel as if it has a greater range of motion than normal.
  • Knee stiffness – may make walking, sitting down, rising from a chair or climbing stairs difficult. A person may have trouble bending or straightening the knee.
  • The feeling of knee instability – may be particularly noticeable during activities that strain the knee, such as going downstairs or pivoting on one leg. The knee may feel as if it is about to give out. Instability is usually associated with more severe MCL tears.
  • Pain when bearing weight – such as when walking, sitting down, or rising from a chair.

Diagnosis of Medial Collateral Ligament Injury

Stage

The severity and symptoms of a knee ligament sprain depend on the degree of stretching or tearing of the knee ligament. You may notice an audible snap or tearing sound at the time of your ligament injury.

  • In a mild, Grade I MCL sprain –  the knee ligament has a slight stretch, but they don’t tear. Although the knee joint may not hurt or swell very much, a mild ligament sprain can increase the risk of a repeat injury.
  • With a moderate Grade II MCL sprain – the knee ligament tears partially. Knee swelling and bruising are common, and the use of the knee joint is usually painful and challenging. You may have some complaints of instability or a feeling of the knee giving way.
    With a severe Grade III MCL sprain – the ligament tears completely, causing swelling and sometimes bleeding under the skin. As a result, the joint is unstable and can be difficult to bear weight. You may have a feeling of the knee giving way. Often there will be no pain or severe pain that subsides quickly following a grade 3 tear as all of the pain fibers are torn at the time of injury. With these more severe tears, other structures are at risk of injury, including the meniscus or ACL.

Physical Exam

Testing of the knee joint should be done using the following techniques and the findings compared to the contralateral, normal knee:[rx][rx]

  • Valgus stress at 0° and 20° – This test puts direct stress on the medial knee structures, reproducing the mechanism of injury. Valgus stress testing is done with the patient supine on the exam table. The lower extremity, supported by the examiner, is abducted. The examiner’s fingers monitor the medial joint space for gapping while placing the opposite hand on the ankle. The knee is placed in 20° of flexion. The examiner then uses their own thigh as a fulcrum at the knee and applies a valgus force (pulling the foot and ankle away from the patient’s body). The force is then used to establish the amount of gapping present within the joint. It has been reported that 20° of flexion is best for isolating the MCL, allowing the practitioner to establish the degree of injury (see Classification). Additional testing is done at 0° to determine if a Grade III injury is present.[rx][rx]
  • Valgus stress testing –  is the best way to test the integrity of the MCL directly. The patient should be positioned supine with the hip abducted on the affected side so that the leg is unsupported off the table. The knee should be brought into 30 degrees of flexion. The examiner should grasp the ankle with one hand and push the ankle laterally while applying a valgus force to the knee with the other hand.
  • Anteromedial drawer test – This test is performed with the patient supine with the knee flexed to 80-90°. The foot is externally rotated 10-15° and the examiner supplies an anterior and external rotational force. The joint can then be evaluated for tibial anteromedial rotation, taking care to recognize the possibility of posterolateral corner instability giving similar rotational test results. As always, compare the test in the opposite knee.[rx][rx][rx]
  • Dial Test (anteromedial rotation test) – This test should be executed with the patient lying both supine and prone. When the patient is supine, the knees must be flexed 30° off the table. The thigh is then stabilized and the foot externally rotated. The examiner watches for the tibial tubercle of the affected knee to rotate as the foot rotates, comparing it to the contralateral knee. A positive test will show the rotation of greater than 10-15° of rotation compared to the opposite knee. This is most easily assessed with a hand placed over the tibia while testing. When the patient is prone, the knee is flexed to 90° and both feet are externally rotated and compared, noting the difference from the non-injured joint. Similar to the anteromedial drawer test, a false positive test can result from a posterolateral corner injury. Testing at both 30° and 90° helps to distinguish between these injuries: one should monitor where the tibial rotation occurs (anteromedial or posterolateral) in the supine position and also assess for medial or lateral joint line gapping to differentiate between these two injuries.[rx][rx][rx]

Imaging Test

  • X-rays – use low levels of radiation and give doctors a view of a person’s bones. Although MCL injuries do not show up on standard X-ray exams, they are a relatively inexpensive, fast way to rule out other possible injuries that might be causing the symptoms. Additionally, a stress X-ray—where a physician applies a valgus force to the knee during the exam—can help to determine the degree of ligamentous injury.
  • Magnetic resonance imaging (MRI) – shows a detailed view of the soft tissue surrounding the knee joint. An MRI can also help a doctor determine the location and grade of an MCL tear.
  • Ultrasound imaging – uses high-frequency sound waves to build a picture of the knee’s tissues. Ultrasound can be utilized in situations when an MRI is not recommended. Ultrasound may also be used in an urgent care setting to make an immediate assessment, allowing the injury to be treated more quickly.

Treatment of Medial Collateral Ligament Injury

Nonsurgical

Most everyone who has an MCL injury will be advised by a health care professional to follow the RICE method:

  • Rest – Activities that irritates the knee, such as pivoting and walking for long periods of time, should be avoided until the symptoms get better.
  • Ice – A person may be advised to apply ice packs to the knee to help reduce swelling and decrease pain. Apply ice with a compressive wrap for 20 minutes and repeat every 3-4 hours for the first 24-48 hours.
  • Compression – Wearing a tight, elastic bandage around the knee can help stop swelling.
  • Elevation – Keeping the knee propped up above the waist can help decrease swelling.
  • Wear a knee cap – that allows the knee to move forward and backward but restricts side-to-side movement. Apply minimally restrictive lateral hinge brace (grade II or III injuries).
  • Use crutches – to avoid weight-bearing. Crutches are not needed in all cases. Dispense crutches; allow weight-bearing as tolerated.
  • Bracing – Your knee must be protected from the same sideways force that caused the injury. You may need to change your daily activities to avoid risky movements. Your doctor may recommend a brace to protect the injured ligament from stress. To further protect your knee, you may be given crutches to keep you from putting weight on your

Medication

If the injury is severe and pain is intolerable the following medicine can be considered to prescribe

  • Take anti-inflammatory medications – Non-steroidal anti-inflammatory drugs (NSAIDs), like will help with pain and swelling. However, these drugs can have side effects, such as an increased risk of bleeding and ulcers. They should be only used occasionally unless your doctor specifically says otherwise.
  • Antibiotic – Cefuroxime or Azithromycin, or  Flucloxacillin or any other cephalosporin/quinolone antibiotic must be used to prevent infection or clotted blood remove to prevent furthers swelling and edema.
  • NSAIDs – Prescription-strength drugs that reduce both pain and inflammation. Pain medicines and anti-inflammatory drugs help to relieve pain and stiffness, allowing for increased mobility and exercise. There are many common over-the-counter medicines called non-steroidal anti-inflammatory drugs (NSAIDs). They include and KetorolacAceclofenacNaproxen, Etoricoxib.
  • Corticosteroids – Also known as oral steroids, these medications reduce inflammation.
  • Muscle Relaxants –  These medications provide relief from associated muscle spasms.
  • Neuropathic Agents – Drugs(pregabalin & gabapentin) that address neuropathic—or nerve-related—pain. This includes burning, numbness, and tingling.
  • Opioids – Also known as narcotics, these medications are intense pain relievers that should only be used under a doctor’s careful supervision.
  • Topical Medications – These prescription-strength creams, gels, ointments, patches, and sprays help relieve pain and inflammation through the skin.
  • Calcium & vitamin D3 – to improve bone health and healing fracture. As a general rule, men and women age 50 and older should consume 1,200 milligrams of calcium a day, and 600 international units of vitamin D a day.
  • Antidepressants – A drug that blocks pain messages from your brain and boosts the effects of endorphins (your body’s natural painkillers).
  • Glucosamine & DiacereinChondroitin sulfate – can be used to tightening the loose tension, cartilage, ligament, and cartilage, ligament regenerates cartilage or inhabits the further degeneration of cartilage, ligament. They are structural components of articular cartilage, and the thought is that a supplement will aid in the health of articular cartilage.
  • Intra-articular corticosteroid injections – may be useful for symptomatic injury especially where there is a considerable inflammatory component. The delivery of the corticosteroid directly into the knee may reduce local inflammation associated with injury and minimize the systemic effects of the steroid.
  • Intra-articular hyaluronic acid injections (HA) – injections are another injectable option for a knee injury. HA is a glycosaminoglycan that is found throughout the human body and is an important component of synovial fluid and articular cartilage. HA breaks down during the process of ligament injury and contributes to the loss of articular cartilage as well as stiffness and pain. Local delivery of HA into the joint acts as a lubricant and may help increase the natural production of HA in the joint.
  • Platelet-rich plasma (PRP) injection – newer therapy where a blood sample is taken from the patient, spun in a centrifuge, growth factors are isolated and then they are injected back into the affected site to stimulate faster healing.

Surgery

  • Knee arthroscopy – minimally invasive surgical procedure to diagnose and repair an MCL injury; small incisions are made in the knee and a camera is inserted to visualize the injury and determine treatment.

Physiotherapy

Depending on the grade of injury, you can start to feel better within days to just a few weeks of the damage. Your physiotherapy treatment will aim to:

  • Reduce pain and inflammation.
  • Normalize joint range of motion.
  • Strengthen your knee: esp quadriceps (esp VMO) and hamstrings.
  • Strengthen your lower limb: calves, hip and pelvis muscles.
  • Improve patellofemoral (knee cap) alignment
  • Normalize your muscle lengths
  • Improve your proprioception, agility and balance
  • Improve your technique and function, e.g. walking, running, squatting, hopping and landing.
  • Guide return to sports activities and exercises
  • Minimize your chance of re-injury.

Exercises

A physical therapist will be able to advise on strengthening exercises to aid recovery after an MCL tear. Some possible exercises may include:

Exercise to restore range of motion and increase strength. These exercises typically include gentle stretches and strengthening exercises. People may also do upper body workouts and swim in order to keep up general conditioning. Some people may work with a physical therapist for guided treatment.

1. Hamstring curl

  • Stand up straight, engaging the stomach muscles.
  • Stand on one leg and slowly bend the opposite knee by bringing the heel up toward the buttocks.
  • Hold for 30 seconds before repeating on the other side of the body.
  • A person can hold on to a chair or table for support if needed.

2. Wall slide

  • Standing up straight, with both feet flat on the ground, place the back firmly against a wall.
  • Slowly slide down, keeping the back against the wall until reaching a squatting position.
  • Hold for 30 seconds.
  • Push up from the feet to stand up, keeping the back flat against the wall.
  • Repeat 10 to 15 times.

3. Chair squat

  • Standing on one leg, slowly squat toward sitting down onto a chair.
  • Return to a standing position, again standing on one leg.
  • Bend at the waist and keep the body in a straight line when standing.
  • A person may need to build up to sitting fully on the chair

Subsequent treatment

  • Begin active range-of-motion exercises in cold whirlpool at least twice daily.
  • Begin straight-leg raises and electrical muscle stimulation (if available).
  • Maintain general conditioning with upper body ergometer or swimming.

Goal one: Walking unassisted without a limp

  • Discard crutches.
  • Continue range of motion, isometric strengthening, and conditioning exercises.

Goal two: 90 degrees of knee flexion

  • Begin stair climber and bicycle ergometer with seat high; gradually lower seat.
  • Begin isotonic progressive restrictive exercise for quadriceps and hamstrings; supplement with isokinetic exercise if available.
  • Continue range of motion and conditioning exercises.

Goal Three: Full knee motion

  • Begin running and functional exercise program.
  • For example:
    • Jog 1 mile.

    • Five successive 100-yard sprints at half speed.

    • Five successive 100-yard sprints at three-quarters speed.

    • Five successive 100-yard sprints at full speed.

    • Five zigzag sprints at half speed.

    • Five zigzag sprints at full speed.

  • Other agility drills (e.g. Cariocas).
  • Continue conditioning.

Goal four: Complete entire running program in one session

  • May return to competition if the athlete has minimal pain, full range of motion, and 90 percent of normal strength.
  • Continue to use a brace for all sports participation for the remainder of the season.

Rehabilitation

The rehabilitation for a non-operative treatment can be split into four phases:

  • Phase one is from one to two weeks. Phase one consists of controlling the swelling of the knee by applying ice for 15 minutes every two hours (first two days). The rest of the week the frequency can be reduced to three times a day. Use ice as tolerated and as needed based on symptoms. In the begin, the patient needs to use crutches. Early weight bearing is encouraged because patients who increasing their weight-bearing, they can progressively reduce their dependence on crutches. Afterward, progress to one crutch and let the patient stop using the crutches only when normal gait is possible. Another aim of this phase is to try to maintain the ability to straighten and bend the knee from 0° to 90° knee flexion. For achieving the range of motion of the knee it is important to emphasize full extension and progress flexion as tolerated. Pain-free stretches for the hamstrings, quads, groin and calf muscles (in particular) are suggested. At last, there are therapeutic exercises. The patient may begin with static strengthening exercises (as soon as pain allows it). They consist for example of Quadricpes sets, straight leg raises, range-of-motion exercises, sitting hip flexion, side-lying hip abduction, standing hip extension, standing, and hamstring curls. As soon as patients can tolerate it, they are encouraged to ride a stationary bike to improve the range of motion of the knee. This would ensure accelerated healing. The amount of time and effort on the stationary bike is increased as tolerated. Obviously, every patient is different and these are not the standard exercises that have to be given to patients. There are no limits on upper extremity workouts that do not affect the injured knee[rx]. It’s important that the patient rests from all painful activities (use crutches if necessary), and that the MCL is well protected (by wearing a stabilized knee brace).
  • Starting at week three-phase two begins – The aims for the range of motion are the same as in phase one. Progress to 20 minutes of biking. Increase also the resistance as tolerated by the patient. Biking will ensure healing, rebuild strength, and maintain aerobic conditioning. The physiotherapist can give other exercises like Hamstring curls, leg presses (double-leg), and step-ups. As a precaution, the patient has the chance to be examined by a physician every three weeks to verify the healing of the ligament[rx].
  • Phase three starts from week five –  A major goal for this phase: full weight-bearing on the injured knee. Discontinue the use of a brace when ambulating with full weight-bearing is possible and there is no gait deviation. The range of motion has to be fully achieved and had to be symmetrical with the not injured knee. The therapeutic exercises are the same as in phase two. They may benefit progression. We continue with cold therapy and compression to eliminate swelling. In this phase, you can commence with balance and proprioceptive activities. To maintain aerobic fitness the patient can use the stepper or (if possible) may begin to swim. As a precaution, the patient has the chance to be examined by a physician every five to six weeks. When needed, you can be allowed to make stress radiography as a precaution.[rx]
  • Six weeks after injuring the knee, phase four can begin – Discontinue wearing the brace during the gait. Athletics can wear the brace for competition through the competitive season for at least three months. Cold therapy still needs to be applied. The aim of the therapeutic exercises is more focused on sport-specific or daily movements. The intensity of the strengthening exercises needs to be increased and instead of double leg exercises, we change to single-leg exercises. The patient may start running again at a comfortable pace (make sure the patient doesn’t make sudden changes of direction). As a precaution, it is best to return the competition once full motion and strength is returned and when the patient passes a sport functional test[rx].

How to do the exercises

Knee flexion with heel slide

Picture of how to do knee flexion with heel slide

slide 1 of 10, Knee flexion with heel slide,

  • Lie on your back with your knees bent.
  • Slide your heel back by bending your affected knee as far as you can. Then hook your other foot around your ankle to help pull your heel even farther back.
  • Hold for about 6 seconds, then rest for up to 10 seconds.
  • Repeat 8 to 12 times.

Heel slides on a wall

Pictures of how to do heel slides on a wall

slide 2 of 10, Heel slides on a wall,

  • Lie on the floor close enough to a wall so that you can place both legs up on the wall. Your hips should be as close to the wall as is comfortable for you.
  • Start with both feet resting on the wall. Slowly let the foot of your affected leg slide down the wall until you feel a stretch in your knee.
  • Hold for 15 to 30 seconds.
  • Then slowly slide your foot up to where you started.
  • Repeat 2 to 4 times.

Quad sets

Picture of how to do quadriceps exercise

slide 3 of 10, Quad sets,

  • Sit with your affected leg straight and supported on the floor or a firm bed. Place a small, rolled-up towel under your knee. Your other leg should be bent, with that foot flat on the floor.
  • Tighten the thigh muscles of your affected leg by pressing the back of your knee down into the towel.
  • Hold for about 6 seconds, then rest for up to 10 seconds.
  • Repeat 8 to 12 times.

Short-arc quad

Picture of how to do short-arc quad exercise

slide 4 of 10, Short-arc quad,

  • Lie on your back with your knees bent over a foam roll or a large rolled-up towel.
  • Lift the lower part of your affected leg and straighten your knee by tightening your thigh muscle. Keep the bottom of your knee on the foam roll or rolled-up towel.
  • Hold your knee straight for about 6 seconds, then slowly bend your knee and lower your leg back to the floor. Rest for up to 10 seconds between repetitions.
  • Repeat 8 to 12 times.

Straight-leg raises to the front

Picture of how to do straight-leg raise exercise

slide 5 of 10, Straight-leg raises to the front,

  • Lie on your back with your good knee bent so that your foot rests flat on the floor. Your affected leg should be straight. Make sure that your low back has a normal curve. You should be able to slip your hand in between the floor and the small of your back, with your palm touching the floor and your back touching the back of your hand.
  • Tighten the thigh muscles in your affected leg by pressing the back of your knee flat down to the floor. Hold your knee straight.
  • Keeping the thigh muscles tight and your leg straight, lift your affected leg up so that your heel is about 30 centimeters off the floor. Hold for about 6 seconds, then lower slowly.
  • Relax for up to 10 seconds between repetitions.
  • Repeat 8 to 12 times.

Hamstring set (heel dig)

Picture of how to do seated hamstring exercise

slide 6 of 10, Hamstring set (heel dig),

  • Sit with your affected leg bent. Your good leg should be straight and supported on the floor.
  • Tighten the muscles on the back of your bent leg (hamstring) by pressing your heel into the floor.
  • Hold for about 6 seconds, then rest for up to 10 seconds.
  • Repeat 8 to 12 times.

Hip adduction

Picture of how to do hip adduction exercise

slide 7 of 10, Hip adduction,

  • Sit on the floor with your knees bent.
  • Place a pillow between your knees.
  • Put your hands slightly behind your hips for support.
  • Squeeze the pillow by tightening the muscles on the inside of your thighs.
  • Hold for 6 seconds, then rest for up to 10 seconds.
  • Repeat 8 to 12 times.

Hip abduction

Picture of how to do hip abduction exercise

slide 8 of 10, Hip abduction,

  • Sit on the floor with your affected knee close to a wall.
  • Bend your affected knee but keep the other leg straight in front of you.
  • Place a pillow between the outside of your knee and the wall.
  • Put your hands slightly behind your hips for support.
  • Push the outside of your knee against the pillow and the wall.
  • Hold for 6 seconds, then rest for up to 10 seconds.
  • Repeat 8 to 12 times.

Lateral step-up

Picture of how to do lateral step-up exercise

slide 9 of 10, Lateral step-up,

  • Stand sideways on the bottom step of a staircase with your injured leg on the step and your other foot on the floor. Hold on to the banister or wall.
  • Use your injured leg to raise yourself up, bringing your other foot level with the stair step. Make sure to keep your hips level as you do this. And try to keep your knee moving in a straight line with your middle toe. Do not put the foot you are raising on the stair step.
  • Slowly lower your foot back down.
  • Repeat 8 to 12 times.

Wall squats with ball

Picture of how to do wall squats with ball

slide 10 of 10, Wall squats with ball,

  • Stand with your back facing a wall. Place your feet about a shoulder-width apart.
  • Place the therapy ball between your back and the wall, and move your feet out in front of you so they are about 30 centimetres in front of your hips.
  • Keep your arms at your sides, or put your hands on your hips.
  • Slowly squat down as if you are going to sit in a chair, rolling your back over the ball as you squat. The ball should move with you but stay pressed into the wall.
  • Be sure that your knees do not go in front of your toes as you squat.
  • Hold for 6 seconds.
  • Slowly rise to your standing position.
  • Repeat 8 to 12 times.

How do I get ready for a knee ligament repair?

  • Your healthcare provider will explain the procedure to you and offer you the chance to ask any questions that you might have about the procedure.
  • You will be asked to sign a consent form that gives your permission to do the procedure. Read the form carefully and ask questions if something is not clear.
  • In addition to a complete medical history, your healthcare provider may perform a complete physical exam to ensure you are in good health before undergoing the procedure. You may undergo blood tests or other diagnostic tests.
  • Tell your healthcare provider if you are sensitive to or are allergic to any medicines, latex, tape, and anesthetic agents (local and general).
  • Tell your healthcare provider of all medicines (prescribed and over-the-counter) and herbal supplements that you are taking.
  • Tell your healthcare provider if you have a history of bleeding disorders or if you are taking any anticoagulant (blood-thinning) medicines, aspirin, or other medicines that affect blood clotting. It may be necessary for you to stop these medicines before the procedure.
  • If you are pregnant or suspect that you are pregnant, you should notify your healthcare provider.
  • You will be asked to fast for 8 hours before the procedure, generally after midnight.
  • You may receive a sedative prior to the procedure to help you relax. Because the sedative may make you drowsy, you will need to arrange for someone to drive you home.
  • You may meet with a physical therapist prior to your surgery to discuss rehabilitation.
  • Arrange for someone to help around the house for a week or two after you are discharged from the hospital.
  • Based on your health condition, your healthcare provider may request other specific preparations.

What happens during a knee ligament repair?

Knee ligament repair may be done on an outpatient basis or rarely as part of your stay in a hospital. Procedures may vary depending on your condition and your healthcare provider’s practices.

Knee ligament repair may be performed while you are asleep under general anesthesia, or while you are awake under spinal anesthesia. If spinal anesthesia is used, you will have no feeling from your waist down. Your healthcare provider will discuss this with you in advance.

Generally, knee ligament repair surgery follows this process:

  • You will be asked to remove clothing and will be given a gown to wear.
  • An intravenous (IV) line may be started in your arm or hand.
  • You will be positioned on the operating table.
  • The anesthesiologist will continuously monitor your heart rate, blood pressure, breathing, and blood oxygen level during the surgery.
  • The skin over the surgical site will be cleansed with an antiseptic solution.
  • The healthcare provider will make several small incisions in the knee area.
  • The healthcare provider will do the surgery using an arthroscope (a small tube-shaped instrument that is inserted into a joint). The healthcare provider may reattach the torn ligament or reconstruct the torn ligament by using a portion (graft) of the patellar tendon (that connects the kneecap to the tibia), the hamstring tendon (from the back of the thigh), or other autografts. The tendon graft may come from the person (autograft) or from an organ donor (allograft).
  • The healthcare provider will drill small holes in the tibia and femur where the torn ligament was attached.
  • The healthcare provider will thread the graft through the holes and attach it with surgical staples, screws, or other
    means. Bone eventually grows around the graft.
  • The incision will be closed with stitches or surgical staples.
  • A sterile bandage or dressing will be applied.

What happens after a knee ligament repair?

After the surgery, you will be taken to the recovery room for observation. Your recovery process will vary depending on the type of anesthesia that is given. Once your blood pressure, pulse, and breathing are stable and you are alert, you will be taken to your hospital room or discharged to your home. Knee ligament repair is usually done on an outpatient basis.

You may be given crutches and a knee immobilizer before you go home.

Once you are home, it is important to keep the surgical area clean and dry. Your healthcare provider will give you specific bathing instructions. The stitches or surgical staples will be removed during a follow-up office visit.

Take a pain reliever for soreness as recommended by your healthcare provider. Aspirin or certain other pain medicines may increase the chance of bleeding. Be sure to take only recommended medicines.

To help reduce swelling, you may be asked to elevate your leg and apply an ice bag to the knee several times per day for the first few days. Your healthcare provider will arrange for an exercise program to help you regain muscle strength, stability, and range of motion. Physical therapy is a key part of recovery.

Tell your healthcare provider if you have any of the following:

  • Fever or chills
  • Redness, swelling, bleeding, or another drainage from the incision site
  • Increased pain around the incision site
  • Numbness or tingling in the leg
  • Calf swelling or tenderness

You may resume your normal diet unless your healthcare provider advises you differently.

Because of the limited mobility, it may be hard for a few weeks to resume your normal daily activities. You may need someone at home to assist you. You should not drive until your healthcare provider tells you to. Other activity restrictions may apply. Full recovery from the surgery and rehab may take several months.

Your healthcare provider may give you additional or alternate instructions after the procedure, depending on your particular situation.

Next steps

Before you agree to the test or the procedure make sure you know:

  • The name of the test or procedure
  • The reason you are having the test or procedure
  • What results to expect and what they mean
  • The risks and benefits of the test or procedure
  • What the possible side effects or complications are
  • When and where you are to have the test or procedure
  • Who will do the test or procedure and what that person’s qualifications are
  • What would happen if you did not have the test or procedure
  • Any alternative tests or procedures to think about
  • When and how you will get the results
  • Who to call after the test or procedure if you have questions or problems
  • How much you will have to pay for the test or procedure

References

Loading

If the article is helpful, please Click to Star Icon and Rate This Post!
[Total: 0 Average: 0]

What Is Knee Joint Ligaments? – Types, Disease Condition

What Is Knee Joint Ligaments?/Ligaments are bands of tough, elastic connective tissue that surround a joint to give support and limit the joint’s movement? Knee ligaments are thick strands of tissue made of collagenous fibers that connect the upper leg bones to the lower ones. There are four main knee joint ligaments: the lateral collateral ligament (LCL), medial collateral ligament (MCL), anterior cruciate ligament (ACL), and the posterior cruciate ligament (PCL). Collectively, their main function is to restrain knee movement in order to provide joint stability.

The knee is the largest joint in the body. It is a compound synovial joint that consists of the tibiofemoral joint and the patellofemoral joint. It primarily serves as a hinge joint which allows flexion and extension as well as various other movements. It joins the lower leg and thigh bilaterally and is an essential component of efficient bipedal movements such as walking, running, and jumping. The anatomical function and stability of the knee depend on muscles, bones, ligaments, cartilage, synovial tissue, synovial fluid, and other connective tissues. The 4 main stabilizing ligaments of the knee are the anterior cruciate (ACL), posterior cruciate (PCL), medial collateral (MCL), and lateral collateral  (LCL). The ACL attaches at the lateral condyle of the femur and the intercondyloid eminence of the tibia, and functions to prevent anterior translation of the tibia on the femur. The PCL attaches at the medial condyle of the femur and the posterior intercondylar area of the tibia, and functions to prevent forward displacement of the femur on the tibia.

Ligaments Of Knee Joint

Ligaments and menisci

The ligaments of the knee joint can be divided into two groups; extracapsular ligaments and intracapsular ligaments. These ligaments connect the femur and tibia, holding them in place, providing stability, and preventing dislocation.

Extracapsular ligaments are found outside the joint capsule and include the patellar ligament, lateral and medial collateral ligaments, and oblique and arcuate popliteal ligaments. Intracapsular ligaments are found inside the joint capsule, with the cruciate ligaments being the most well known of this subgroup.

Patellar ligament

The patellar ligament is a strong, thick fibrous band that is a distal continuation of the quadriceps femoris tendon. It is found superficial/anterior to the infrapatellar bursa and extends from the apex of the patella to the tibial tuberosity.

Along its outer margins, the patellar ligament blends with the medial and lateral patellar retinacula, which are extensions of the vastus medialis and lateralis muscles, respectively, as well as the overlying fascia. The patellar ligament plays a major role in stabilizing the patella and preventing its displacement.

Lateral (fibular) collateral ligament

The lateral (fibular) collateral ligament is a strong ligament that originates from the lateral epicondyle of the femur, just posterior to the proximal attachment of the popliteus, and extends distally to attach on the lateral surface of the fibular head.

As it attaches to the fibular head, the ligament splits the tendon of biceps femoris muscle in two. The lateral collateral ligament is found deep to the lateral patellar retinaculum, and superficial to the tendon of popliteus muscle, which separates the ligament from the lateral meniscus.

Medial (tibial) collateral ligament

The medial( (tibial) collateral ligament is the strong, flat ligament of the medial aspect of the knee joint. The medial collateral ligament, in addition to its literal counterpart, acts to secure the knee joint and prevent excessive sideways movement by restricting external and internal rotation of the extended knee. The medial collateral ligament has sometimes divided the literature into superficial and deep parts:

  • Superficial medial collateral ligament – originates just proximal the medial epicondyle of the femur. This ligament has two attachment points; a proximal attachment on the medial condyle of the tibia, and a distal attachment on the medial shaft of the tibia. Anteriorly, the superficial medial collateral ligament blends with the medial patellar retinaculum and the medial patellofemoral ligament, which courses from the medial femoral condyle to attach onto the medial border of the patella.
  • Deep medial collateral ligament – a vertical thickening of the knee joint capsule found underneath the superficial medial collateral ligament. It originates from the area of the distal femur, then attaches to the medial meniscus, and terminates on the proximal tibia. These two parts of the ligament are defined as meniscofemoral and meniscotibial ligaments (see below).

Oblique popliteal ligament

The oblique popliteal ligament (Bourgery ligament) is an expansion of the semimembranosus tendon which originates posterior to the medial tibial condyle and reflects superiorly and laterally to attach on the lateral condyle of the femur. As it spans the intercondylar fossa, the oblique popliteal ligament reinforces the posterior part of the joint capsule and blends with its central portion.

Arcuate popliteal ligament

Arcuate popliteal ligament is a thick, fibrous band that arises on the posterior aspect of the fibular head and arches superiorly and medially to attach on the posterior side of the joint capsule of the knee. The arcuate popliteal ligament reinforces the posterolateral part of the joint capsule, and together with the oblique popliteal ligament, prevents overextension of the knee joint.

Cruciate ligaments

The paired cruciate ligaments got their name due to the fact that they cross each other obliquely within the joint in a way that resembles a cross (latin = crux), or a letter X. They cross within the joint capsule, however remain external to the synovial cavity. The cruciate ligaments are divided as follows:

  • Anterior cruciate ligament – arises from the anterior intercondylar area of the tibia just behind the attachment of the medial meniscus, and extends posterolaterally and proximally to attach on the posterior part of the medial surface of the lateral femoral condyle. As it crosses to the other side of the knee joint, the ligament passes underneath the transverse ligament (see below) and blends with the anterior horn of the lateral meniscus. The anterior cruciate ligament is important to prevent posterior rolling and displacement of the femoral condyle during flexion, as well as to prevent hyperextension of the knee joint.
  • Posterior cruciate ligament – arises from the posterior intercondylar area of the tibia and extends anteromedially and proximally to attach on the anterior part of the lateral surface of the medial femoral condyle. This ligament is almost twice as strong and has better blood supply than the anterior cruciate ligament. The posterior cruciate ligament has the opposite function of the anterior cruciate ligament, serving to prevent anterior rolling and displacement of the femoral condyle during extension, as well as to prevent hyperflexion of the knee joint.

Menisci

The menisci are fibrocartilaginous crescent-shaped plates found between the articular surfaces of the femur and tibia and serve to provide their congruence and shock absorption. The menisci are thick and vascularized in their outer one third, while their inner two-thirds are thinner and avascular. Additionally, the inner two-thirds contain radially organized collagen bundles, whereas the outer third contains larger circumferentially arranged bundles. Thus, it is believed that the inner portion is more adapted for weight-bearing and resisting compressive forces, while the outer portions are suited for resisting tensional forces. The menisci are divided as follows:

  • Medial meniscus – a C-shaped, almost semicircular fibrocartilaginous plate that overlies the surface of the medial tibial plateau. Its anterior horn attaches on the anterior intercondylar area of tibia and blends with the anterior cruciate ligament. Its posterior horn is attached to the posterior intercondylar area of the tibia, between the attachments of the lateral meniscus and the posterior cruciate ligament.
  • Lateral meniscus – an almost circular fibrocartilaginous plate that overlies the surface of the lateral tibial plateau. Its anterior horn also attaches to the anterior intercondylar area of tibia and partially blends with the anterior cruciate ligament. Similarly, its posterior horn attaches to the posterior intercondylar areas anterior to the posterior horn of the medial meniscus.
  • Transverse ligament – connects the menisci anteriorly extending from the anterior margin of the lateral meniscus to the anterior horn of the medial meniscus. Its exact role is uncertain but it is thought that these ligaments stabilize the menisci during knee movements and decrease tension generated in the longitudinal circumferential fibers.
  • meniscofemoral ligaments – are the superior portions of the distal medial collateral ligament extending from the posterior horn of the lateral meniscus to the lateral aspect of the medial femoral condyle. They are divided into two ligaments; an anterior meniscofemoral ligament (of Humphry) that courses anterior to the posterior cruciate ligament; and a posterior menisco femoral ligament (of Wrisberg), that runs posterior to the posterior cruciate ligament.
  • Meniscotibial (coronary) ligaments – are the inferior portions of the distal medial collateral ligament, extend between the margin of the lateral meniscus and the peripheral area of the tibial condyles. It is comprised of a medial and lateral meniscotibial (coronary) ligament.
  • Patellomeniscal ligament – comprised of a medial and lateral patellomeniscal ligament, often described as simply medial and lateral ligaments. These ligaments run from the inferior third of the patella to insert on the anterior portion of the medial and lateral meniscus, respectively.
  • Ligamentum mucosum – consists of two alar folds that attach onto the infrapatellar fat pad, holding it in position. This structure is an embryonic remnant that separates the medial and lateral compartments of the knee.
  • Popliteofibular ligament – located on the posterolateral aspect of the knee joint, extending from the popliteus muscle to the medial aspect of the fibula.
  • Fabellofibular ligament – arises from a small sesamoid bone on the posterior aspect of the lateral supracondylar ridge of the femur and inserts distally on the posterolateral edge of the styloid process of the fibula.

Knee Conditions

  • Chondromalacia patella (also called patellofemoral syndrome) – Irritation of the cartilage on the underside of the kneecap (patella), causing knee pain. This is a common cause of knee pain in young people.
  • Knee osteoarthritis – Osteoarthritis is the most common form of arthritis, and often affects the knees. Caused by aging and wear and tear of cartilage, osteoarthritis symptoms may include knee pain, stiffness, and swelling.
  • Knee effusion – Fluid buildup inside the knee, usually from inflammation. Any form of arthritis or injury may cause a knee effusion.
  • Meniscal tear – Damage to a meniscus, the cartilage that cushions the knee, often occurs with twisting the knee. Large tears may cause the knee to lock.
  • ACL (anterior cruciate ligament) strain or tear – The ACL is responsible for a large part of the knee’s stability. An ACL tear often leads to the knee “giving out,” and may require surgical repair.
  • PCL (posterior cruciate ligament) strain or tear – PCL tears can cause pain, swelling, and knee instability. These injuries are less common than ACL tears, and physical therapy (rather than surgery) is usually the best option.
  • MCL (medial collateral ligament) strain or tear – This injury may cause pain and possible instability to the inner side of the knee.
  • Patellar subluxation – The kneecap slides abnormally or dislocates along the thigh bone during activity. Knee pain around the kneecap results.
  • Patellar tendonitis – Inflammation of the tendon connecting the kneecap (patella) to the shin bone. This occurs mostly in athletes from repeated jumping.
  • Knee bursitis – Pain, swelling, and warmth in any of the bursae of the knee. Bursitis often occurs from overuse or injury.
  • Baker’s cyst – Collection of fluid in the back of the knee. Baker’s cysts usually develop from a persistent effusion as in conditions such as arthritis.
  • Rheumatoid arthritis – An autoimmune condition that can cause arthritis in any joint, including the knees. If untreated, rheumatoid arthritis can cause permanent joint damage.
  • Gout – A form of arthritis caused by buildup of uric acid crystals in a joint. The knees may be affected, causing episodes of severe pain and swelling.
  • Pseudogout – A form of arthritis similar to gout, caused by calcium pyrophosphate crystals depositing in the knee or other joints.
  • Septic arthritis – An infection caused by bacteria, a virus, or fungus inside the knee can cause inflammation, pain, swelling, and difficulty moving the knee. Although uncommon, septic arthritis is a serious condition that usually gets worse quickly without treatment.

Knee Tests

  • Physical examination – By examining the location of knee pain and looking for swelling or abnormal movement, a doctor gathers information about potential causes of damage or stress on the knee.
  • Drawer test – With the knee bent, a doctor can pull (anterior drawer test) and push (posterior drawer test) the lower leg while holding the foot stable to check the stability of the ACL and PCL knee ligaments.
  • Valgus stress test – Pushing the calf outward while holding the thigh stable, a doctor can check for injury to the medial collateral ligament (MCL). Pushing the calf inward (varus stress test), a doctor can look for injury to the lateral collateral ligament (LCL).
  • Knee X-ray – A plain X-ray film of the knee is typically the best initial imaging test for most knee conditions.
  • Magnetic resonance imaging (MRI scan) – Using high-energy magnetic waves, an MRI scanner creates highly detailed images of the knee and leg. An MRI scan is the most-often used method of detecting ligament and meniscal injuries.
  • Arthrocentesis of the knee (joint aspiration) – A needle is inserted into the joint space inside the knee, and fluid is drawn out. Various forms of arthritis may be diagnosed through knee arthrocentesis.
  • Arthroscopy – A surgical procedure that allows examination of the knee with an endoscope.

Knee Treatments

  • RICE therapy – Rest (or reducing daily activities), Ice, Compression (as with bandage support) and Elevation. RICE is good initial therapy for many knee conditions.
  • Pain medicines – Over-the-counter or prescription pain relievers such as acetaminophen (Tylenol), ibuprofen (Motrin), and naproxen (Aleve) can treat most knee pain.
  • Physical therapy – An exercise program can strengthen the muscles surrounding the knee, increasing the knee’s stability.
  • Cortisone injection – Injecting steroids into the knee can help reduce pain and swelling.
  • Hyaluronan injection –  Injection of this “goo” material into the knee may reduce pain from arthritis and delay the need for knee surgery in some people.
  • Knee surgery – Surgery may be done to correct a variety of knee conditions. Surgery can replace or repair a torn ligament, remove an injured meniscus, or entirely replace a severely damaged knee. Surgery may be done with a large incision (open) or smaller incisions (arthroscopic).
  • Arthroscopic surgery – An endoscope (flexible tube with surgical tools on its end) is inserted into the knee joint. Arthroscopic surgery has a shorter recovery and rehabilitation period than open surgery.
  • ACL repair –  A surgeon uses a graft (cut from your own body or a donor’s body) to replace the torn ACL.

Movements

There are four main movements that the knee joint permits:

  • Extension:  Produced by the quadriceps femoris, which inserts into the tibial tuberosity.
  • Flexion: Produced by the hamstrings, gracilis, sartorius and popliteus.
  • Lateral rotation: Produced by the biceps femoris.
  • Medial rotation: Produced by five muscles; semimembranosus, semitendinosus, gracilis, sartorius and popliteus.

How do I get ready for a knee ligament repair?

  • Your healthcare provider will explain the procedure to you and offer you the chance to ask any questions that you might have about the procedure.
  • You will be asked to sign a consent form that gives your permission to do the procedure. Read the form carefully and ask questions if something is not clear.
  • In addition to complete medical history, your healthcare provider may perform a complete physical exam to ensure you are in good health before undergoing the procedure. You may undergo blood tests or other diagnostic tests.
  • Tell your healthcare provider if you are sensitive to or are allergic to any medicines, latex, tape, and anesthetic agents (local and general).
  • Tell your healthcare provider of all medicines (prescribed and over-the-counter) and herbal supplements that you are taking.
  • Tell your healthcare provider if you have a history of bleeding disorders or if you are taking any anticoagulant (blood-thinning) medicines, aspirin, or other medicines that affect blood clotting. It may be necessary for you to stop these medicines before the procedure.
  • If you are pregnant or suspect that you are pregnant, you should notify your healthcare provider.
  • You will be asked to fast for 8 hours before the procedure, generally after midnight.
  • You may receive a sedative prior to the procedure to help you relax. Because the sedative may make you drowsy, you will need to arrange for someone to drive you home.
  • You may meet with a physical therapist prior to your surgery to discuss rehabilitation.
  • Arrange for someone to help around the house for a week or two after you are discharged from the hospital.
  • Based on your health condition, your healthcare provider may request other specific preparations.

References

Loading

If the article is helpful, please Click to Star Icon and Rate This Post!
[Total: 0 Average: 0]

Knee Ligaments – Anatomy, Types, Functions,

Knee Ligaments/Ligaments are bands of tough, elastic connective tissue that surround a joint to give support and limit the joint’s movement. Knee ligaments are thick strands of tissue made of collagenous fibers that connect the upper leg bones to the lower ones. There are four main knee joint ligaments: the lateral collateral ligament (LCL), medial collateral ligament (MCL), anterior cruciate ligament (ACL), and the posterior cruciate ligament (PCL). Collectively, their main function is to restrain knee movement in order to provide joint stability.

The knee is the largest joint in the body. It is a compound synovial joint that consists of the tibiofemoral joint and the patellofemoral joint. It primarily serves as a hinge joint which allows flexion and extension as well as various other movements. It joins the lower leg and thigh bilaterally and is an essential component of efficient bipedal movements such as walking, running, and jumping. The anatomical function and stability of the knee depend on muscles, bones, ligaments, cartilage, synovial tissue, synovial fluid, and other connective tissues. The 4 main stabilizing ligaments of the knee are the anterior cruciate (ACL), posterior cruciate (PCL), medial collateral (MCL), and lateral collateral  (LCL). The ACL attaches at the lateral condyle of the femur and the intercondyloid eminence of the tibia, and functions to prevent anterior translation of the tibia on the femur. The PCL attaches at the medial condyle of the femur and the posterior intercondylar area of the tibia, and functions to prevent forward displacement of the femur on the tibia.

Ligaments Of Knee Joint

Ligaments and menisci

The ligaments of the knee joint can be divided into two groups; extracapsular ligaments and intracapsular ligaments. These ligaments connect the femur and tibia, holding them in place, providing stability, and preventing dislocation.

Extracapsular ligaments are found outside the joint capsule and include the patellar ligament, lateral and medial collateral ligaments, and oblique and arcuate popliteal ligaments. Intracapsular ligaments are found inside the joint capsule, with the cruciate ligaments being the most well known of this subgroup.

Patellar ligament

The patellar ligament is a strong, thick fibrous band that is a distal continuation of the quadriceps femoris tendon. It is found superficial/anterior to the infrapatellar bursa and extends from the apex of the patella to the tibial tuberosity.

Along its outer margins, the patellar ligament blends with the medial and lateral patellar retinacula, which are extensions of the vastus medialis and lateralis muscles, respectively, as well as the overlying fascia. The patellar ligament plays a major role in stabilizing the patella and preventing its displacement.

Lateral (fibular) collateral ligament

The lateral (fibular) collateral ligament is a strong ligament that originates from the lateral epicondyle of the femur, just posterior to the proximal attachment of the popliteus, and extends distally to attach on the lateral surface of the fibular head.

As it attaches to the fibular head, the ligament splits the tendon of biceps femoris muscle in two. The lateral collateral ligament is found deep to the lateral patellar retinaculum, and superficial to the tendon of popliteus muscle, which separates the ligament from the lateral meniscus.

Medial (tibial) collateral ligament

The medial( (tibial) collateral ligament is the strong, flat ligament of the medial aspect of the knee joint. The medial collateral ligament, in addition to its literal counterpart, acts to secure the knee joint and prevent excessive sideways movement by restricting external and internal rotation of the extended knee. The medial collateral ligament has sometimes divided the literature into superficial and deep parts:

  • Superficial medial collateral ligament – originates just proximal the medial epicondyle of the femur. This ligament has two attachment points; a proximal attachment on the medial condyle of the tibia, and a distal attachment on the medial shaft of the tibia. Anteriorly, the superficial medial collateral ligament blends with the medial patellar retinaculum and the medial patellofemoral ligament, which courses from the medial femoral condyle to attach onto the medial border of the patella.
  • Deep medial collateral ligament – a vertical thickening of the knee joint capsule found underneath the superficial medial collateral ligament. It originates from the area of the distal femur, then attaches to the medial meniscus, and terminates on the proximal tibia. These two parts of the ligament are defined as meniscofemoral and meniscotibial ligaments (see below).

Oblique popliteal ligament

The oblique popliteal ligament (Bourgery ligament) is an expansion of the semimembranosus tendon which originates posterior to the medial tibial condyle and reflects superiorly and laterally to attach on the lateral condyle of the femur. As it spans the intercondylar fossa, the oblique popliteal ligament reinforces the posterior part of the joint capsule and blends with its central portion.

Arcuate popliteal ligament

Arcuate popliteal ligament is a thick, fibrous band that arises on the posterior aspect of the fibular head and arches superiorly and medially to attach on the posterior side of the joint capsule of the knee. The arcuate popliteal ligament reinforces the posterolateral part of the joint capsule, and together with the oblique popliteal ligament, prevents overextension of the knee joint.

Cruciate ligaments

The paired cruciate ligaments got their name due to the fact that they cross each other obliquely within the joint in a way that resembles a cross (latin = crux), or a letter X. They cross within the joint capsule, however remain external to the synovial cavity. The cruciate ligaments are divided as follows:

  • Anterior cruciate ligament – arises from the anterior intercondylar area of the tibia just behind the attachment of the medial meniscus, and extends posterolaterally and proximally to attach on the posterior part of the medial surface of the lateral femoral condyle. As it crosses to the other side of the knee joint, the ligament passes underneath the transverse ligament (see below) and blends with the anterior horn of the lateral meniscus. The anterior cruciate ligament is important to prevent posterior rolling and displacement of the femoral condyle during flexion, as well as to prevent hyperextension of the knee joint.
  • Posterior cruciate ligament – arises from the posterior intercondylar area of the tibia and extends anteromedially and proximally to attach on the anterior part of the lateral surface of the medial femoral condyle. This ligament is almost twice as strong and has better blood supply than the anterior cruciate ligament. The posterior cruciate ligament has the opposite function of the anterior cruciate ligament, serving to prevent anterior rolling and displacement of the femoral condyle during extension, as well as to prevent hyperflexion of the knee joint.

Menisci

The menisci are fibrocartilaginous crescent-shaped plates found between the articular surfaces of the femur and tibia and serve to provide their congruence and shock absorption. The menisci are thick and vascularized in their outer one third, while their inner two-thirds are thinner and avascular. Additionally, the inner two-thirds contain radially organized collagen bundles, whereas the outer third contains larger circumferentially arranged bundles. Thus, it is believed that the inner portion is more adapted for weight-bearing and resisting compressive forces, while the outer portions are suited for resisting tensional forces. The menisci are divided as follows:

  • Medial meniscus – a C-shaped, almost semicircular fibrocartilaginous plate that overlies the surface of the medial tibial plateau. Its anterior horn attaches on the anterior intercondylar area of tibia and blends with the anterior cruciate ligament. Its posterior horn is attached to the posterior intercondylar area of the tibia, between the attachments of the lateral meniscus and the posterior cruciate ligament.
  • Lateral meniscus – an almost circular fibrocartilaginous plate that overlies the surface of the lateral tibial plateau. Its anterior horn also attaches to the anterior intercondylar area of tibia and partially blends with the anterior cruciate ligament. Similarly, its posterior horn attaches to the posterior intercondylar areas anterior to the posterior horn of the medial meniscus.
  • Transverse ligament – connects the menisci anteriorly extending from the anterior margin of the lateral meniscus to the anterior horn of the medial meniscus. Its exact role is uncertain but it is thought that these ligaments stabilize the menisci during knee movements and decrease tension generated in the longitudinal circumferential fibers.
  • meniscofemoral ligaments – are the superior portions of the distal medial collateral ligament extending from the posterior horn of the lateral meniscus to the lateral aspect of the medial femoral condyle. They are divided into two ligaments; an anterior meniscofemoral ligament (of Humphry) that courses anterior to the posterior cruciate ligament; and a posterior menisco femoral ligament (of Wrisberg), that runs posterior to the posterior cruciate ligament.
  • Meniscotibial (coronary) ligaments – are the inferior portions of the distal medial collateral ligament, extend between the margin of the lateral meniscus and the peripheral area of the tibial condyles. It is comprised of a medial and lateral meniscotibial (coronary) ligament.
  • Patellomeniscal ligament – comprised of a medial and lateral patellomeniscal ligament, often described as simply medial and lateral ligaments. These ligaments run from the inferior third of the patella to insert on the anterior portion of the medial and lateral meniscus, respectively.
  • Ligamentum mucosum – consists of two alar folds that attach onto the infrapatellar fat pad, holding it in position. This structure is an embryonic remnant that separates the medial and lateral compartments of the knee.
  • Popliteofibular ligament – located on the posterolateral aspect of the knee joint, extending from the popliteus muscle to the medial aspect of the fibula.
  • Fabellofibular ligament – arises from a small sesamoid bone on the posterior aspect of the lateral supracondylar ridge of the femur and inserts distally on the posterolateral edge of the styloid process of the fibula.

Knee Conditions

  • Chondromalacia patella (also called patellofemoral syndrome) – Irritation of the cartilage on the underside of the kneecap (patella), causing knee pain. This is a common cause of knee pain in young people.
  • Knee osteoarthritis – Osteoarthritis is the most common form of arthritis, and often affects the knees. Caused by aging and wear and tear of cartilage, osteoarthritis symptoms may include knee pain, stiffness, and swelling.
  • Knee effusion – Fluid buildup inside the knee, usually from inflammation. Any form of arthritis or injury may cause a knee effusion.
  • Meniscal tear – Damage to a meniscus, the cartilage that cushions the knee, often occurs with twisting the knee. Large tears may cause the knee to lock.
  • ACL (anterior cruciate ligament) strain or tear – The ACL is responsible for a large part of the knee’s stability. An ACL tear often leads to the knee “giving out,” and may require surgical repair.
  • PCL (posterior cruciate ligament) strain or tear – PCL tears can cause pain, swelling, and knee instability. These injuries are less common than ACL tears, and physical therapy (rather than surgery) is usually the best option.
  • MCL (medial collateral ligament) strain or tear – This injury may cause pain and possible instability to the inner side of the knee.
  • Patellar subluxation – The kneecap slides abnormally or dislocates along the thigh bone during activity. Knee pain around the kneecap results.
  • Patellar tendonitis – Inflammation of the tendon connecting the kneecap (patella) to the shin bone. This occurs mostly in athletes from repeated jumping.
  • Knee bursitis – Pain, swelling, and warmth in any of the bursae of the knee. Bursitis often occurs from overuse or injury.
  • Baker’s cyst – Collection of fluid in the back of the knee. Baker’s cysts usually develop from a persistent effusion as in conditions such as arthritis.
  • Rheumatoid arthritis – An autoimmune condition that can cause arthritis in any joint, including the knees. If untreated, rheumatoid arthritis can cause permanent joint damage.
  • Gout – A form of arthritis caused by buildup of uric acid crystals in a joint. The knees may be affected, causing episodes of severe pain and swelling.
  • Pseudogout – A form of arthritis similar to gout, caused by calcium pyrophosphate crystals depositing in the knee or other joints.
  • Septic arthritis – An infection caused by bacteria, a virus, or fungus inside the knee can cause inflammation, pain, swelling, and difficulty moving the knee. Although uncommon, septic arthritis is a serious condition that usually gets worse quickly without treatment.

Knee Tests

  • Physical examination – By examining the location of knee pain and looking for swelling or abnormal movement, a doctor gathers information about potential causes of damage or stress on the knee.
  • Drawer test – With the knee bent, a doctor can pull (anterior drawer test) and push (posterior drawer test) the lower leg while holding the foot stable to check the stability of the ACL and PCL knee ligaments.
  • Valgus stress test – Pushing the calf outward while holding the thigh stable, a doctor can check for injury to the medial collateral ligament (MCL). Pushing the calf inward (varus stress test), a doctor can look for injury to the lateral collateral ligament (LCL).
  • Knee X-ray – A plain X-ray film of the knee is typically the best initial imaging test for most knee conditions.
  • Magnetic resonance imaging (MRI scan) – Using high-energy magnetic waves, an MRI scanner creates highly detailed images of the knee and leg. An MRI scan is the most-often used method of detecting ligament and meniscal injuries.
  • Arthrocentesis of the knee (joint aspiration) – A needle is inserted into the joint space inside the knee, and fluid is drawn out. Various forms of arthritis may be diagnosed through knee arthrocentesis.
  • Arthroscopy – A surgical procedure that allows examination of the knee with an endoscope.

Knee Treatments

  • RICE therapy – Rest (or reducing daily activities), Ice, Compression (as with bandage support) and Elevation. RICE is good initial therapy for many knee conditions.
  • Pain medicines – Over-the-counter or prescription pain relievers such as acetaminophen (Tylenol), ibuprofen (Motrin), and naproxen (Aleve) can treat most knee pain.
  • Physical therapy – An exercise program can strengthen the muscles surrounding the knee, increasing the knee’s stability.
  • Cortisone injection – Injecting steroids into the knee can help reduce pain and swelling.
  • Hyaluronan injection –  Injection of this “goo” material into the knee may reduce pain from arthritis and delay the need for knee surgery in some people.
  • Knee surgery – Surgery may be done to correct a variety of knee conditions. Surgery can replace or repair a torn ligament, remove an injured meniscus, or entirely replace a severely damaged knee. Surgery may be done with a large incision (open) or smaller incisions (arthroscopic).
  • Arthroscopic surgery – An endoscope (flexible tube with surgical tools on its end) is inserted into the knee joint. Arthroscopic surgery has a shorter recovery and rehabilitation period than open surgery.
  • ACL repair –  A surgeon uses a graft (cut from your own body or a donor’s body) to replace the torn ACL.

Movements

There are four main movements that the knee joint permits:

  • Extension:  Produced by the quadriceps femoris, which inserts into the tibial tuberosity.
  • Flexion: Produced by the hamstrings, gracilis, sartorius and popliteus.
  • Lateral rotation: Produced by the biceps femoris.
  • Medial rotation: Produced by five muscles; semimembranosus, semitendinosus, gracilis, sartorius and popliteus.

How do I get ready for a knee ligament repair?

  • Your healthcare provider will explain the procedure to you and offer you the chance to ask any questions that you might have about the procedure.
  • You will be asked to sign a consent form that gives your permission to do the procedure. Read the form carefully and ask questions if something is not clear.
  • In addition to complete medical history, your healthcare provider may perform a complete physical exam to ensure you are in good health before undergoing the procedure. You may undergo blood tests or other diagnostic tests.
  • Tell your healthcare provider if you are sensitive to or are allergic to any medicines, latex, tape, and anesthetic agents (local and general).
  • Tell your healthcare provider of all medicines (prescribed and over-the-counter) and herbal supplements that you are taking.
  • Tell your healthcare provider if you have a history of bleeding disorders or if you are taking any anticoagulant (blood-thinning) medicines, aspirin, or other medicines that affect blood clotting. It may be necessary for you to stop these medicines before the procedure.
  • If you are pregnant or suspect that you are pregnant, you should notify your healthcare provider.
  • You will be asked to fast for 8 hours before the procedure, generally after midnight.
  • You may receive a sedative prior to the procedure to help you relax. Because the sedative may make you drowsy, you will need to arrange for someone to drive you home.
  • You may meet with a physical therapist prior to your surgery to discuss rehabilitation.
  • Arrange for someone to help around the house for a week or two after you are discharged from the hospital.
  • Based on your health condition, your healthcare provider may request other specific preparations.

References

Loading

If the article is helpful, please Click to Star Icon and Rate This Post!
[Total: 0 Average: 0]

Ligaments Of Knee Joint – Types, Test, Function, Movement

Ligaments Of Knee Joint/Ligaments are bands of tough, elastic connective tissue that surround a joint to give support and limit the joint’s movement. Knee ligaments are thick strands of tissue made of collagenous fibers that connect the upper leg bones to the lower ones. There are four main knee joint ligaments: the lateral collateral ligament (LCL), medial collateral ligament (MCL), anterior cruciate ligament (ACL), and the posterior cruciate ligament (PCL). Collectively, their main function is to restrain knee movement in order to provide joint stability.

The knee is the largest joint in the body. It is a compound synovial joint that consists of the tibiofemoral joint and the patellofemoral joint. It primarily serves as a hinge joint which allows flexion and extension as well as various other movements. It joins the lower leg and thigh bilaterally and is an essential component of efficient bipedal movements such as walking, running, and jumping. The anatomical function and stability of the knee depend on muscles, bones, ligaments, cartilage, synovial tissue, synovial fluid, and other connective tissues. The 4 main stabilizing ligaments of the knee are the anterior cruciate (ACL), posterior cruciate (PCL), medial collateral (MCL), and lateral collateral  (LCL). The ACL attaches at the lateral condyle of the femur and the intercondyloid eminence of the tibia, and functions to prevent anterior translation of the tibia on the femur. The PCL attaches at the medial condyle of the femur and the posterior intercondylar area of the tibia, and functions to prevent forward displacement of the femur on the tibia.

Ligaments Of Knee Joint

Ligaments and menisci

The ligaments of the knee joint can be divided into two groups; extracapsular ligaments and intracapsular ligaments. These ligaments connect the femur and tibia, holding them in place, providing stability, and preventing dislocation.

Extracapsular ligaments are found outside the joint capsule and include the patellar ligament, lateral and medial collateral ligaments, and oblique and arcuate popliteal ligaments. Intracapsular ligaments are found inside the joint capsule, with the cruciate ligaments being the most well known of this subgroup.

Patellar ligament

The patellar ligament is a strong, thick fibrous band that is a distal continuation of the quadriceps femoris tendon. It is found superficial/anterior to the infrapatellar bursa and extends from the apex of the patella to the tibial tuberosity.

Along its outer margins, the patellar ligament blends with the medial and lateral patellar retinacula, which are extensions of the vastus medialis and lateralis muscles, respectively, as well as the overlying fascia. The patellar ligament plays a major role in stabilizing the patella and preventing its displacement.

Lateral (fibular) collateral ligament

The lateral (fibular) collateral ligament is a strong ligament that originates from the lateral epicondyle of the femur, just posterior to the proximal attachment of the popliteus, and extends distally to attach on the lateral surface of the fibular head.

As it attaches to the fibular head, the ligament splits the tendon of biceps femoris muscle in two. The lateral collateral ligament is found deep to the lateral patellar retinaculum, and superficial to the tendon of popliteus muscle, which separates the ligament from the lateral meniscus.

Medial (tibial) collateral ligament

The medial( (tibial) collateral ligament is the strong, flat ligament of the medial aspect of the knee joint. The medial collateral ligament, in addition to its literal counterpart, acts to secure the knee joint and prevent excessive sideways movement by restricting external and internal rotation of the extended knee. The medial collateral ligament has sometimes divided the literature into superficial and deep parts:

  • Superficial medial collateral ligament – originates just proximal the medial epicondyle of the femur. This ligament has two attachment points; a proximal attachment on the medial condyle of the tibia, and a distal attachment on the medial shaft of the tibia. Anteriorly, the superficial medial collateral ligament blends with the medial patellar retinaculum and the medial patellofemoral ligament, which courses from the medial femoral condyle to attach onto the medial border of the patella.
  • Deep medial collateral ligament – a vertical thickening of the knee joint capsule found underneath the superficial medial collateral ligament. It originates from the area of the distal femur, then attaches to the medial meniscus, and terminates on the proximal tibia. These two parts of the ligament are defined as meniscofemoral and meniscotibial ligaments (see below).

Oblique popliteal ligament

The oblique popliteal ligament (Bourgery ligament) is an expansion of the semimembranosus tendon which originates posterior to the medial tibial condyle and reflects superiorly and laterally to attach on the lateral condyle of the femur. As it spans the intercondylar fossa, the oblique popliteal ligament reinforces the posterior part of the joint capsule and blends with its central portion.

Arcuate popliteal ligament

Arcuate popliteal ligament is a thick, fibrous band that arises on the posterior aspect of the fibular head and arches superiorly and medially to attach on the posterior side of the joint capsule of the knee. The arcuate popliteal ligament reinforces the posterolateral part of the joint capsule, and together with the oblique popliteal ligament, prevents overextension of the knee joint.

Cruciate ligaments

The paired cruciate ligaments got their name due to the fact that they cross each other obliquely within the joint in a way that resembles a cross (latin = crux), or a letter X. They cross within the joint capsule, however remain external to the synovial cavity. The cruciate ligaments are divided as follows:

  • Anterior cruciate ligament – arises from the anterior intercondylar area of the tibia just behind the attachment of the medial meniscus, and extends posterolaterally and proximally to attach on the posterior part of the medial surface of the lateral femoral condyle. As it crosses to the other side of the knee joint, the ligament passes underneath the transverse ligament (see below) and blends with the anterior horn of the lateral meniscus. The anterior cruciate ligament is important to prevent posterior rolling and displacement of the femoral condyle during flexion, as well as to prevent hyperextension of the knee joint.
  • Posterior cruciate ligament – arises from the posterior intercondylar area of the tibia and extends anteromedially and proximally to attach on the anterior part of the lateral surface of the medial femoral condyle. This ligament is almost twice as strong and has better blood supply than the anterior cruciate ligament. The posterior cruciate ligament has the opposite function of the anterior cruciate ligament, serving to prevent anterior rolling and displacement of the femoral condyle during extension, as well as to prevent hyperflexion of the knee joint.

Menisci

The menisci are fibrocartilaginous crescent-shaped plates found between the articular surfaces of the femur and tibia and serve to provide their congruence and shock absorption. The menisci are thick and vascularized in their outer one third, while their inner two-thirds are thinner and avascular. Additionally, the inner two-thirds contain radially organized collagen bundles, whereas the outer third contains larger circumferentially arranged bundles. Thus, it is believed that the inner portion is more adapted for weight-bearing and resisting compressive forces, while the outer portions are suited for resisting tensional forces. The menisci are divided as follows:

  • Medial meniscus – a C-shaped, almost semicircular fibrocartilaginous plate that overlies the surface of the medial tibial plateau. Its anterior horn attaches on the anterior intercondylar area of tibia and blends with the anterior cruciate ligament. Its posterior horn is attached to the posterior intercondylar area of the tibia, between the attachments of the lateral meniscus and the posterior cruciate ligament.
  • Lateral meniscus – an almost circular fibrocartilaginous plate that overlies the surface of the lateral tibial plateau. Its anterior horn also attaches to the anterior intercondylar area of tibia and partially blends with the anterior cruciate ligament. Similarly, its posterior horn attaches to the posterior intercondylar areas anterior to the posterior horn of the medial meniscus.
  • Transverse ligament – connects the menisci anteriorly extending from the anterior margin of the lateral meniscus to the anterior horn of the medial meniscus. Its exact role is uncertain but it is thought that these ligaments stabilize the menisci during knee movements and decrease tension generated in the longitudinal circumferential fibers.
  • meniscofemoral ligaments – are the superior portions of the distal medial collateral ligament extending from the posterior horn of the lateral meniscus to the lateral aspect of the medial femoral condyle. They are divided into two ligaments; an anterior meniscofemoral ligament (of Humphry) that courses anterior to the posterior cruciate ligament; and a posterior menisco femoral ligament (of Wrisberg), that runs posterior to the posterior cruciate ligament.
  • Meniscotibial (coronary) ligaments – are the inferior portions of the distal medial collateral ligament, extend between the margin of the lateral meniscus and the peripheral area of the tibial condyles. It is comprised of a medial and lateral meniscotibial (coronary) ligament.
  • Patellomeniscal ligament – comprised of a medial and lateral patellomeniscal ligament, often described as simply medial and lateral ligaments. These ligaments run from the inferior third of the patella to insert on the anterior portion of the medial and lateral meniscus, respectively.
  • Ligamentum mucosum – consists of two alar folds that attach onto the infrapatellar fat pad, holding it in position. This structure is an embryonic remnant that separates the medial and lateral compartments of the knee.
  • Popliteofibular ligament – located on the posterolateral aspect of the knee joint, extending from the popliteus muscle to the medial aspect of the fibula.
  • Fabellofibular ligament – arises from a small sesamoid bone on the posterior aspect of the lateral supracondylar ridge of the femur and inserts distally on the posterolateral edge of the styloid process of the fibula.

Knee Conditions

  • Chondromalacia patella (also called patellofemoral syndrome) – Irritation of the cartilage on the underside of the kneecap (patella), causing knee pain. This is a common cause of knee pain in young people.
  • Knee osteoarthritis – Osteoarthritis is the most common form of arthritis, and often affects the knees. Caused by aging and wear and tear of cartilage, osteoarthritis symptoms may include knee pain, stiffness, and swelling.
  • Knee effusion – Fluid buildup inside the knee, usually from inflammation. Any form of arthritis or injury may cause a knee effusion.
  • Meniscal tear – Damage to a meniscus, the cartilage that cushions the knee, often occurs with twisting the knee. Large tears may cause the knee to lock.
  • ACL (anterior cruciate ligament) strain or tear – The ACL is responsible for a large part of the knee’s stability. An ACL tear often leads to the knee “giving out,” and may require surgical repair.
  • PCL (posterior cruciate ligament) strain or tear – PCL tears can cause pain, swelling, and knee instability. These injuries are less common than ACL tears, and physical therapy (rather than surgery) is usually the best option.
  • MCL (medial collateral ligament) strain or tear – This injury may cause pain and possible instability to the inner side of the knee.
  • Patellar subluxation – The kneecap slides abnormally or dislocates along the thigh bone during activity. Knee pain around the kneecap results.
  • Patellar tendonitis – Inflammation of the tendon connecting the kneecap (patella) to the shin bone. This occurs mostly in athletes from repeated jumping.
  • Knee bursitis – Pain, swelling, and warmth in any of the bursae of the knee. Bursitis often occurs from overuse or injury.
  • Baker’s cyst – Collection of fluid in the back of the knee. Baker’s cysts usually develop from a persistent effusion as in conditions such as arthritis.
  • Rheumatoid arthritis – An autoimmune condition that can cause arthritis in any joint, including the knees. If untreated, rheumatoid arthritis can cause permanent joint damage.
  • Gout – A form of arthritis caused by buildup of uric acid crystals in a joint. The knees may be affected, causing episodes of severe pain and swelling.
  • Pseudogout – A form of arthritis similar to gout, caused by calcium pyrophosphate crystals depositing in the knee or other joints.
  • Septic arthritis – An infection caused by bacteria, a virus, or fungus inside the knee can cause inflammation, pain, swelling, and difficulty moving the knee. Although uncommon, septic arthritis is a serious condition that usually gets worse quickly without treatment.

Knee Tests

  • Physical examination – By examining the location of knee pain and looking for swelling or abnormal movement, a doctor gathers information about potential causes of damage or stress on the knee.
  • Drawer test – With the knee bent, a doctor can pull (anterior drawer test) and push (posterior drawer test) the lower leg while holding the foot stable to check the stability of the ACL and PCL knee ligaments.
  • Valgus stress test – Pushing the calf outward while holding the thigh stable, a doctor can check for injury to the medial collateral ligament (MCL). Pushing the calf inward (varus stress test), a doctor can look for injury to the lateral collateral ligament (LCL).
  • Knee X-ray – A plain X-ray film of the knee is typically the best initial imaging test for most knee conditions.
  • Magnetic resonance imaging (MRI scan) – Using high-energy magnetic waves, an MRI scanner creates highly detailed images of the knee and leg. An MRI scan is the most-often used method of detecting ligament and meniscal injuries.
  • Arthrocentesis of the knee (joint aspiration) – A needle is inserted into the joint space inside the knee, and fluid is drawn out. Various forms of arthritis may be diagnosed through knee arthrocentesis.
  • Arthroscopy – A surgical procedure that allows examination of the knee with an endoscope.

Knee Treatments

  • RICE therapy – Rest (or reducing daily activities), Ice, Compression (as with bandage support) and Elevation. RICE is good initial therapy for many knee conditions.
  • Pain medicines – Over-the-counter or prescription pain relievers such as acetaminophen (Tylenol), ibuprofen (Motrin), and naproxen (Aleve) can treat most knee pain.
  • Physical therapy – An exercise program can strengthen the muscles surrounding the knee, increasing the knee’s stability.
  • Cortisone injection – Injecting steroids into the knee can help reduce pain and swelling.
  • Hyaluronan injection –  Injection of this “goo” material into the knee may reduce pain from arthritis and delay the need for knee surgery in some people.
  • Knee surgery – Surgery may be done to correct a variety of knee conditions. Surgery can replace or repair a torn ligament, remove an injured meniscus, or entirely replace a severely damaged knee. Surgery may be done with a large incision (open) or smaller incisions (arthroscopic).
  • Arthroscopic surgery – An endoscope (flexible tube with surgical tools on its end) is inserted into the knee joint. Arthroscopic surgery has a shorter recovery and rehabilitation period than open surgery.
  • ACL repair –  A surgeon uses a graft (cut from your own body or a donor’s body) to replace the torn ACL.

Movements

There are four main movements that the knee joint permits:

  • Extension:  Produced by the quadriceps femoris, which inserts into the tibial tuberosity.
  • Flexion: Produced by the hamstrings, gracilis, sartorius and popliteus.
  • Lateral rotation: Produced by the biceps femoris.
  • Medial rotation: Produced by five muscles; semimembranosus, semitendinosus, gracilis, sartorius and popliteus.

How do I get ready for a knee ligament repair?

  • Your healthcare provider will explain the procedure to you and offer you the chance to ask any questions that you might have about the procedure.
  • You will be asked to sign a consent form that gives your permission to do the procedure. Read the form carefully and ask questions if something is not clear.
  • In addition to complete medical history, your healthcare provider may perform a complete physical exam to ensure you are in good health before undergoing the procedure. You may undergo blood tests or other diagnostic tests.
  • Tell your healthcare provider if you are sensitive to or are allergic to any medicines, latex, tape, and anesthetic agents (local and general).
  • Tell your healthcare provider of all medicines (prescribed and over-the-counter) and herbal supplements that you are taking.
  • Tell your healthcare provider if you have a history of bleeding disorders or if you are taking any anticoagulant (blood-thinning) medicines, aspirin, or other medicines that affect blood clotting. It may be necessary for you to stop these medicines before the procedure.
  • If you are pregnant or suspect that you are pregnant, you should notify your healthcare provider.
  • You will be asked to fast for 8 hours before the procedure, generally after midnight.
  • You may receive a sedative prior to the procedure to help you relax. Because the sedative may make you drowsy, you will need to arrange for someone to drive you home.
  • You may meet with a physical therapist prior to your surgery to discuss rehabilitation.
  • Arrange for someone to help around the house for a week or two after you are discharged from the hospital.
  • Based on your health condition, your healthcare provider may request other specific preparations.

References

Loading

If the article is helpful, please Click to Star Icon and Rate This Post!
[Total: 0 Average: 0]

Knee Meniscus Injury – Causes, Symptoms, Treatment

Knee Meniscus Injury is a crescent-shaped, cartilaginous band found between the medial tibia and medial femur. The primary function is to decrease the amount of stress on the knee joint. The medial meniscus receives vascular supply via a capillary network formed by the medial, lateral and middle geniculate arteries and receives its innervation from the posterior tibial, obturator, and femoral nerves.

The medial meniscus is a fibrocartilage semicircular band that spans the knee joint medially, located between the medial condyle of the femur and the medial condyle of the tibia. It is also referred to as the internal semilunar fibrocartilage. The medial meniscus has more of a crescent shape while the lateral meniscus is more circular. The anterior aspects of both menisci are connected by the transverse ligament. It is a common site of injury, especially if the knee is twisted.

A tear to the meniscus (also known as a cartilage tear) is a common injury that can cause pain and problems with sports and daily activities. The meniscus is a vital component of the knee that acts like a cushion between the femur (thigh) and tibia (shin) bones, providing shock absorption and stability.

Anatomy and Physiology

The meniscus is a C-shaped cartilage that serves as a cushion between the proximal tibia and the distal femur, comprising the knee joint.  The average width is 10 mm to 12 mm, and the average thickness is 4 mm to 5 mm. The meniscus is made of fibroelastic cartilage. It is an interlacing network of collagen, glycoproteins, proteoglycan, and cellular elements, and is about 70% water. Three ligaments attach to the meniscus. The coronary ligaments connect the meniscus peripherally. The transverse (inter-meniscal) ligament is anterior and serves as a connection between the medial and lateral meniscus. The meniscofemoral ligament joins the meniscus to the posterior cruciate ligament (PCL) and has two components: the Humphrey ligament anteriorly, and the ligament of Wrisberg posteriorly. The meniscofemoral ligament originates from the posterior horn of the lateral meniscus. The meniscus is supplied blood from the medial inferior genicular artery and the lateral inferior genicular artery. The meniscus is known to have a very poor blood supply, especially the central portion, which gets most of its nutrition via diffusion. The cartilage structure of the meniscus serves as a shock absorber and cushion or for the knee joint. There are several types of possible tears of the meniscus. These include flap tear, radial tear, horizontal cleavage, bucket handle tear, longitudinal tear, and degenerative tear.

Types of Knee Meniscus Injury

There are two categories of meniscal injuries – acute tears and degenerative tears.

  • An acute tear – usually occurs when the knee is bent and forcefully twisted, while the leg is in a weight-bearing position. Statistics show that about 61 of 100,000 people experience an acute tear of the meniscus.
  • Degenerative tears – of the meniscus are more common in older people. Sixty percent of the population over the age of 65 probably has some sort of degenerative tear of the meniscus. As the meniscus ages, it weakens and becomes less elastic. Degenerative tears may result from minor events and there may or may not be any symptoms present.

A meniscal tear can be classified in various ways, such as by anatomic location or by proximity to the blood supply. Various tear patterns and configurations have been described.[rx] These include

  • Radial tears
  • Flap or parrot-beak tears
  • Peripheral, longitudinal tears
  • Bucket-handle tears
  • Horizontal cleavage tears
  • Complex, degenerative tears

These tears can then be further classified by their proximity to the meniscus blood supply, namely whether they are located in the “red-red,” “red-white,” or “white-white” zones.

The functional importance of these classifications, however, is to ultimately determine whether a meniscus is repairable. The repairability of a meniscus depends on a number of factors. These include:

  • Age/strength
  • Activity level
  • Tear pattern
  • Chronicity of the tear
  • Associated injuries (anterior cruciate ligament injury)
  • Healing potential

or

There are different types of meniscal tears, describing the morphology of the injury. Identifying and accurately describing the type of meniscal tear can help the surgeon in patient education and planning of the surgical procedure. Meniscal tear types include

Basic tears

  • longitudinally oriented tears
      • horizontal tear (cleavage tear)
        • parallel to the tibial plateau involving one of the articular surfaces or free edge
        • divides the meniscus into superior and inferior parts
      • longitudinal tear (vertical tear)
        • perpendicular to the tibial plateau and parallel to the long axis of the meniscus
        • divides the meniscus into medial and lateral parts
        • Wrisberg rip – is a specific subtype
        • ramp lesion – is a specific subtype
  • radial tear – perpendicular to both the tibial plateau and the long axis of the meniscus
  • root tear – typically radial-type tear located at the meniscal root
  • complex tear – a combination of all or some of horizontal, longitudinal and radial-type tears
  • displaced tear – tear involving a component that is displaced, either still attached to the parent meniscus or detached:
    • flap tear: displaced horizontal or longitudinal tears
    • bucket-handle tear: displaced longitudinal tear
    • parrot beak tear: oblique radial tear

Medial Meniscus Injury

Causes of Knee Meniscus Injury

  • Inward (valgus) force – Usually, the medial collateral ligament, followed by the anterior cruciate ligament, then the medial meniscus (this mechanism is the most common and is usually accompanied by some external rotation and flexion, as when being tackled in football)
  • Outward (varus) force –  Often, the lateral collateral ligament, anterior cruciate ligament, or both (this mechanism is the 2nd most common)
  • Anterior or posterior forces and hyperextension –  Typically, the cruciate ligaments
  • Weight-bearing and rotation at the time of injury – Usually, menisci
  • Motor vehicle accidents – A “dashboard injury” occurs when the driver’s or passenger’s bent knee slams against the dashboard, pushing in the shinbone just below the knee and causing the posterior meniscus tear.
  • Contact sports – Athletes in sports such as football and soccer can tear their posterior meniscus ligament when they fall on a bent knee with their foot pointed down. The shinbone hits the ground first and it moves backward. Being tackled when your knee is bent also can cause this injury.
  • The knee is hit directly – especially during sports like soccer, rugby, and football
  • A person lands on a bent knee – such as during a fall or misstep
  • Landing directly on the front of the shinbone – such as when a dancer comes down from a leap and falls
  • A person makes cutting or pivoting maneuvers – such as when an athlete plants a foot and shifts directions
  • A person lands on one leg – which can happen after a jump in basketball or volleyball
  • A direct blow to the bent knee in an automobile injury
  • A sports-related injury in which the knee bends
  • Pulling on the ligament in a twisting injury or hyperextension
  • A misstep on uneven terrain

Symptoms of Knee Meniscus Injury

If you’ve torn your meniscus, you might have the following signs and symptoms in your knee:

  • Localized pain near the area of the tear – In tears of the lateral meniscus, this discomfort will be present along the outside edge of the knee. The pain will manifest on the inside edge of the injured knee for tears of the medial meniscus.
  • Immediate pain after the injury – A torn meniscus will often be obvious from the moment that the injury occurs. In these instances, the tearing of the meniscus is typically accompanied by the feeling of a pop or snap within the leg during an overexerting twisting or stretching motion.
  • Slow onset of symptoms – Conversely, for some, the meniscus can tear without much of a sign or initial pain. This slow onset of symptoms is more common in older individuals and those with damaged knee cartilage from osteoarthritis.
  • Pain with movement – The pain will reflect the location of the tear but extend throughout the knee with movement. In the event that the knee has locked, bending it will cause searing pain to worsen.
  • Pain after resting – Pain will likely diminish somewhat with rest; however, it will return with movement in most cases. Movement may also exacerbate swelling.
  • Fluid accumulation within the knee joint – This accumulated fluid will cause the entire area to swell up and reduce mobility. This symptom, which may occur as a result of a number of knee injuries, is known as “water on the knee.”
  • Knee locking – If a piece of the meniscus breaks free of the disc structure due to a tear, it may lodge within the joint of the knee itself. This lodging can cause knee locking, in which a person loses the ability to fully straighten the leg when sitting or standing.
  • A popping sensation
  • Swelling or stiffness
  • Pain, especially when twisting or rotating your knee
  • Difficulty straightening your knee fully
  • Feeling as though your knee is locked in place when you try to move it
  • difficulty moving your knee or inability to move it in a full range of motion
  • the feeling of your knee locking or catching
  • the feeling that your knee is giving way or unable to support you
  • The feeling of your knee giving way
  • Pain in the knee
  • A popping sensation during the injury
  • Difficulty bending and straightening the leg
  • A tendency for your knee to get “stuck” or lock up

What are the signs?

You might feel a ‘pop’ if you tear your meniscus. Many people find they can still walk on their injured knee. However, it might become gradually stiffer and more swollen over the next day or so. Common symptoms include the following.

  • Pain in your knee, although this can vary. Some people only have mild pain, and for others, the pain may come and go.
  • Swelling, usually several hours after the injury.
  • Feeling as though your knee is catching or locking, usually when your knee is bent. You may notice it making clicking or popping sounds too.
  • Your knee feeling ‘loose’, as though it’s going to give way.
  • Being unable to bend and extend your knee fully.

Symptoms of severe meniscus tears

  • Popping, locking or catching
  • Inability to straighten the knee
  • A knee that gives way
  • Stiffness and swelling right after the incident

Diagnosis of Knee Meniscus Injury

Medical History

During your doctor’s appointment, he will ask you several questions about your knee pain. Examples of such questions include:

  • Where exactly is your knee pain located?
  • Did your knee swelling come on suddenly or did it gradually develop over days?
  • Are you experiencing any other symptoms besides pain and swelling, like your knee giving out or an inability to bend or extend your knee?
  • Have you experienced any trauma or injury to the knee?
  • Do you have a known history of knee osteoarthritis?

Physical examination

After noting symptoms, a physician can perform clinical tests to determine if the pain is caused by compression and impingement of a torn meniscus. The knee is examined for swelling. In meniscal tears, pressing on the joint line on the affected side typically produces tenderness.

  • Stress testing – Stress testing to evaluate ligament integrity helps distinguish partial from complete tears. However, if patients have significant pain and swelling or muscle spasm, testing is typically delayed until x-rays exclude fractures. Also, significant swelling and spasm may make joint stability difficult to evaluate. Such patients should be examined 2 to 3 days later (after swelling and spasm have subsided). A delayed physical examination of the knee is more sensitive than MRI of the knee (86% vs 76% [rx]) for the diagnosis of meniscal and anterior cruciate ligament injuries.
  • Steinmann test – Steinman test is done to diagnose meniscal pathology at the knee joint. The test is divided into 2 parts i.e Steinman part 1 and Steinman part 2 or Steinman’s tenderness displacement test. This test is useful to distinguish meniscal pathology from injury to the ligament or osteophytes.
  • The McMurray test – involves pressing on the joint line while stressing the meniscus (using flexion-extension movements and varus or valgus stress). The test is often used to indicate cartilage injuries. With the patient laying on their back the therapist holds the knee with the upper hand and the heel with the lower hand. The therapist then applies a valgus (inward) stress to the knee whilst the other hand rotates the leg externally (outwards) and extends the knee. Pain and/or an audible click while performing this maneuver can indicate a torn medial meniscus.
  • Apley’s grind test – (a grinding maneuver while the person lies prone and the knee is bent 90°) and the Thessaly test (flexing the affected knee to 20 degrees, pivoting on the knee to see. Apley’s test is also used in cases of suspected meniscal tears. The patient is positioned on their front with the knee bent. The therapist grasps the heel and ankle and applies a compressive force through the lower leg. At the same time, they rotate the lower leg. Any reproduction of symptoms, pain, or clicking is a positive response, suggesting a torn meniscus.
  • The Lachman test – is the most sensitive physical test for acute anterior cruciate ligament tears (rx). With the patient supine, the examiner supports the patient’s thigh and calf, and the patient’s knee is flexed 20°. The lower leg is moved anteriorly. The excessive passive anterior motion of the lower leg from the femur suggests a significant tear.

Imaging tests

  • Imaging tests may be ordered to confirm a tear of the meniscus. These include:

Knee X-ray

  • This test won’t show a meniscus tear. However, it can be helpful to determine if there are any other causes of your knee pain, like osteoarthritis.

MRI

  • An MRI uses a magnetic field to take multiple images of your knee. An MRI will be able to take pictures of cartilage and ligaments to determine if there’s a meniscus tear.
  • While MRIs can help your doctor make a diagnosis, they aren’t considered 100 percent reliable. According to a study from 2008 published in the Journal of Trauma Management & OutcomesTrusted Source, the MRI’s accuracy for diagnosing lateral meniscus tears is 77 percent.
  • Sometimes, meniscus tears may not show up on an MRI because they can closely resemble degenerative or age-related changes. Additionally, a doctor may make an incorrect diagnosis that a person has a torn meniscus. This is because some structures around the knee can closely resemble a meniscus tear.

Ultrasound

  • An ultrasound uses sound waves to take images inside the body. This will determine if you have any loose cartilage that may be getting caught in your knee.

Arthroscopy

  • If your doctor is unable to determine the cause of your knee pain from these techniques, they may suggest arthroscopy to study your knee. If you require surgery, your doctor will also most likely use an arthroscope.
  • With arthroscopy, a small incision or cut is made near the knee. The arthroscope is a thin and flexible fiber-optic device that can be inserted through the incision. It has a small light and camera. Surgical instruments can be moved through the arthroscope or through additional incisions in your knee.
  • After an arthroscopy, either for surgery or examination, people can often go home the same day.

Treatment of Knee Meniscus Injury

Non-Surgical Injury

  • Protection  – the joint from further injury by taping/strapping the knee joint, or wearing knee support which has additional support at the sides.
  • Rest – Avoid activities that aggravate your knee pain, especially any activity that causes you to twist, rotate or pivot your knee. If your pain is severe, using crutches can take the pressure off your knee and promote healing.
  • Ice – Ice can reduce knee pain and swelling. Use a cold pack, a bag of frozen vegetables or a towel filled with ice cubes for about 15 minutes at a time, keeping your knee elevated. Do this every four to six hours the first day or two, and then as often as needed. Ice your knee to reduce pain and swelling. Do it for 15-20 minutes every 3-4 hours for 2-3 days or until the pain and swelling is gone.
  • Elevate your knee – with a pillow under your heel when you’re sitting or lying down.
  • A stabilized knee brace –  has flexible springs in the sides for additional support or for more severe injuries a hinged knee brace with solid metal supports linked by a hinge will help protect the joint from sideways or lateral movement. Compression will also help reduce swelling.
  • Rest the knee –  Limit activities to include walking if the knee is painful. Use crutches to help relieve pain.
  • Compress your knee. Use an elastic bandage or a neoprene type sleeve on your knee to control swelling.
  • Use stretching and strengthening exercises to help reduce stress to your knee – Ask your doctor to recommend a physical therapist for guidance.
  • Avoid impact activities such as running and jumping 
  • Full weight-bearing is not permitted for 1 – 6 weeks – after surgery, depending on the type of injury and repair. Crutches will be used initially following surgery. Many surgeons brace the knee and restrict motion for 6 weeks, to prevent excessive flexion and extension.
  • Range of motion exercises – begin anywhere from 0 – 6 weeks after surgery, depending on the type of repair.
  • Strengthening exercises – begin once the full range of motion has returned.
  • Return to vigorous activities – such as sports, may begin 3 – 4 months after repair.

Physiotherapy

  • A professional therapist will undertake a thorough assessment and make an accurate diagnosis to confirm cartilage meniscus injury and they may undertake an MRI scan to determine the extent of the injury.
  • A physical therapist will focus on improving mobility, strength, flexibility, and balance, which can help speed up recovery time and improve performance once the injury has healed.
  • Walking (weight-bearing) is initiated as soon as possible.
  • Knee straightening (extension) and bending (flexion) are encouraged. Pool therapy is helpful.
  • Stationary cycling is initiated as soon as adequate motion is achieved.
  • Quadriceps strengthening exercises are started, such as standing squats with toe raises and leg press.
  • Hamstring exercise may be modified for 6 months.
  • Surgery is avoided in most cases unless other major ligaments are disrupted.

Medication

If the injury is severe and pain is intolerable the following medicine can be considered to prescribe

  • Take anti-inflammatory medications. Non-steroidal anti-inflammatory drugs (NSAIDs), like will help with pain and swelling. However, these drugs can have side effects, such as an increased risk of bleeding and ulcers. They should be only used occasionally unless your doctor specifically says otherwise.
  • Antibiotic – Cefuroxime or Azithromycin, or  Flucloxacillin or any other cephalosporin/quinolone antibiotic must be used to prevent infection or clotted blood remove to prevent furthers swelling and edema.
  • NSAIDs – Prescription-strength drugs that reduce both pain and inflammation. Pain medicines and anti-inflammatory drugs help to relieve pain and stiffness, allowing for increased mobility and exercise. There are many common over-the-counter medicines called non-steroidal anti-inflammatory drugs (NSAIDs). They include and KetorolacAceclofenacNaproxen, Etoricoxib.
  • Corticosteroids – Also known as oral steroids, these medications reduce inflammation.
  • Muscle Relaxants –  These medications provide relief from associated muscle spasms.
  • Neuropathic Agents – Drugs(pregabalin & gabapentin) that address neuropathic—or nerve-related—pain. This includes burning, numbness, and tingling.
  • Opioids – Also known as narcotics, these medications are intense pain relievers that should only be used under a doctor’s careful supervision.
  • Topical Medications – These prescription-strength creams, gels, ointments, patches, and sprays help relieve pain and inflammation through the skin.
  • Calcium & vitamin D3 – to improve bone health and healing fracture. As a general rule, men and women age 50 and older should consume 1,200 milligrams of calcium a day, and 600 international units of vitamin D a day.
  • Antidepressants – A drug that blocks pain messages from your brain and boosts the effects of endorphins (your body’s natural painkillers).
  • Glucosamine & DiacereinChondroitin sulfate – can be used to tightening the loose tension, cartilage, ligament, and cartilage, ligament regenerates cartilage or inhabits the further degeneration of cartilage, ligament. They are structural components of articular cartilage, and the thought is that a supplement will aid in the health of articular cartilage.
  • Intra-articular corticosteroid injections – may be useful for symptomatic meniscus injury especially where there is a considerable inflammatory component. The delivery of the corticosteroid directly into the knee may reduce local inflammation associated with a meniscus injury and minimize the systemic effects of the steroid.
  • Intra-articular hyaluronic acid injections (HA) – injections are another injectable option for knee meniscus injury. HA is a glycosaminoglycan that is found throughout the human body and is an important component of synovial fluid and articular cartilage. HA breaks down during the process of meniscus injury and contributes to the loss of articular cartilage as well as stiffness and pain. Local delivery of HA into the joint acts as a lubricant and may help increase the natural production of HA in the joint.
  • Platelet-rich plasma (PRP) injection – newer therapy where a blood sample is taken from the patient, spun in a centrifuge, growth factors are isolated and then they are injected back into the affected site to stimulate faster healing.

Surgery

Grade 3 meniscus tears usually require surgery, which may include:

  • Arthroscopic repair — An arthroscope is inserted into the knee to see the tear. One or two other small incisions are made for inserting instruments. Many tears are repaired with dartlike devices that are inserted and placed across the tear to hold them together. The body usually absorbs these over time. Arthroscopic meniscus repairs typically take about 40 minutes. Usually, you will be able to leave the hospital the same day.
  • Arthroscopic partial meniscectomy – The goal of this surgery is to remove a small piece of the torn meniscus in order to get the knee functioning normally.
  • Arthroscopic total meniscectomy – Occasionally, a large tear of the outer meniscus can best be treated by arthroscopic total meniscectomy, a procedure in which the entire meniscus is removed.

Trephination/ Abrasion Technique

  • This procedure is used for stable tears located on the periphery near the meniscus and joint capsule junction, where there’s a good blood supply. Multiple holes or shavings are made in the torn part of the meniscus to promote bleeding, which enhances the healing process.

Partial Resection

  • This surgical procedure is used for tears located in the inner 2/3 of the meniscus where there is no blood supply. The goal is to stabilize the rim of the meniscus by removing as little of the inner meniscus as possible. Only the torn part of the meniscus is removed. If the meniscus remains mostly intact with only the inner portion removed, the patient usually does well and does not develop early arthritis.

Complete Resection

  • This procedure involves the complete removal of the damaged meniscus. This technique is only performed if absolutely necessary. Removal of the entire meniscus frequently leads to the development of arthritis.

Meniscal Repair

  • Repairs are performed on tears near the outer 1/3 of the meniscus where a good blood supply exists, or on large tears that would require a near-total resection. The torn portion of the meniscus is repaired by using either sutures or absorbable fixation devices. These devices include arrows, barbs, staples, or tacks that join the torn edges of the meniscus so they can heal.

Meniscal Replacement

  • Experimental attempts to replace damaged meniscus are seen as important recent advances in orthopedic medicine. The new technology mentioned here has been performed at a few surgical centers across the country on a small number of patients

Collagen meniscus implant

  • This is a scaffold of collagen inserted into the patient’s knee. Over time, a new meniscus may grow within the joint. This procedure is currently in FDA trials in the United States and has just been approved as an accepted surgical procedure in Europe.

Meniscal transplant

  • This procedure involves transplanting a meniscus from a donor into the injured knee. Only a limited number of surgeons perform this procedure on a routine basis. The long-term outcomes are still being evaluated.

Meniscus transplants

Meniscus transplants are accomplished successfully regularly, although it is still somewhat of a rare procedure, and many questions surrounding its use remain. Side effects of meniscectomy include:

  • The knee loses its ability to transmit and distribute the load and absorb mechanical shock.
  • Persistent and significant swelling and stiffness in the knee.
  • The knee may not be fully mobile; there may be the sensation of knee locking or buckling in the knee.
  • The full knee may be in full motion after the tear of the meniscus.
  • Increases progression of arthritis and time to knee replacement.

Post-Surgical Rehabilitation

Typical locations of arthroscopic surgery incisions in a knee joint following surgery for a tear in the meniscus

After successful surgery for treating the destroyed part of the meniscus, patients must follow a rehabilitation program to have the best result. The rehabilitation following a meniscus surgery depends on whether the entire meniscus was removed or repaired.

If the destroyed part of the meniscus was removed, patients can usually start walking using a crutch a day or two after surgery. Although each case is different, patients return to their normal activities on average after a few weeks (2 or 3). Still, a completely normal walk will resume gradually, and it’s not unusual to take 2–3 months for the recovery to reach a level where a patient will walk totally smoothly. Many meniscectomy patients don’t ever feel a 100% functional recovery, but even years after the procedure they sometimes feel tugging or tension in a part of their knee. There is a little medical follow-up after meniscectomy and official medical documentation tends to ignore the imperfections and side-effects of this procedure.

If the meniscus was repaired, the rehabilitation program that follows is a lot more intensive. After the surgery, a hinged knee brace is sometimes placed on the patient. This brace allows the controlled movement of the knee. The patient is encouraged to walk using crutches from the first day, and most of the times can put partial weight on the knee.

Phase I

There are three phases that follow meniscal surgery. Each phase consists of rehabilitation goals, exercises, and criteria to move on to the next phase. Phase I starts immediately following surgery to 4–6 weeks or until the patient is able to meet progression criteria. The goals are to restore normal knee extension, reduce and eliminate swelling, regain leg control, and protect the knee (Fowler, PJ, and D. Pompan, 1993). During the first 5 days following the surgery, a passive continuous motion machine is used to prevent a prolonged period of immobilization which leads to muscular atrophy and delays functional recovery.[rx] During the 4–6 weeks post-surgical, active and passive non-weight bearing motions that flex the knee up to 90° are recommended. For patients with meniscal transplantation, further knee flexion can damage the allograft because of the increased shear forces and stresses.

Phase II

This phase of the rehabilitation program is 6 to 14 weeks after the surgery. The goals for Phase II include being able to restore full ROM, normalized gait, and performing functional movements with control and no pain (Fowler, PJ, and D. Pompan, 1993). Also, muscular strengthening and neuromuscular training are emphasized using progressive weight-bearing and balance exercises. Exercises in this phase can increase knee flexion for more than 90°.[rx] Advised exercises include stationary bicycle, standing on a foam surface with two and one legs, abdominal and back strengthening, and quadriceps strengthening. The proposed criteria include normal gait on all surfaces and single-leg balance longer than 15 seconds (Ulrich G.S., and S Aroncyzk, 1993).

Balance exercises on a foam surface in phase 2. The patient tries to maintain balance first with both legs, then with only the affected leg.

Phase III

Patients begin exercises in phase III 14 to 22 weeks after surgery. Phase III’s goal and final criteria is to perform sport/work specific movements with no pain or swelling (Fowler, PJ, and D. Pompan, 1993). Drills for maximal muscle control, strength, flexibility,[rx] movements specific to patient’s work/sport, low to high rate exercises, and abdominal and back strengthening exercises are all recommended exercises (Ulrich G.S., and S Aroncyzk, 1993). Exercises to increase cardiovascular fitness are also applied to fully prepare the patients to return to their desired activities.

Next steps

Tips to help you get the most from a visit to your healthcare provider:

  • Know the reason for your visit and what you want to happen.
  • Before your visit, write down the questions you want to be answered.
  • Bring someone with you to help you ask questions and remember what your provider tells you.
  • At the visit, write down the name of a new diagnosis, and any new medicines, treatments, or tests. Also, write down any new instructions your provider gives you.
  • Know why a new medicine or treatment is prescribed, and how it will help you. Also, know what the side effects are.
  • Ask if your condition can be treated in other ways.
  • Know why a test or procedure is recommended and what the results could mean.
  • Know what to expect if you do not take the medicine or have the test or procedure.
  • If you have a follow-up appointment, write down the date, time, and purpose for that visit.
  • Know how you can contact your provider if you have questions.

Prevention

Although it’s hard to prevent accidental knee injuries, you may be able to reduce your risks by:

  • Warming up and stretching before participating in athletic activities
  • Exercising to strengthen the muscles around your knee
  • Avoiding sudden increases in the intensity of your training program
  • Wearing comfortable, supportive shoes that fit your feet and your sport
  • Wearing appropriate protective gear during activities, including athletic activities, in which knee injuries are common (especially if you’ve had knee injuries before).

References

Loading

If the article is helpful, please Click to Star Icon and Rate This Post!
[Total: 0 Average: 0]
Translate »